Backcountry
Navigation 101
Backcountry Navigation 101
Navigating in the backcountry has changed a lot over the years with easy and affordable access to technology. Anyone can now turn their cell phone into a stand-alone GPS unit that puts a blue dot wherever you are in terrain. The basics, however, haven’t changed.
To truly use your navigation tools (even the fancy ones) you must first understand the basics of navigation:
How to read Topographical (Topo) Maps
And how to use a map and compass together to take and follow a bearing
It’s important to not become too overly reliant on technology for navigation because what happens if the battery runs out? Do you have the skills to get back home without a blue dot or track to show you the way?

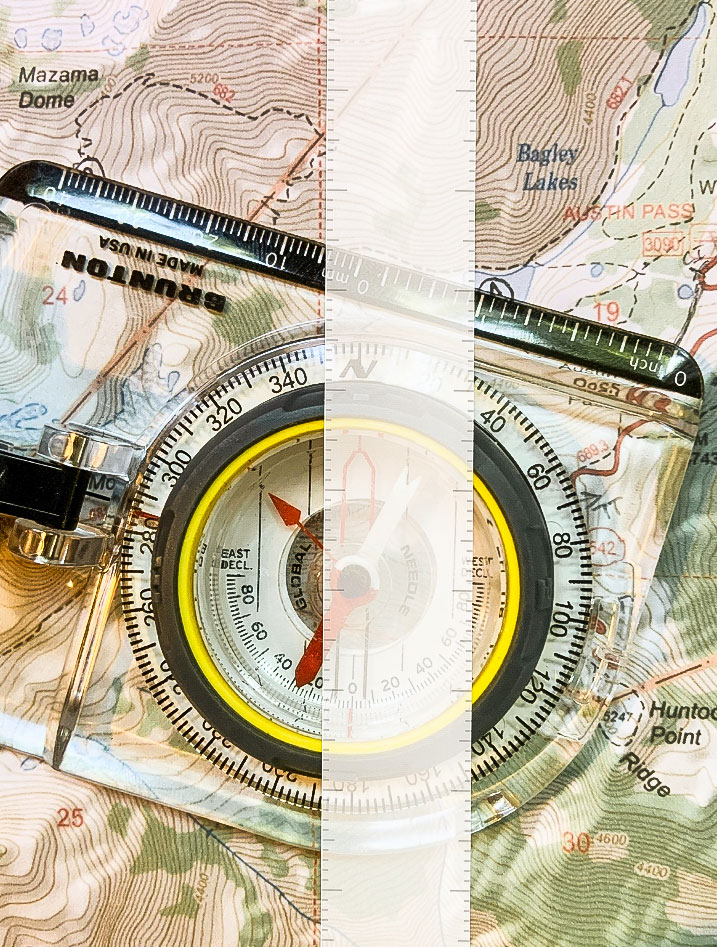
The Compass
The ultimate navigation tool. In a whiteout with horizontal freezing rain, the compass will get you where you want to go (as long as you know your bearing… more on that later). Before we can really get into navigation, you should first understand the parts of a compass and what they’re for.
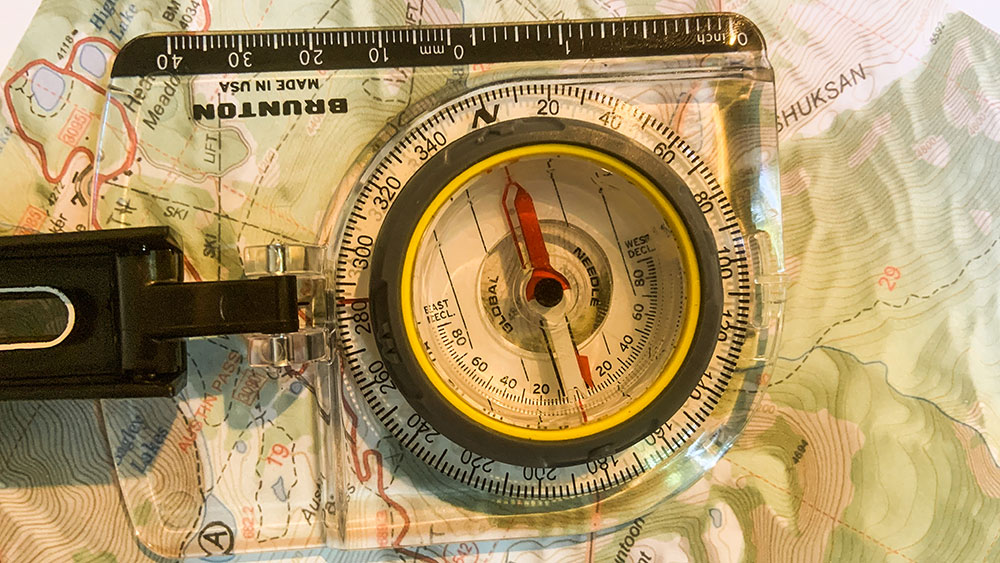
Base Plate
Usually clear so you can see the map below, the base plate has at least one straight edge marked with scales, a direction of travel arrow, and index lines.
Direction of Travel Arrow
Reminds you which direction to point your compass in order to follow a bearing in the field.
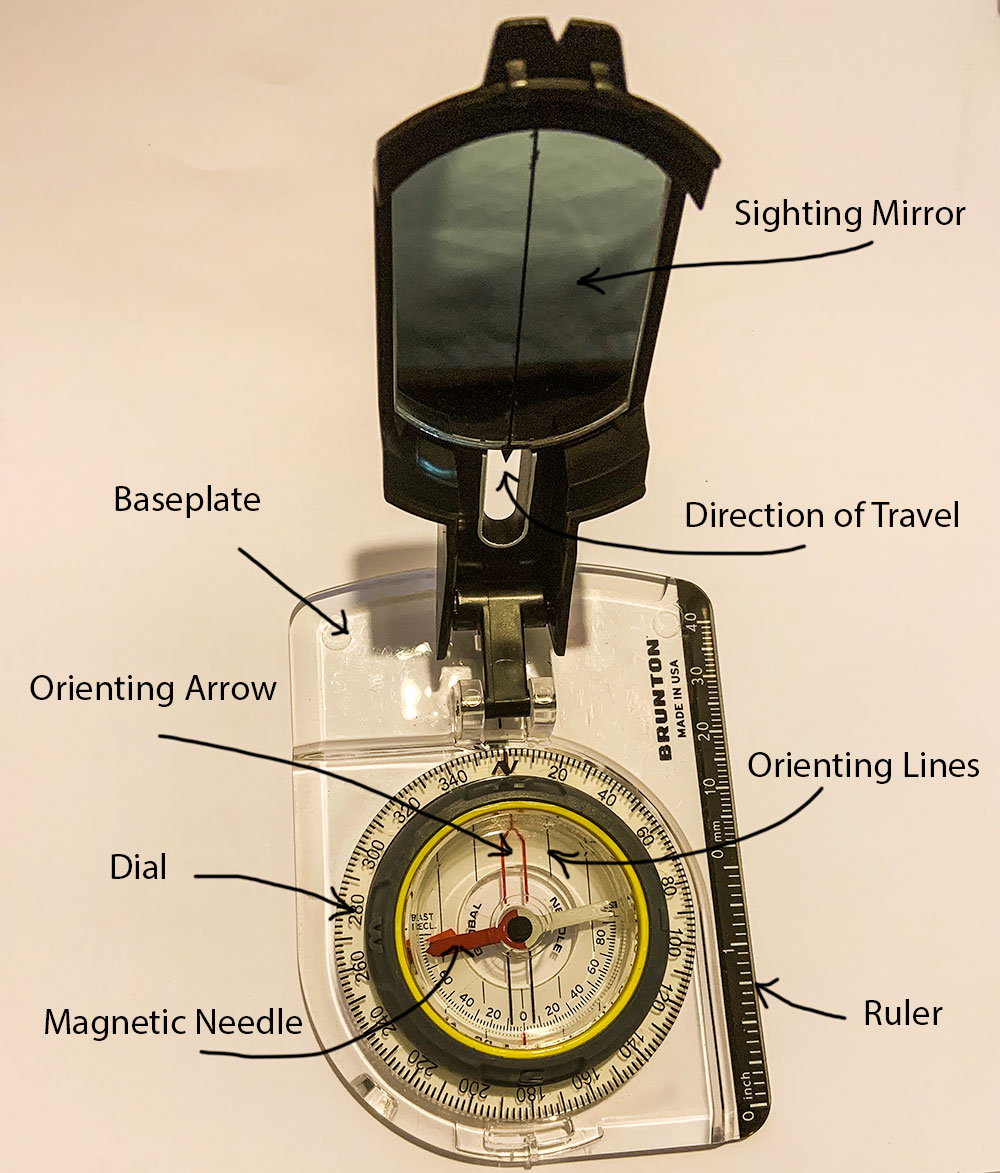
Housing
The liquid-filled capsule that contains the magnetic needle is called the housing. The liquid helps dampen the needle movement, making it easier to get a more accurate reading.
Magnetic Needle
A magnetic strip of metal that is on a pivot in the center of the housing. The part of the needle that points north is usually painted red, while the other side is often white or black.
Dial
The dial is part of the housing and is marked in two-degree increments. When the dial is rotated, the orienting arrow, declination scale, and orienting lines also rotate as part of the housing.
Orienting Arrow
The orienting arrow is marked on the bottom of the housing and rotates with the housing. It allows the baseplate to be aligned relative to the magnetic needle. This becomes important when you want to follow a bearing.
Orienting Lines
These lines are marked on the bottom of the housing and rotate with it, the same as the orienting arrow. They are also often called meridian lines and north-south lines. When taking a bearing from a map, the orienting lines are aligned with the north-south map grid lines.
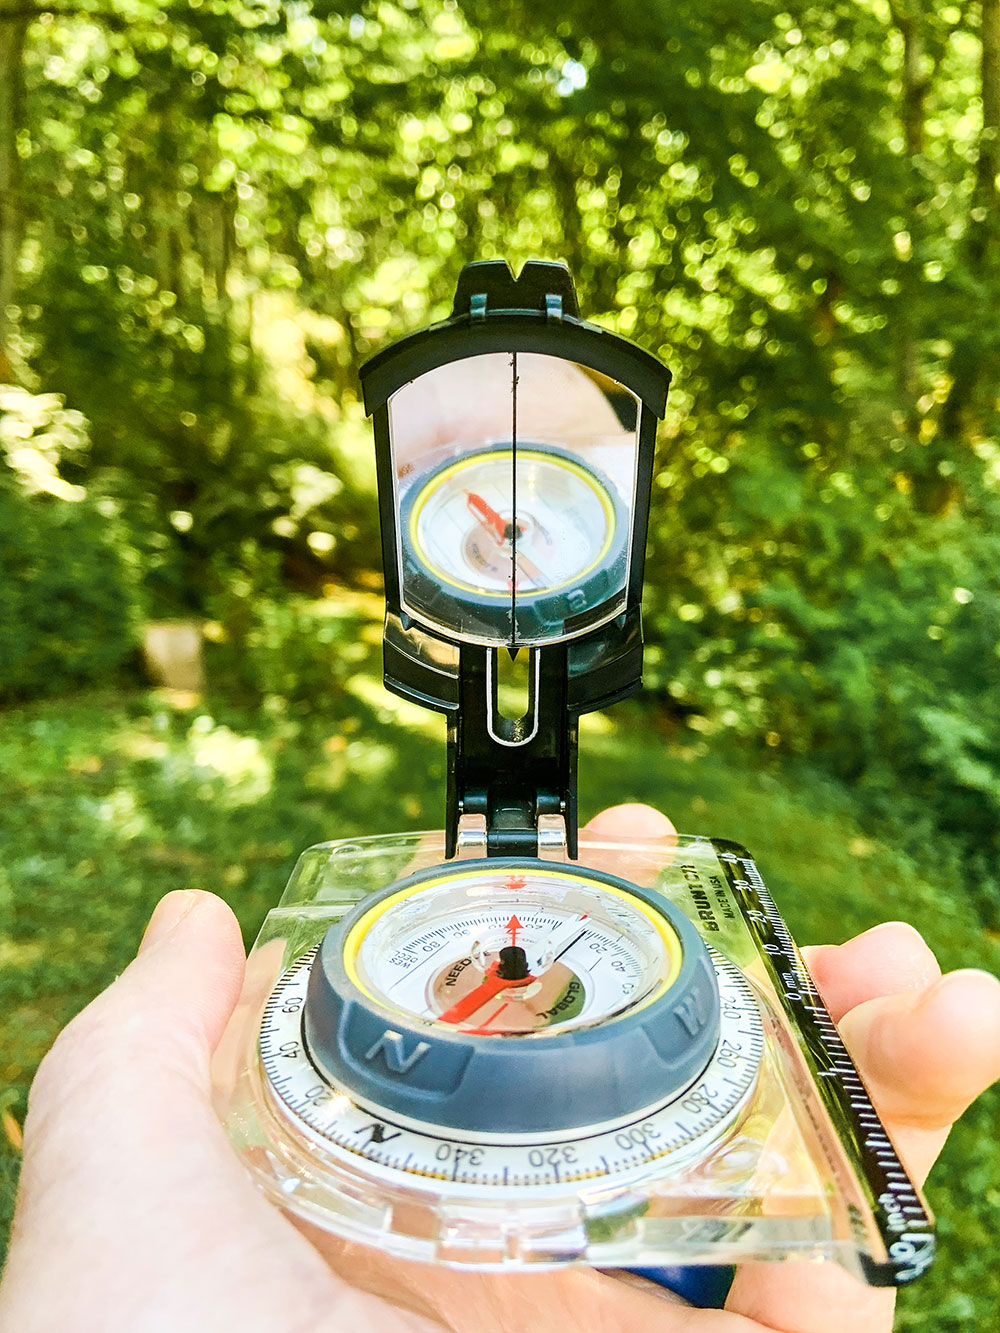
Sighting Mirror
Some compasses come with a sighting mirror. The mirror allows you to view the compass dial and the background at the same time. Notice the vertical line in the center of the mirror above. This vertical line can be extended (conceptually) into the horizon to more accurately target your desired bearing. Additionally, if you’re a backcountry skier or rider, you can utilize sighting mirrors to measure slope angle, which is important when operating in avalanche terrain.
Topographic Maps
Topographic maps (often called “Topo Maps” for short) represent 3-Dimensional terrain in a 2-Dimensional format. These accurate and to-scale maps detail human-made and natural features on the ground such as rivers, lakes, roads, railways, power transmission lines, contours, elevations, and geographical names. Using colors, they even identify glaciers, forests, and open alpine slopes. It’s important to know when the maps were created, however, because the world is constantly changing and some land features come and go.
The major components of topographic maps that actually allow you to see the 3-D landscape are contour lines.
Contour Lines
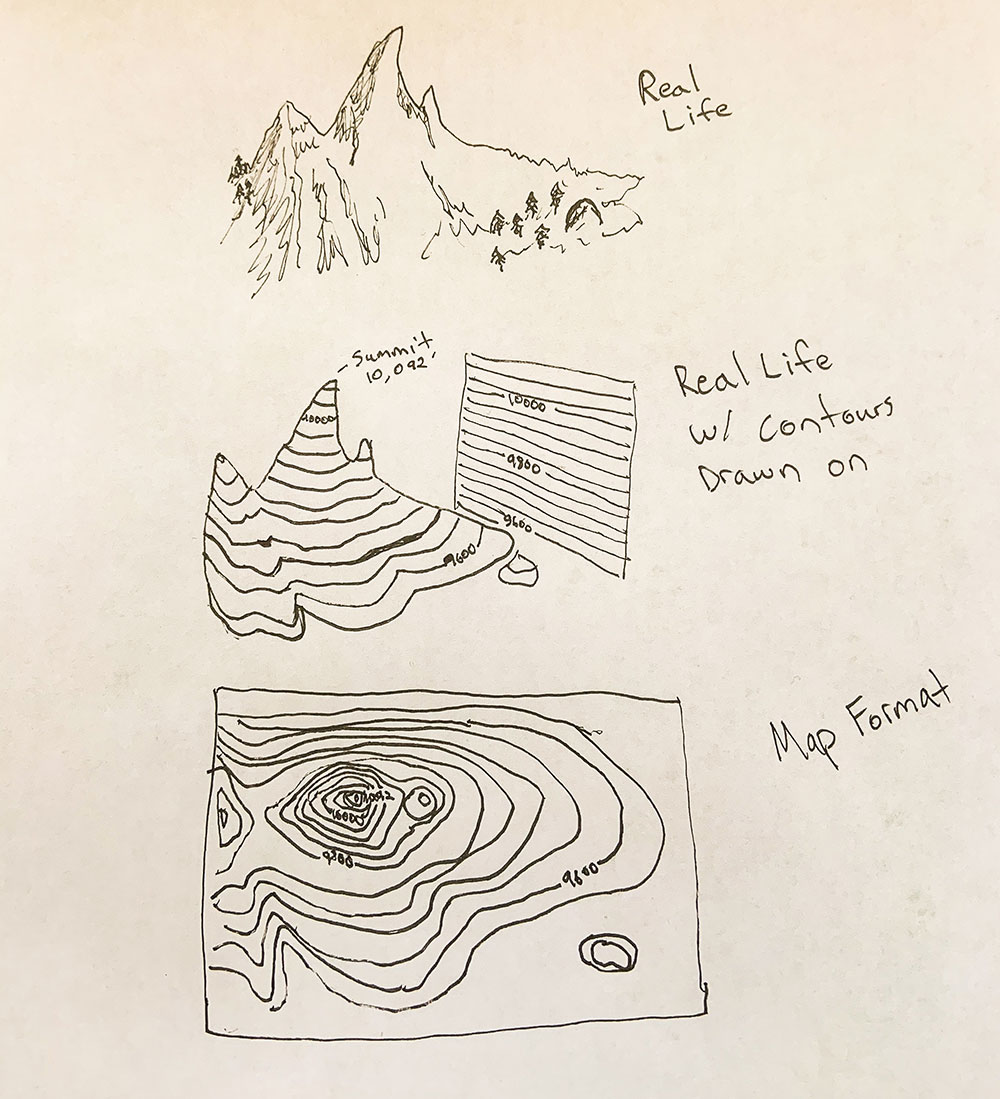
Contour lines show elevation and the shape of terrain by connecting points of equal elevation. This means that if you physically followed a contour line, elevation remains constant. Common contour intervals – the elevation change between contour lines- range from 40′(Most the lower 48) to 100′ (Alaska). The closer contour lines are together, the steeper the terrain. The further apart, the flatter or more mellow the terrain. Basically, you take a mountain and squish it flat on a page. The cartoon below will help you visualize what that looks like.
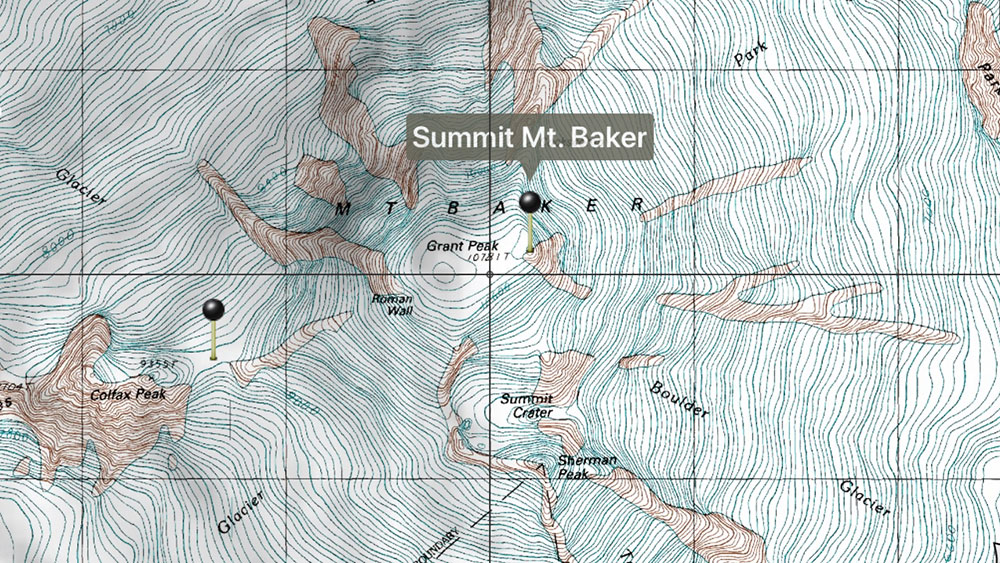
High Points and Low Points
Contour lines, since they connect points of equal elevation, are circular in nature. If you follow a contour line for long enough, you’ll eventually get back to where you started. Because of this, high points and low points are actually circles. Can you find the high points on the summit plateau of Mount Baker below?
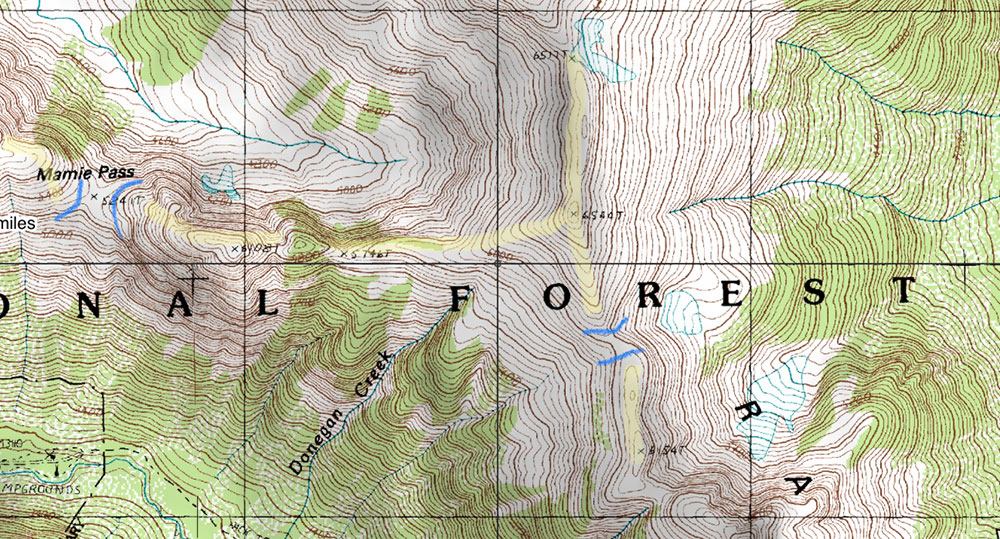
Ridges and Gullys
The “V’s” and “U’s” in your topo map contour lines. To identify ridges, there is usually low ground in three directions and high ground in one direction. When crossing a ridge at right angles, there is a steep climb to the crest and then a steep descent to the base. When moving along the ridge, depending on the location, there may be either an almost imperceptible slope or a very visible incline. The closed end of the contour line (Bottom of the V or U) points away from high ground. The ridges in the image below are marked in light yellow. The blue lines mark a saddle or pass, which is a low point along a ridge.
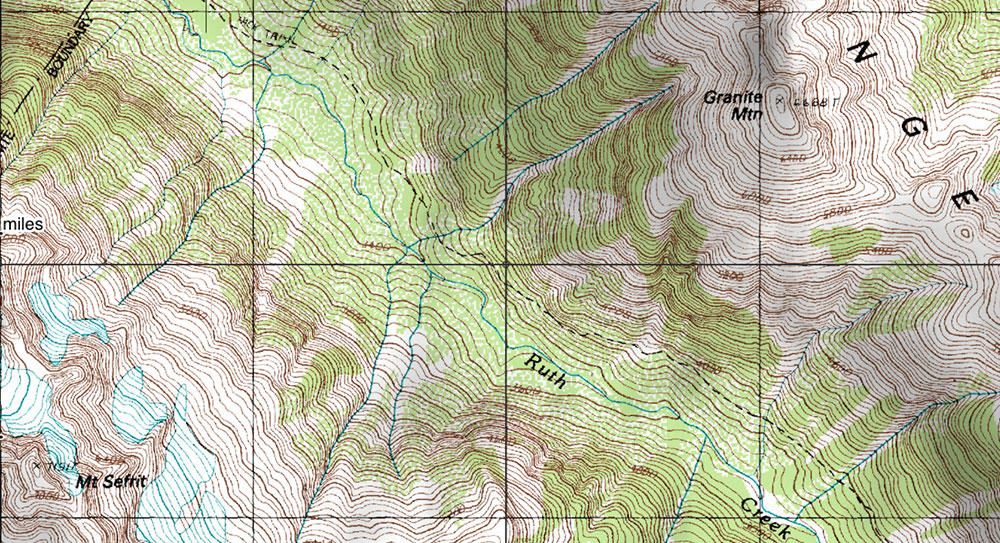
A gully looks like the opposite of a ridge on a topo map with the closed end of the contour line always pointing upstream or toward high ground. Instead of low points on three sides, it has high points on three sides. A valley is just a large gully that is often very flat, wide, and open with a large watercourse running through it. In the image below, there are multiple gullies coming off of Granite Mountain and Mt. Sefrit ending in the valley below. Hint: water often flows in gullies, depicted by a blue line.
Taking a Bearing
Now that you understand the parts of a compass and the basics of reading a topographical map, let’s get into how to actually use these tools to find our way in the mountains.
Declination
Unfortunately, our compass and map don’t work perfectly together unless you adjust for declination. Declination is the difference between Magnetic North (what your compass points to) vs True North (What maps are oriented to). Declination changes on a yearly basis and depending on where you are geographically. Thankfully, it’s an easy fix. You can look up the declination in your area on the NOAA Website.
Once you know your declination, most compasses allow you to rotate the actual housing in order to have the declination adjusted for. If you’ve got a compass that can do this, check out the video below to learn how and about declination in general.
If not, you’ll have to do the math, but it’s not that bad. That’s coming from someone who doesn’t like math. You will be adding to your bearing (if your declination is east) or subtracting from (if your declination is west). For where I live in WA, the declination is 15 degrees East. In order for my compass to point to true north (0 degrees), I’ll just need to turn my dial 15 degrees counterclockwise. Again, this is because I would actually be facing 15 degrees (not 0 degrees) if I lined up my compass to face north without adjusting for declination.
Bearings
Once you’ve adjusted for declination, bearings are the way we can navigate through terrain and know we’re on the right track. To take a bearing using a map:
Step 1: first figure out where you are and where you want to go. For this, it’s good to use clear landmarks. In the example below, I’m using a lake (Point A) as my location and a saddle (Point B) as where I want to end up.

Step 2: Ensure your map is oriented to North. The text should be right side up for reading purposes.
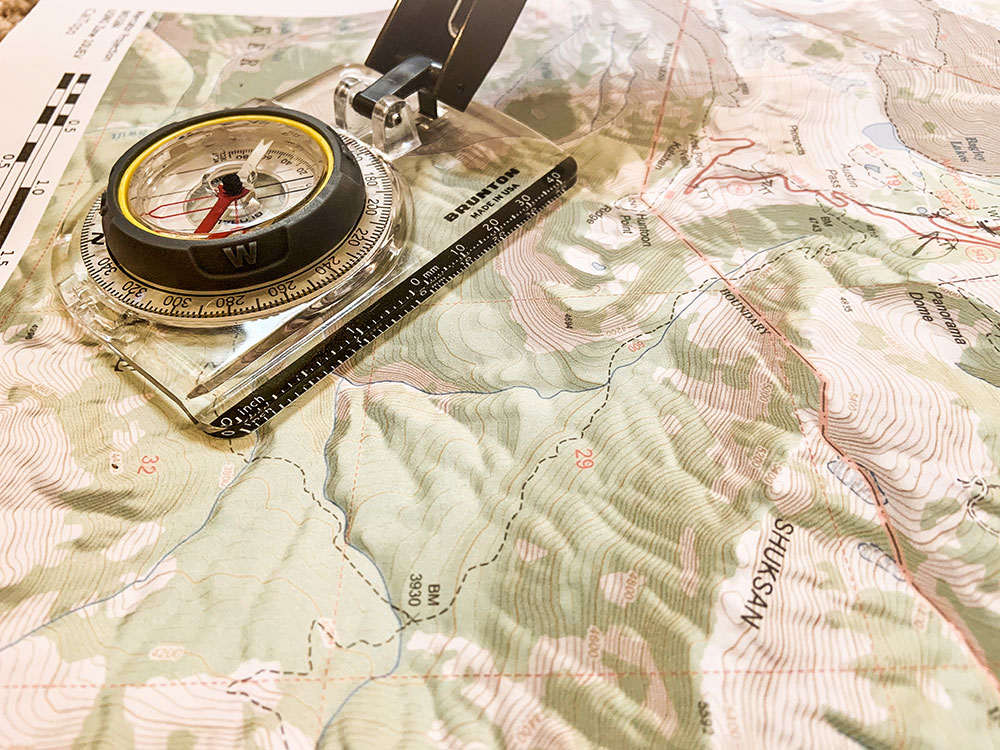
Step 3: Place your compass with the straight edge along the invisible line that would Connect point A and Point B.
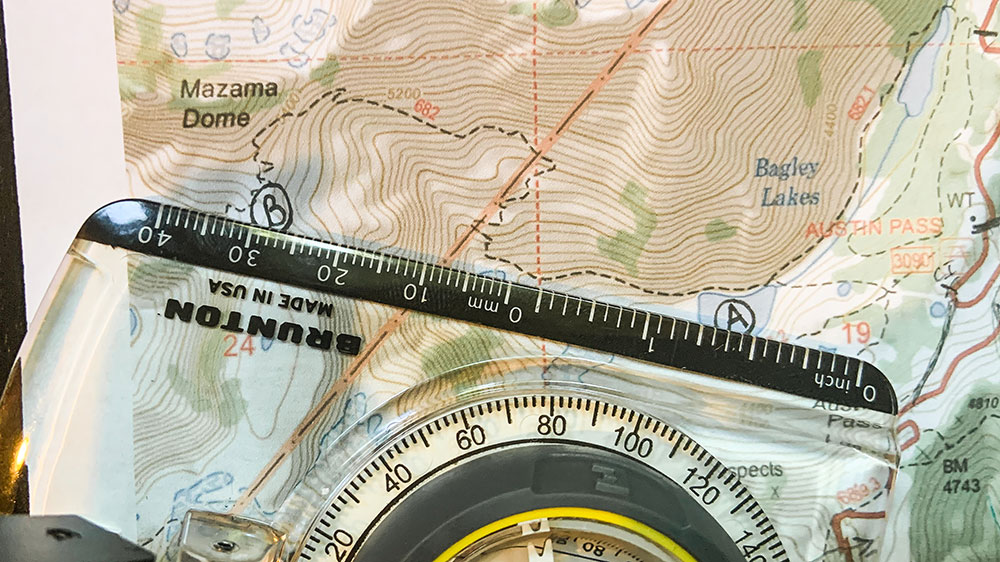
Step 4: Rotate the dial so that the orienting lines are parallel to the lines on the map and the compass housing is pointed north. In the image below, a ruler is overlayed to show the lines on the map being parallel to the orienting lines.
Step 5: Take your compass off the map and whatever number is where your direction of travel arrow is pointing is your bearing. In the image below and this example, that is 285 Degrees West. To follow it, just turn the compass until the red magnetic needle is inside the orienting arrow. Remember, if you haven’t adjusted for declination yet, you’ll need to do so here.
Here’s a short video told in a great accent to summarize. Be sure to check out our blog on Whiteout Navigation to learn how to take bearings and navigation to the next level.
Whiteout
Navigation
Whiteout Navigation
Whether you are a backcountry skier or mountain climber, learning the basics of whiteout navigation is essential for off-trail travel in the mountains. This post presents tools, strategies, and techniques to keep in your quiver for those low visibility days.
This post has two main sections:
1. Where to Move (Tools for knowing where to go in a whiteout)
Whiteout Navigation Plan | Navigation Tools
2. How to Move (Strategies and techniques for how to travel and stay on course)
Handrails | Bearing Off | Travel Techniques
Where to Move
If you get caught out in a whiteout, especially in glaciated or snowy terrain with no distinguishable terrain characteristics, it’s easy to become disoriented. Heard the phrase “inside the ping-pong ball?” Below are the things you need to know to make the best decision on where to navigate.
Whiteout Navigation Plan
The easiest way to know where to navigate in a white-out is to be proactive and have a whiteout navigation plan. These plans can be as complex and detailed as you’d like but need at the core three main details: Waypoints, Bearings, and Back Bearings. Below is an example of a complex whiteout navigation plan that also includes UTMs, distance, elevation, and munter rates. Curious how to make complex tour plans? Check out our Backcountry Skiing Pro Course for backcountry skiers and riders.

Waypoints
Waypoints are points placed along your route at regular intervals that are used for navigation. Think of them like a trail of bread crumbs you can use to navigate through terrain and then also get back home. Ideally, waypoints are placed at the start and end objective of your route, and anywhere a change in direction is required.
They also work best at obvious terrain features that you can’t miss. Those could be an individual tree or large boulder on a ridge, or a lake, cliff face, drainage, highway, or larger scale feature. Your goal is to go then from waypoint to waypoint to get to your objective and then reverse the waypoints to get back home.
Bearings
Where waypoints are the bread crumbs, bearings are how you navigate to the next bread crumb without getting lost. By recording the compass bearing in your plan to the next waypoint, you can be sure that you’re headed in the right direction (remember to adjust for declination). Don’t know how to take a bearing or what declination is? Check out our Backcountry Navigation 101 blog.
Back Bearings
Just as important as knowing your bearing to the next waypoint is the bearing back to the previous one. Back bearings get you home. Calculating the 180 degree opposite of your bearing to a waypoint gives you the back bearing. In the navigation plan above, you can see on line one that the bearing from the car to the first waypoint is 198 degrees. Therefore, 198-180 = 18 degrees for the back bearing.
Navigation Tools
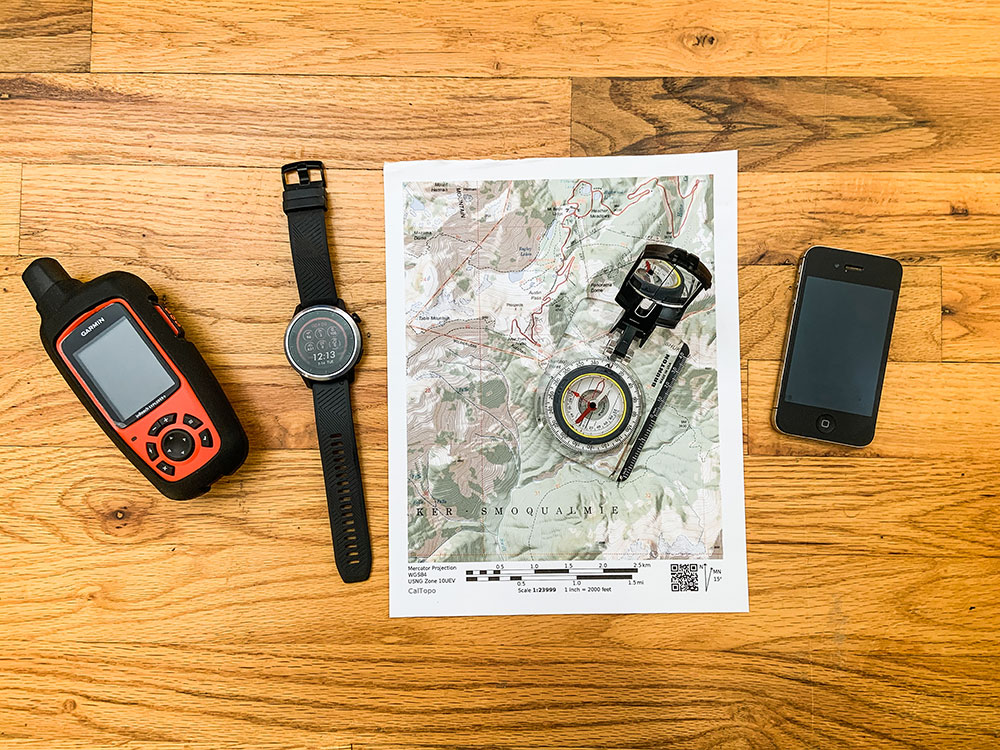
GPS
There are cell phone applications now like CalTopo and Gaia that turn your cell phone into a GPS even in airplane mode. This can be a more affordable option than to drop hundreds of dollars on a stand-alone GPS unit. Drawbacks to using your cell phone as a GPS unit is battery life, cell phones die quicker, and usability in wet conditions (like a whiteout). Touch screens don’t really work well when wet.
Altimeter
There are quite affordable altimeter watches now that (if calibrated regularly) are quite accurate. Knowing your elevation is essential when navigating in a whiteout. A GPS will provide your elevation, but it’s nice to have a back up in case your phone or GPS unit runs out of battery.
Map
Have an analog backup to the technology. If you actually want to be able to use it in a whiteout, laminate the map or at least put it in a zip lock bag to waterproof it.
Compass
The ultimate navigation tool. Much easier than trying to pull out your cell phone or a GPS in a storm. If you did your homework and have a good whiteout navigation plan, then you just need to follow your compass bearing.
How to Move
Once you decide on where to go, here are some strategies and techniques to help keep the squad together and to where you need to go.
Handrails
These are obvious physical terrain features that you can use as a “handrail” to ensure that you don’t get off route. A creek or river, ridgelines, valley bottoms, couloirs, and roads are all obvious terrain features that you’ll recognize when you hit them, even in a whiteout. Below is an example of a ridgeline handrail (the railroad grade on the Easton Glacier route up Mount Baker). Even in a whiteout, as long as you don’t stray from the ridge, you’ll make it where you want to go.

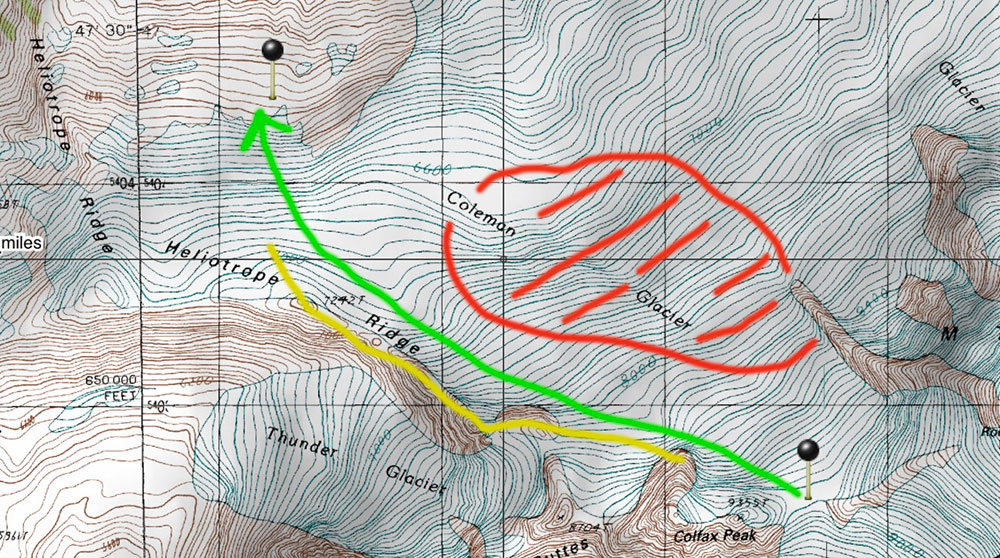
In the picture below, if trying to get from the saddle on the Coleman-Deming Route of Mount Baker (Waypoint in lower right) back to camp (Waypoint in upper left), it is important to avoid the center of the Coleman Glacier (Red) where it is heavily crevassed. By using the Heliotrope Ridge (Yellow) as a “handrail”, you can make sure that you’re headed in the right direction by keeping the ridge in sight on the left as you travel downhill (Green).
Bearing Off
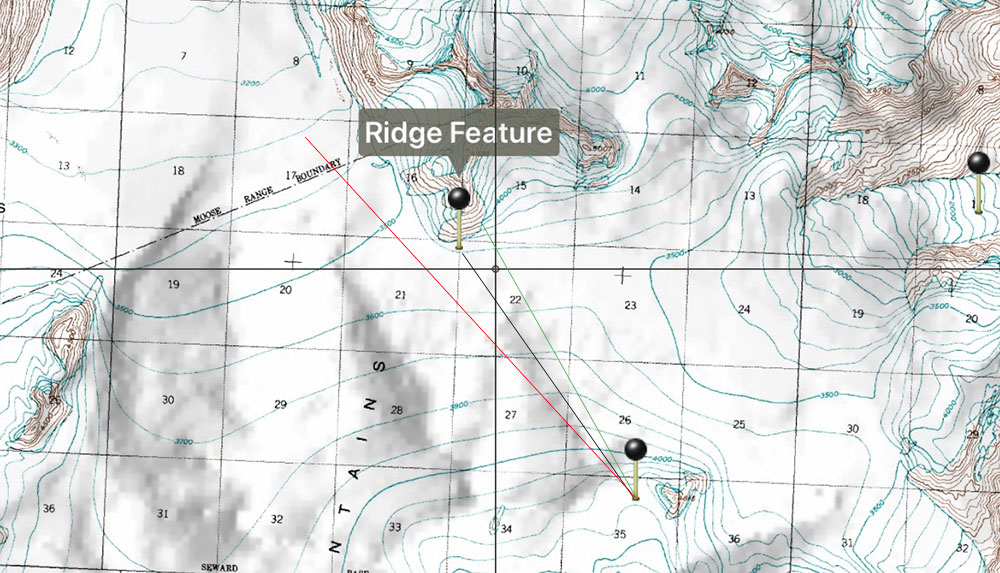
This is a technique where you intentionally take a bearing that is a few degrees off of your true desired destination in order to hit an obvious handrail feature that ensures you won’t miss your destination. In the example below, in glaciated terrain, we took a bearing that was intentionally off (green) in order to hit the ridge feature where we needed to change direction. If we missed the ridge feature (red), we’d end up out in the middle of the ice field with no physical handrails to know where we were.
Travel Techniques
Iron Caterpillar
Make this your default uphill technique for ensuring the squad stays together in whiteout conditions. It’s pretty self-explanatory: Stay just behind the person in front of you (tip to tail if you’re on skis), and, like Ludacris says: “When I move you move”. Just like that.
Check the Leader
On flat terrain, most folks travel in circles thinking they are walking in a straight line. To combat this, travel in your iron caterpillar and have the last person carrying a compass and the first person acting as a reference point. Regularly check the compass bearing against the leading person and adjust their direction left or right as required.
Only two of you? Have the leader walk while the rear person stands still and holds the bearing. Instruct the leader where to go to be in line with the bearing and have them stop when they’re almost out of sight. Then Catch up to them, reacquire the bearing, and repeat.
Physical Markers
A common backcountry skiing and riding trick to be able to ride in whiteouts is to place some sort of physical thing on the slope in order to provide some contrast. Examples of this include large washers with flagging tape around them tossed at various intervals downslope, a ski pole tossed a little further ahead, or cordalette tied to a pole that you swish downhill in front of you. If you create a skin track or boot track on the way up, this could also count as a physical marker that could potentially be followed on the way back. Commonly in big glaciated terrain, folks use wands placed at regular intervals to navigate. If you go this route, make sure you pick up your wands on the way back unless you need to leave them for other parties so they don’t just become trash on the glacier.
Want to learn more? Check out our Ultimate Guide to Backcountry Skiing.
Repair Kits for Backcountry Skiing
Repair Kits for Backcountry Skiing and Riding
Let’s layout a little scenario. You’re out for a long day tour in perfect pow conditions. To get away from the crowds, you push out pretty far into terrain and drop into a different drainage than the car is parked. On your run down, you take a tumble and rip out your toe piece.
Without a repair kit, what are your options? How long will it take you to crawl out? Is that even possible? People have died this way. The way to avoid (at the least) a very frustrating and slow evacuation out of the field is to invest in a quality repair kit that can fix most problems. If you put together your own kit, you’ll be surprised how modest a financial investment it is. There are some quality repair kits pre-built out there now by Traverse Equipment for $90 if you want to go that route.
Below is a breakdown of the everyday essentials you should always have, other items to consider bringing and multi-day specific items.
The Everyday Essentials
Depending on how long of a backcountry tour you plan to go on, your repair kit should adapt accordingly. Are you going out overnight or for multiple nights? Your kit will be much more inclusive than for just a short day tour near a ski area. No matter how long your tour, here are some essential items to always have with you.
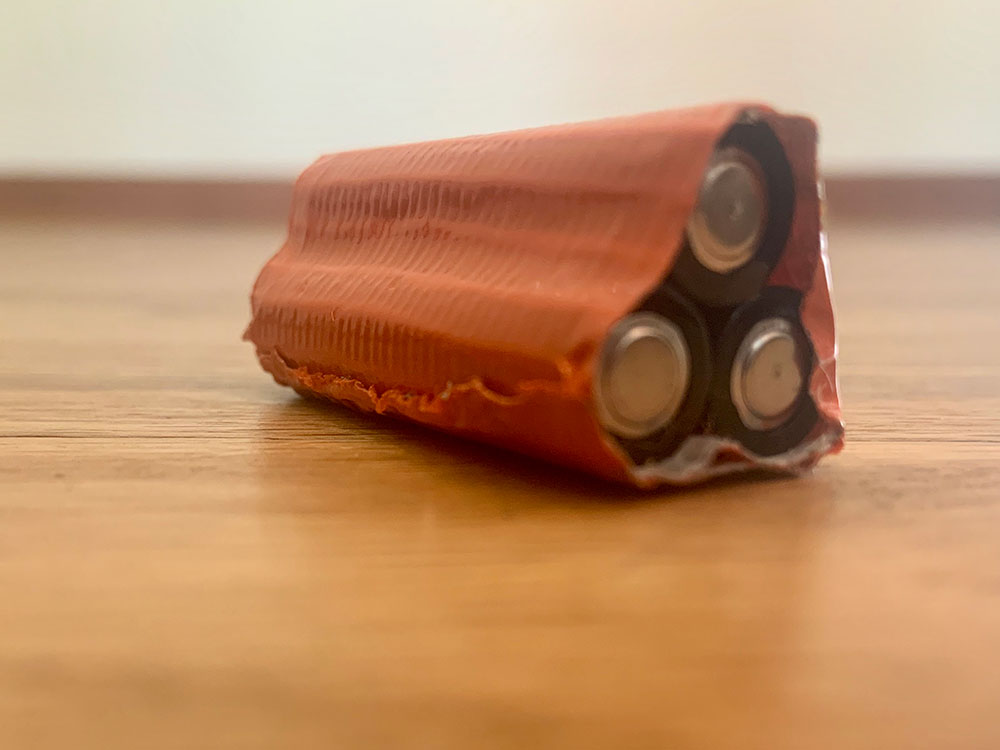
Spare Batteries
Most avalanche beacons and headlamps take triple A. Bring three of them.
Pro Tip: Wrap a piece of tape around the three batteries to keep them together so you’re not fishing around for three individual batteries.
Knife
Sometimes you’ll just need to cut something. Worst case is an emergency where someone has major trauma and you need to expose something buried beneath a lot of different layers. You might need to cut some clothing off. More likely, you’ll need the knife for cutting that spare p-cord to the appropriate length or your block of cheese. Regardless, carry one.
Multi-Tool With Pliers
This multi-tool could also be your knife as long as it’s actually a good one. Pliers are great for grabbing metal parts, which will be quite cold out there in the snow. It should also have some different bits (Phillips and straight at a minimum) so you can tighten loose screws on boots or bindings. Bonus is wire cutting capabilities.
Pro Tip: Keep this in an accessible pocket rather than in your repair kit. You don’t always have to have all items of your repair kit inside the same bag.
Ski Straps
So many applications. I carry three at all times. Break a buckle or tensioning strap on your boot? Ski Strap. Skins falling off your skis or lose a tail clip? Ski Strap.
Pro Tip: Store two rolled up in your repair kit and keep one accessible either rolled on your ski pole or in a pocket that is easily accessible.
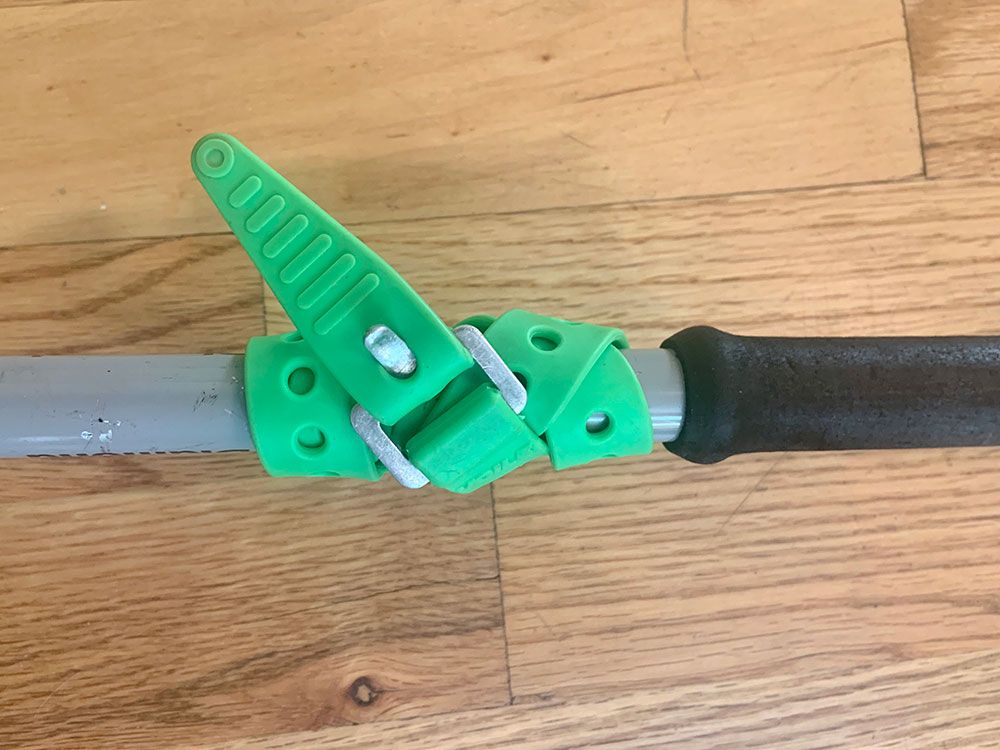
Spare Screws
These should be specific to your boots or bindings. If the screw that holds your walk-ride lock falls out, have fun riding downhill in a sloppy boot.
Pro Tip: If you are a splitboarder, make sure the screws on your binding are tight before each run. Most splitboard bindings have a lot of moving parts, which leads to screws and straps loosening throughout the day. Avoid having to use your spare screws by tightening them proactively!
Extra Powder Basket
Poles are useless in snow without powder baskets. Just carry a spare in case you lose one.
Extra Climbing Skin Tail Clip
You can use a ski strap to keep a climbing skin on a board, but these tend to get scraped off as you walk and can be annoying since they affect glide. It’s way better to just have a spare clip.
Scraper
Snow adhering to your climbing skins? Scrape it off. Snow or ice building up on the bottoms or tops of your boards? Scraper. Can’t get your binding to lock in the right place because there’s too much snow? Scrape it!
Other Items to Consider
Pole Repair
If you take a tumble and snap a ski pole, it’s nice to be able to repair the pole to at least make it usable to get out. With two small hose clamps you can simply clamp the broken pieces together with a little overlap.

Tape
Duct Tape is classic, but leaves behind a nasty residue once removed and doesn’t adhere to all fabric types. I recommend Tenacious Tape from Gear Aid. I’ve had clothing patches survive multiple years going through the wash. Strong stuff from an awesome local company.
Paracord
Multi-Use similar to ski-straps, but smaller, lighter, and can be cut to any length.
Pro Tip: cauterize the cut end with a lighter to keep it from unraveling!
Lighter
For cauterizing that paracord you just cut, lighting your stove, or creating that fire in a survival scenario.
Binding Buddy
Lots of manufacturers sell cheap but effective multi-tools that get most jobs done if you’re not wanting to drop for a nicer multi-tool just yet.
Glop Stopper Wax
Definitely a nice item to carry in the springtime anywhere, but year-round if you ride in a warmer/wetter climate like the Pacific Northwest. Glop Stopper Wax keeps snow from adhering to the bottoms of your climbing skins. If you’ve ever been out after a fresh dump of snow and then had that snow become sticky risers under your feet, you know the humongous pain that is. It can immobilize you.
Pro Tip: apply it before you actually need it. Once your skins get wet and already have snow sticking to them, it’s tough to retroactively put on the wax. Pay attention to changing conditions and apply glop stopper proactively.
Large Hose Clamp
If you rip out a toe piece on a binding, a large enough hose clamp can fit over the ski and boot to clamp the boot to the ski like a big, dumb snowshoe. This only works, however, if the ski boot has a buckle near the toe to keep the clamp from sliding off the boot as you walk.
Baling Wire
Lightweight multi-use material just like paracord except you don’t need a lighter. You do, however, need wire cutters in your multi-tool if you’re going to bring it.
Storage Bag for Kit
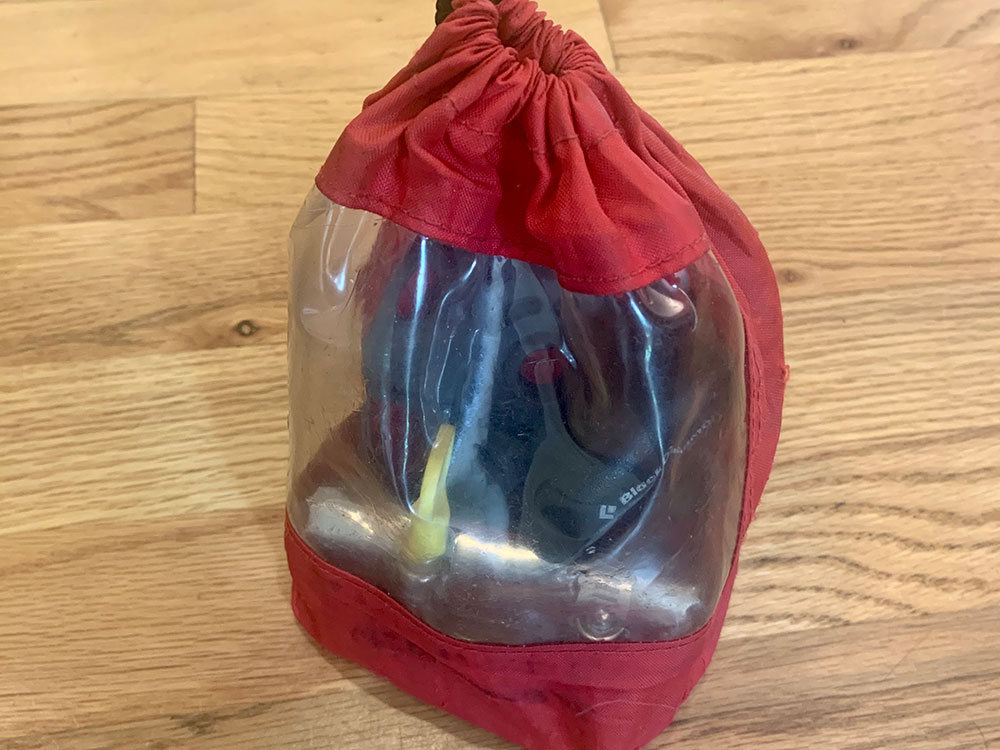
Have a nice compact bag that’s just large enough to accommodate your repair kit items. Preferably this bag is waterproof to keep your metal bits from rusting. Ensuring that you pull out and dry out any items that get wet will protect from rust as well.
Pro Tip: Use a Dynafit Ski Crampon Bag for your repair kit. The clear plastic side is great for visually spotting where the item you need resides. Plus, it’s durable.
Multi-Day Specific
Spare Headlamp
Having a headlamp die can shut down your aspirations for that awesome line you hiked so far into the backcountry to ride. It’s also one of those emergency items that you should always have on you in case your day is way longer than you expected.
Stove Parts
If you’re going out for a multi-day trip, you’ll likely have a stove. Don’t forget to carry spare “o” rings and other items that are stove specific so you can repair whatever issue your stove has in the field. Often melting snow is how you’ll get water in the winter and not having a working stove can be a big safety concern.
Sewing Kit
For three day+ trips (like a traverse) consider bringing a sewing kit to be able to more permanently repair gear rather than the slap and play of tape.
Zipper Repair Kit
Blowing a zipper on a key piece of clothing or, if you’re using a tent, your shelter door is a huge bummer. Rather than poking holes in your items with safety pins to keep them shut, consider bringing a zipper repair kit to fix the issue.
Ripped Toe Piece Repair
On longer multi-day trips a long way from home, it’s nice to know that you can secure back on your toe piece if it completely rips out. Ski straps, baling wire, paracord, and your big hose clamps will do in the short term but require constant management and adjustment. This is a way to reattach your toe piece permanently in order to get out of the field. Take Note: This will destroy your ski, but it’s probably destroyed anyway.
You’ll need:
Socket wrench with Phillips bit and 1/8″ drill bit.
3-4 bolts 1/4″ or smaller that fit through the screw attachment points on your binding toe piece.
3-4 lock nuts and washers that match the size of your bolts.
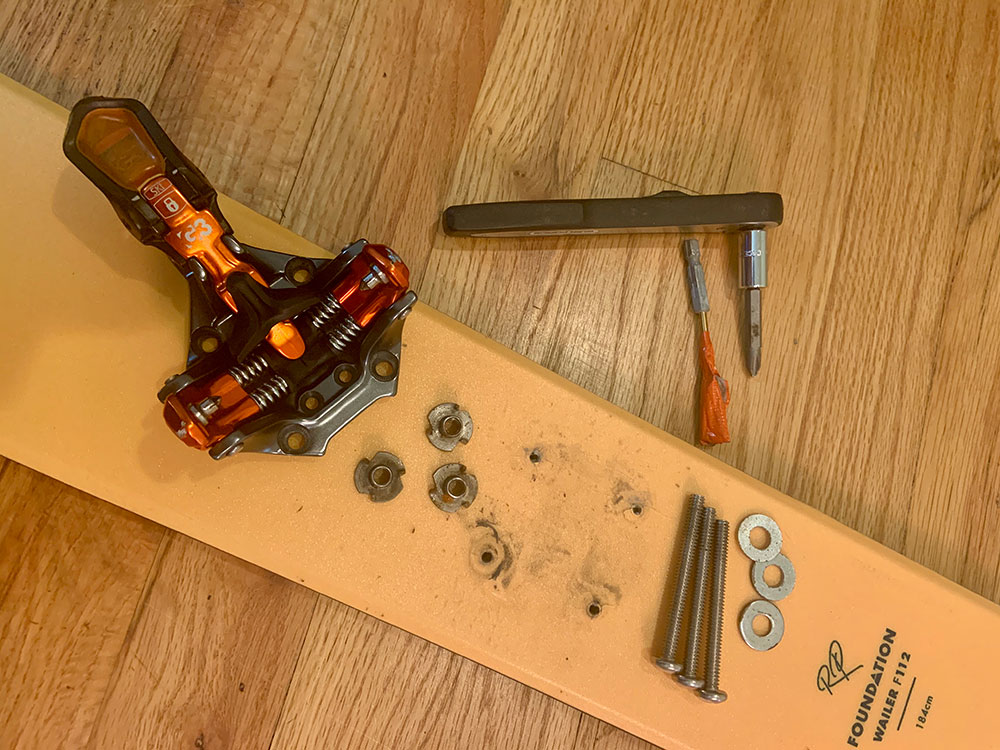
Using the socket wrench and drill bit, drill completely through the ski using the holes where your binding toe piece ripped out. Widen the holes if necessary in order to accommodate your bolts.
Pound the lock nuts into the bottom of your ski.
With a washer on the bolts, screw them through the toe piece and into the lock nuts on the other side of the ski. You’ll likely only need three bolts even if you have four screws in your binding. They won’t be coming out.
Cut off or repeatedly bend the excess bolts with pliers in order to break them off flush with the bottom of your ski. You’re back in business.
Final Thoughts
What you carry in your repair kit should be specific for you and your squad, but should contain at the very least the essentials above. Remember that not everyone in your team needs a full repair kit if you coordinate well, but make it a part of the group gear you always bring.
Like what you learned here? Check out our Ultimate Guide to Backcountry Skiing to get more quality educational content.
Strategic Shoveling
for Avalanche Rescue
Strategic Shoveling for Avalanche Rescue
The average burial depth in an avalanche is around 1.3 meters, which equates to about 1-1.5 tons of snow to move in order to extricate someone from avalanche debris. That’s just on average, in reality, someone could be buried much deeper. How long can someone survive under the snow? On average, if you get someone out in the first 15 minutes, they have a 92% chance of survival as long as they are not dealing with any major trauma. After that… the numbers are bleak. Survival rates drop to 37% after 35 minutes.
Over the years, From 1977-2000, the mean rescue time for recreationists (this includes beacon search) was 29 minutes. From 2000-2006, with the increase in avalanche education and more refined strategic shoveling techniques, the mean rescue time for recreationists decreased to 18 minutes. Research shows that the best way to decrease rescue times and overall mortality rates is to decrease the time spent in the shoveling phase, so let’s get into it.
Strategic Shoveling Techniques
Be Proactive
I would be remiss to not remind you all that the best way to survive an avalanche is to be proactive and not get caught in one to begin with. Take an Avalanche Course and get the education to avoid needing your shovel for anything but training weight. Then, since this post is geared towards just the shoveling aspect of a rescue, make sure that you understand Single Burial Avalanche Rescue techniques and how to use your Avalanche Beacon and probe to pinpoint a buried person’s location.
Shoveling 101: The ABCs
Once you’ve pinpointed a buried individual with a probe strike, the ABC’s tell you where to start digging.
Airway: Start digging downhill of the probe strike (and avoid standing on or above the probe) to preserve the airway of the buried individual.
Burial Depth: The burial depth tells you how far downhill you need to be before digging in towards the probe. The general rule is 1.5x the burial depth found on your probe, but moving one step downhill for a 1 meter or less burial and 2 steps downhill for anything greater than 2 meters is easier to remember and just as effective.
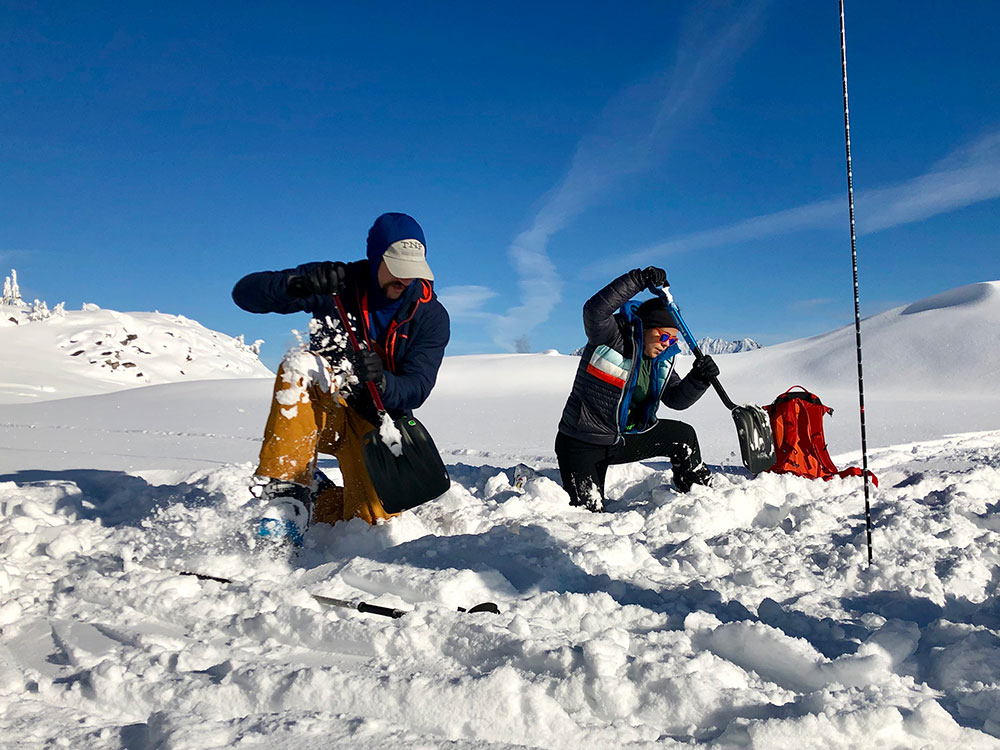
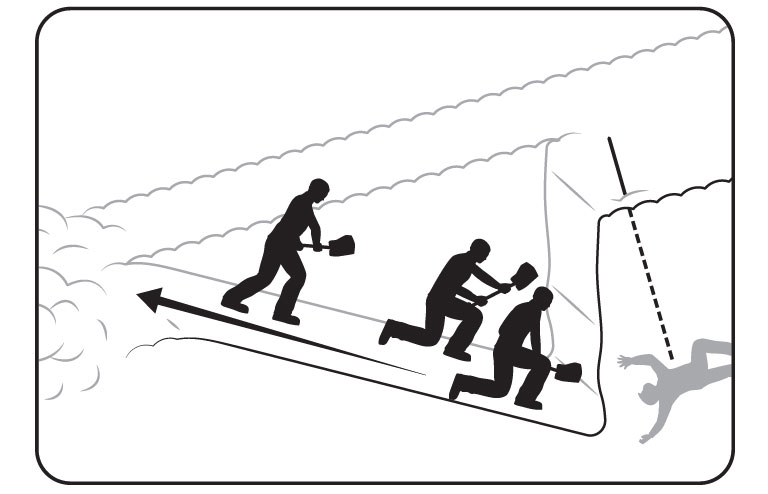
Clearing Snow: Ideally, you’ll clear snow downhill and to the sides by either chopping or paddling (depending on conditions) in order to create a platform 1-2 meters wide nearest your victim and 2 meters wide at the back like in the diagram below. This allows you to have space to provide first aid after excavating the victim. To achieve this platform efficiently, start by clearing snow to the sides. This keeps the downhill side from building up with a lot of snow — preserving it for snow removal later once the hole is deeper. Once the hole is deep enough that lifting snow up and over the sides is inefficient and tiring, paddle snow downhill and to the sides.
Single Rescuer
If you’re alone doing a rescue, that’s a huge bummer. This means you’re doing all the lifting (quite literally). Keep the ABCs in mind as you dig. Start downhill, and move snow downhill and to the sides as efficiently as possible. You’re still aiming to get the slightly angled platform above.
Conveyor Belt
With more rescuers, the more resources you have, but using those rescuers efficiently can be a challenge. A simple method to keep folks organized is the conveyor belt method. This works best with four or more rescuers. The video below demonstrates the method. Take note: partway through the video a fifth person shows up and violates the “A” of the ABCs by standing on top of the victim. Don’t do this.
Below is another video of the conveyor belt method. This time with 10 rescuers.
To Summarize…
Time is against you in an avalanche rescue, so efficiency is key. In order to get more efficient at strategic shoveling takes practice that can’t come from reading about it. So take an Avalanche Course. There you will learn how to best practice rescue on your own so you can build good habits. Hopefully you’ll never have to perform an actual avalanche rescue, but prepare for the worst. Below is one more video from BCA that does a pretty good job of reviewing most these concepts. Stay safe out there!
Want to learn more? Check out our Ultimate Guide to Backcountry Skiing.
Ski Crampons for
Backcountry Skiing
Ski Crampons for Backcountry Skiing and Riding
With warm temps and long days becoming status quo in the North Cascades, I’m transitioning my ski kit over to spring mode. Once the melt freeze cycle takes hold, one thing I’ve always got on me is a set of ski crampons for backcountry skiing or riding.
These nifty, little tools can transform an icy skin track or frozen slope from a slippery nightmare into a pleasant stroll. Ski crampons add security to your skis or splitboard while skinning by penetrating the top few centimeters of the snow under the toe of your boot to help prevent slipping backwards or having your edges skate out while side hilling. Here are 5 tips for getting the most out of your ski crampons:
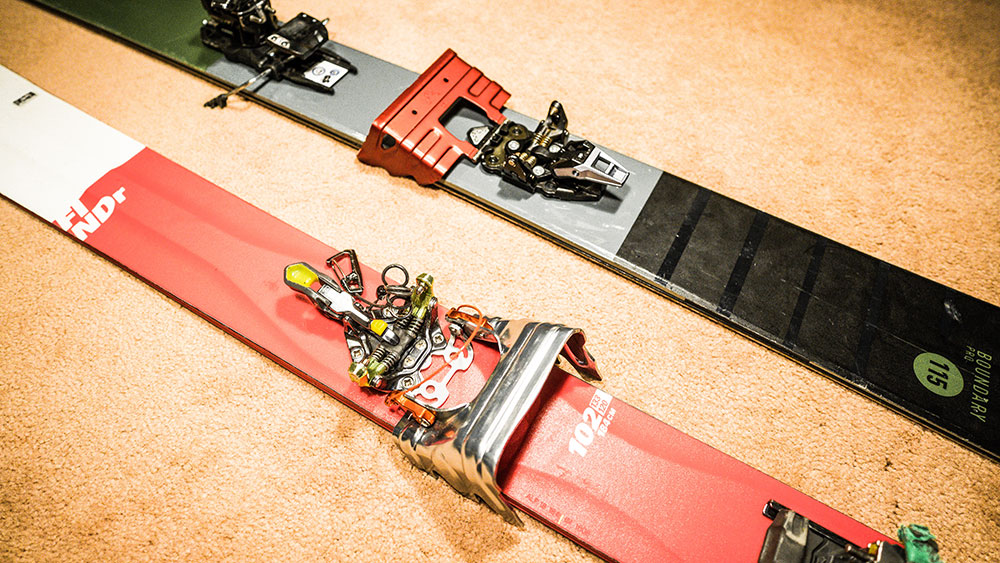
1. Get The Right Pair
Ski crampons are specific in type to your binding, and in size to your ski or board. First, check with your binding manufacturer about what crampons to get. Many companies have their own system for their bindings. Size wise, they should be the smallest size possible while still being bigger than your ski waist. They usually are sold in 10mm increments, so, for example, if your skis are 96mm underfoot you should get a pair of 100mm crampons.
For splitboarders, Spark R&D and Karakoram make splitboard specific crampons. These work the same as ski specific crampons, but are wider to accommodate board width/asymmetry.
2. Have Them Handy
If I think that I might use my crampons, I keep them somewhere I can reach without taking off my pack. I recommend either clipped to a carabiner on your waist belt or clipped to your pack in a reachable spot. Then, if you need to put them on somewhere awkward, you don’t have to worry about your pack sliding away on the icy snow surface. Putting these bad boys on usually takes two hands, unless you have G3’s bindings and Ion Ski Crampons… then you don’t even need to take off your skis.
3. Put Them On (Right) Before You Need Them
Anytime I’m skinning on ice snow I put on my crampons before the slope gets steep. This prevents having to take my skis off anywhere exposed. That said, don’t have them on all the time because they inhibit your ability to glide on lower angle terrain.
4. Leash Your Skis
There are many reasons to put leashes on your skis in the spring. Ski brakes don’t do so well on icy snow, many lightweight ski mountaineering bindings don’t even have brakes, and losing a ski is a bummer at best and could be dangerous for yourself or others below. Since you need to take your skis off to put most crampons on, leash ‘em up!
5. Get The Best Grip
There are two important tricks to get the most purchase out of your ski crampons. The first is to not use any heel risers. This allows your boot to push the crampons as far into the snow surface as possible. It also encourages taking an efficient low angle route. The second trick is to try to keep your skis flat on the snow surface, with your downhill edges dropped toward the snow. This allows both sides of the crampons to dig in, not just the uphill points. This may feel awkward at first but you’ll get used to the motions and will love the added security.
Spring is a great time to do big days and cover some serious ground on firm morning snow on your way to harvest sweet corn. Ski crampons will add efficiency to your ascent and help you save all possible energy for ripping back down to the car. Practice putting them on at home first so your system is dialed before you get out, and enjoy the satisfying crunch of your ski crampons punching through the snow on the way to the top!
Want to learn more? Check out our Ultimate Guide to Backcountry Skiing.
Reverence, Respect,
Reciprocity
Reverence, Respect, Reciprocity: A Sustainable Future for Recreation
Recreate [ rek-ree-eyt ]: verb: to give new life or freshness to, refresh. To restore physically or mentally.
On a trip across the North Cascades Highway this past autumn I witnessed something that I’d never seen before in my lifetime: 700 cars parked at Rainy Pass. The perfect fall day drew larch lovers from near and far to the Rainy/Maple Pass Loop. This trailhead holds maybe 80 cars at best, so where were the rest? Lining the highway. The speed limit on this highway is 50 MPH and with car doors being flung open on either side of the road, the situation felt perilous at best. I burst into tears at the spectacle, sobbing something along the lines of there isn’t enough room for all these people in the forest.
Through my sobbing I imagined people lined head to tail in a line like cows waiting to be milked, or worse. Aside from whether anyone was wearing a mask or not, the image was dire. We’ve been telling people for a decade now to GET OUTSIDE. Put down yours screens and GO OUTSIDE. So finally, all at once it felt like people had heard the call. Ironically, my heart wasn’t filled with gratitude for the multitude of potential supporters of public lands. Instead I felt grief.
I grieve for the loss of solitude that I seek in the wilds. I grieve for the animals that used to call these wilds their home. I grieve for the secret places that are no longer secret as internet trip reports and social media posts have become ubiquitous. Once hard-to-find sacred places cherished by Indigenous Peoples are now on Instagram.
And yet in my sorrow I conceded that, yes, we need people supporting public lands. The recent video produced by Patagonia, Public Trust: The Fight for America’s Public Lands offers an evocative example of what happens to our public lands when no one is watching, when no one cares. They disappear. Wild lands need wild voices. We two-leggeds must be their voices.
My daughter, displaying her astute three-year old intelligence, responded to me that day in the car: “Yes there is enough room, momma” (as she’s hucking stuffies at me from the back seat to try and cheer me up). “Look,” she says, “there are lots of trees.” I couldn’t deny her claim. “Yes,” I said. “There is a lot of forest out there, I’m just not sure we should all be in the forest at the same time. Where would the bear nap?”
There are a lot of humans on this planet right now. David Attenborough’s A Life On Our Planet highlights precisely and terrifyingly what we humans are capable of when it comes to ignoring the vulnerability of our home. And I’m worried that we’ve asked humans to go outside without sharing with them the responsibility inherent in doing so and the tools with which to do it.
Recreation comes with an enormous responsibility—to your own body, the bodies around you (human and more than human), and the landscapes you recreate on. Historically, the ‘Leave No Trace’ ethos has been the gold standard for how to interact with the land. ‘Leave No Trace’ is great, but it’s only a baseline and should be implied. ‘Leave No Trace’ falls short in a number of ways.
The Three R’s
Reverence, respect, and reciprocity. To me, these are the gold standards for responsible and sustainable recreation.
Reverence
We are all stunned by beautiful places and moments. Yosemite, Yellowstone, Mt. Rainier, the alpenglow at sunset, the contrast of the yellow larches against fall’s first snow, the bugle of the elk. Each of these stirs us in profound ways—perhaps even to reverence.
I’d urge us to go a step further and really tune in and ask what is it about these places and moments that makes your heart sing—or cry out? What is it about these places and moments that connects you with your soul and the soul of the Earth? Perhaps in those places and moments we might, for a fleeting moment, feel that our own souls are not so different after all. The reverence we feel witnessing our child’s first breath of air might be the same reverence we feel when the sun’s first rays hit our cold winter-kissed face. That’s the kind of reverence we need to really come into relationship with the where, why, and how we’re recreating.
Respect
Once you really truly feel the depth and magnitude of the place you’re recreating, respecting how you’re doing it comes much more easily. Would you want someone playing a loud boombox at your child’s birth? Likely not. Would you want someone walking carelessly across your well-tended garden? Likely not. Respect isn’t just about packing out your poop and garbage. Respect is about considering the people you’re recreating with or near, all the flora and fauna, and the entire landscape as a whole.
These lands are sacred. This likely feels like a huge responsibility. You might ask yourself, how can I do all of that? I just want to go for a run, a bike ride, a climb, a ski —whatever—and forget all the cursedness of my “other” life—as if your other life is separate from the space that you’re recreating in. The responsibility of recreation is that it isn’t just about our needs, it’s about the needs of the entire system you’re inhabiting. To recreate is to renew yourself. It is important that this renewal does not come at the expense of the ecosystem on which this renewal (and for that matter, life itself) depends.
Your attitude—what you bring to the land—matters. How are you showing up? Are you gossiping about your neighbor? Complaining about your job? Or are you offering yourself as completely as possible to the place and the moment?
Reciprocity
Now that we’re utterly awestruck by the places we’re recreating in and can be present in those places with deep respect for ourselves, the humans and more than humans around us, and the entire landscape, we’re ready to ask the most important question of all. What can I give back? What does this place need from me? What do I have to offer this place in this moment? We all have something to give back. We all have something we can offer. It might be a simple gesture, a silent (or not silent) prayer or blessing, a song —or even just a simple thank you. But I challenge each of you to not be silent.
Resonance
The 3 R’s of recreation seemed reasonable enough, but a friend of mine reminded me of a fourth: Resonance. Resonance is the capacity of the moment to reverberate in your life long after the moment has passed. Resonance is the shift in our consciousness that moves us down the road toward self-awareness. Resonance literally changes our lives. It draws us in and helps us understand the much, much bigger picture (of which we are a part) that transcends our parochial egos.
Resonance is what keeps up going back to certain places. It’s why I make a pilgrimage to the desert southwest every fall. That land speaks to me in a way that no other land does. It makes me come alive. It fills me with a creative fire that burns all winter. Resonance is what motivates us two-leggeds to be the wild voices for the ones without voices.
So find the places that resonate with you and protect them. Honor them. Grieve their loss. Grieve your loss. Leave them gifts of your heart. And keep going back.
The ability to recreate is a gift. The opportunity to recreate on wild lands is nothing short of a miracle. We must make the time to toss our hair into the wind and let go of our day-to-day worries to just play. But, friends, play gently and thoughtfully. Give more than you take. Be aware that the balance is delicate and our footfalls can be heavy. If you have extra time or money, donate it to an organization that protects the places you love.
At a minimum, donate your reverence, respect, and reciprocity so that seven generations from now, these special places might still be the wild places that make your descendant’s hearts sing out in awe and wonder.
To join the conversation, SUBSCRIBE TO MOUNTAIN MUSINGS, and read more thoughts from Jenni about how we can Reimagine Recreation together.
Never Miss A Post
Get blog updates sent to your inbox.