Whiteout
Navigation
Whiteout Navigation
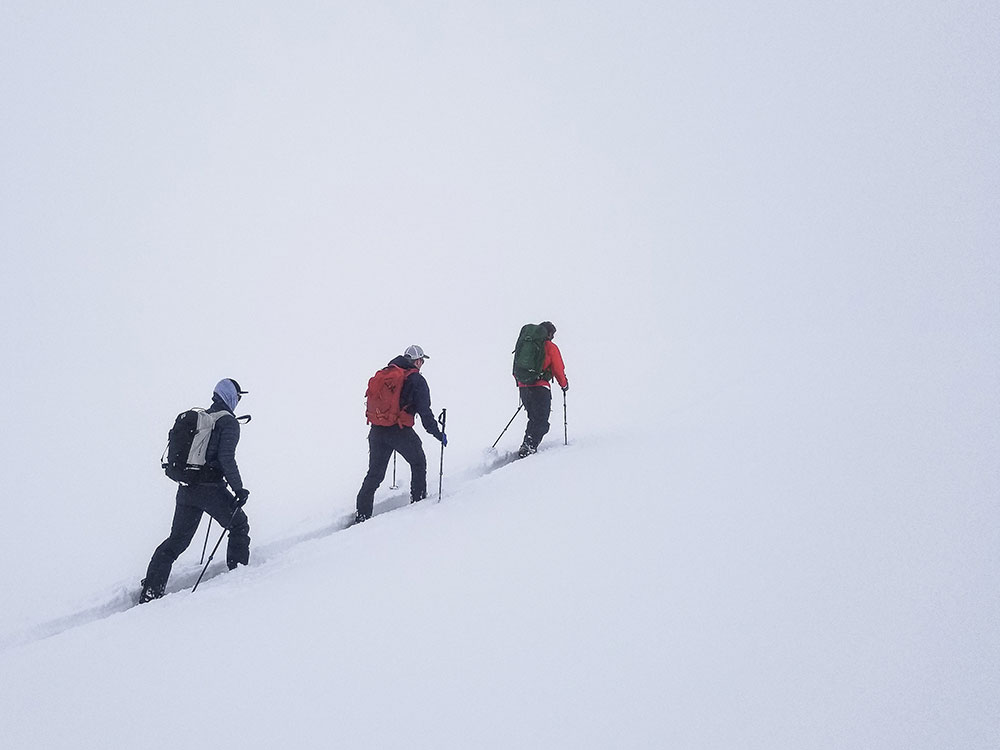
Whether you are a backcountry skier or mountain climber, learning the basics of whiteout navigation is essential for off-trail travel in the mountains. This post presents tools, strategies, and techniques to keep in your quiver for those low visibility days.
This post has two main sections:
1. Where to Move (Tools for knowing where to go in a whiteout)
Whiteout Navigation Plan | Navigation Tools
2. How to Move (Strategies and techniques for how to travel and stay on course)
Handrails | Bearing Off | Travel Techniques
Where to Move
If you get caught out in a whiteout, especially in glaciated or snowy terrain with no distinguishable terrain characteristics, it’s easy to become disoriented. Heard the phrase “inside the ping-pong ball?” Below are the things you need to know to make the best decision on where to navigate.
Whiteout Navigation Plan
The easiest way to know where to navigate in a white-out is to be proactive and have a whiteout navigation plan. These plans can be as complex and detailed as you’d like but need at the core three main details: Waypoints, Bearings, and Back Bearings. Below is an example of a complex whiteout navigation plan that also includes UTMs, distance, elevation, and munter rates. Curious how to make complex tour plans? Check out our Backcountry Skiing Pro Course for backcountry skiers and riders.

Waypoints
Waypoints are points placed along your route at regular intervals that are used for navigation. Think of them like a trail of bread crumbs you can use to navigate through terrain and then also get back home. Ideally, waypoints are placed at the start and end objective of your route, and anywhere a change in direction is required.
They also work best at obvious terrain features that you can’t miss. Those could be an individual tree or large boulder on a ridge, or a lake, cliff face, drainage, highway, or larger scale feature. Your goal is to go then from waypoint to waypoint to get to your objective and then reverse the waypoints to get back home.
Bearings
Where waypoints are the bread crumbs, bearings are how you navigate to the next bread crumb without getting lost. By recording the compass bearing in your plan to the next waypoint, you can be sure that you’re headed in the right direction (remember to adjust for declination). Don’t know how to take a bearing or what declination is? Check out our Backcountry Navigation 101 blog.
Back Bearings
Just as important as knowing your bearing to the next waypoint is the bearing back to the previous one. Back bearings get you home. Calculating the 180 degree opposite of your bearing to a waypoint gives you the back bearing. In the navigation plan above, you can see on line one that the bearing from the car to the first waypoint is 198 degrees. Therefore, 198-180 = 18 degrees for the back bearing.
Navigation Tools
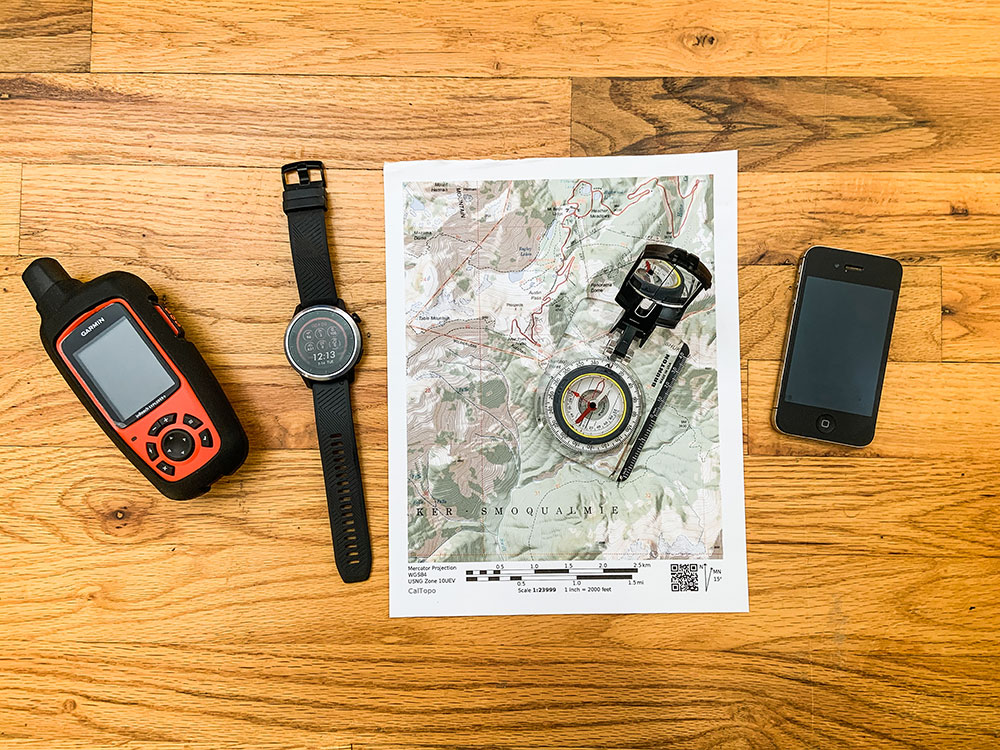
GPS
There are cell phone applications now like CalTopo and Gaia that turn your cell phone into a GPS even in airplane mode. This can be a more affordable option than to drop hundreds of dollars on a stand-alone GPS unit. Drawbacks to using your cell phone as a GPS unit is battery life, cell phones die quicker, and usability in wet conditions (like a whiteout). Touch screens don’t really work well when wet.
Altimeter
There are quite affordable altimeter watches now that (if calibrated regularly) are quite accurate. Knowing your elevation is essential when navigating in a whiteout. A GPS will provide your elevation, but it’s nice to have a back up in case your phone or GPS unit runs out of battery.
Map
Have an analog backup to the technology. If you actually want to be able to use it in a whiteout, laminate the map or at least put it in a zip lock bag to waterproof it.
Compass
The ultimate navigation tool. Much easier than trying to pull out your cell phone or a GPS in a storm. If you did your homework and have a good whiteout navigation plan, then you just need to follow your compass bearing.
How to Move
Once you decide on where to go, here are some strategies and techniques to help keep the squad together and to where you need to go.
Handrails
These are obvious physical terrain features that you can use as a “handrail” to ensure that you don’t get off route. A creek or river, ridgelines, valley bottoms, couloirs, and roads are all obvious terrain features that you’ll recognize when you hit them, even in a whiteout. Below is an example of a ridgeline handrail (the railroad grade on the Easton Glacier route up Mount Baker). Even in a whiteout, as long as you don’t stray from the ridge, you’ll make it where you want to go.

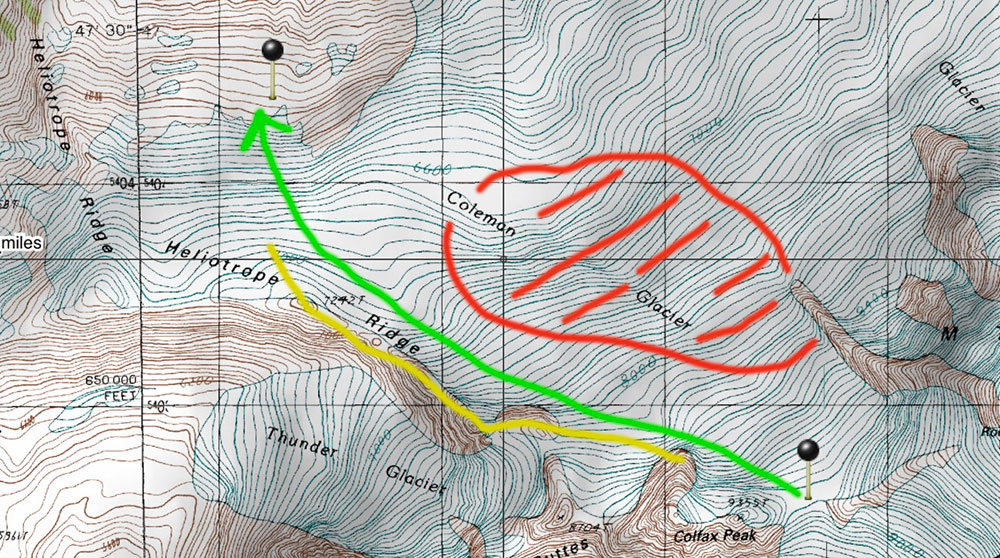
In the picture below, if trying to get from the saddle on the Coleman-Deming Route of Mount Baker (Waypoint in lower right) back to camp (Waypoint in upper left), it is important to avoid the center of the Coleman Glacier (Red) where it is heavily crevassed. By using the Heliotrope Ridge (Yellow) as a “handrail”, you can make sure that you’re headed in the right direction by keeping the ridge in sight on the left as you travel downhill (Green).
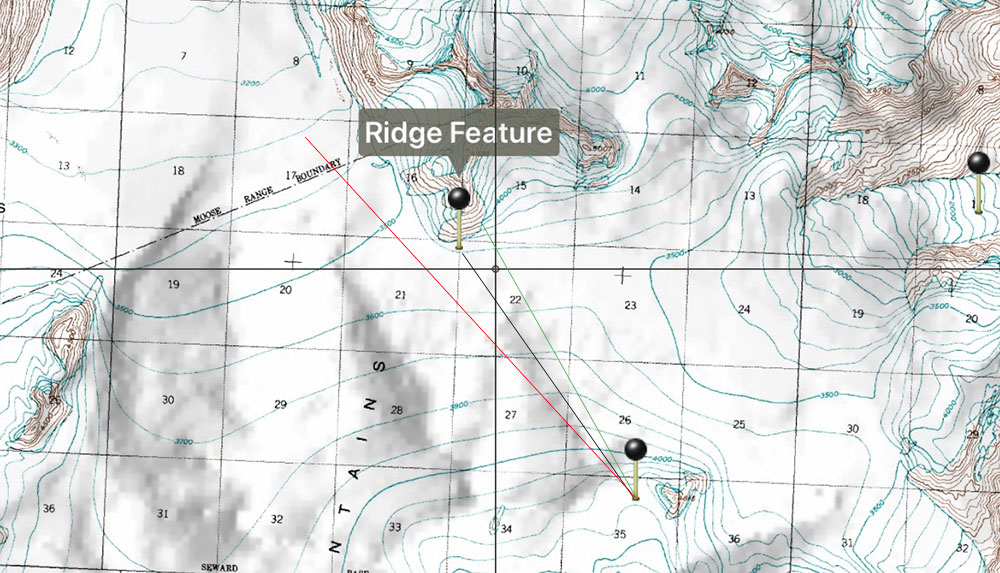
Bearing Off
This is a technique where you intentionally take a bearing that is a few degrees off of your true desired destination in order to hit an obvious handrail feature that ensures you won’t miss your destination. In the example below, in glaciated terrain, we took a bearing that was intentionally off (green) in order to hit the ridge feature where we needed to change direction. If we missed the ridge feature (red), we’d end up out in the middle of the ice field with no physical handrails to know where we were.
Travel Techniques
Iron Caterpillar
Make this your default uphill technique for ensuring the squad stays together in whiteout conditions. It’s pretty self-explanatory: Stay just behind the person in front of you (tip to tail if you’re on skis), and, like Ludacris says: “When I move you move”. Just like that.
Check the Leader
On flat terrain, most folks travel in circles thinking they are walking in a straight line. To combat this, travel in your iron caterpillar and have the last person carrying a compass and the first person acting as a reference point. Regularly check the compass bearing against the leading person and adjust their direction left or right as required.
Only two of you? Have the leader walk while the rear person stands still and holds the bearing. Instruct the leader where to go to be in line with the bearing and have them stop when they’re almost out of sight. Then Catch up to them, reacquire the bearing, and repeat.
Physical Markers
A common backcountry skiing and riding trick to be able to ride in whiteouts is to place some sort of physical thing on the slope in order to provide some contrast. Examples of this include large washers with flagging tape around them tossed at various intervals downslope, a ski pole tossed a little further ahead, or cordalette tied to a pole that you swish downhill in front of you. If you create a skin track or boot track on the way up, this could also count as a physical marker that could potentially be followed on the way back. Commonly in big glaciated terrain, folks use wands placed at regular intervals to navigate. If you go this route, make sure you pick up your wands on the way back unless you need to leave them for other parties so they don’t just become trash on the glacier.
Want to learn more? Check out our Ultimate Guide to Backcountry Skiing.
Mount Baker
Training Plan
The Mount Baker Training Plan is designed to prepare you to climb Mount Baker, assuming the most commonly climbed route – the Coleman Deming. In general, individuals with an active lifestyle should have the necessary fitness to summit Mount Baker, however, the following training plan will ensure that you arrive well prepared and confident in your abilities.
Having something to train for is motivating. When that ‘something’ involves the outdoors the motivation increases. Why? Because your time in the gym is used to enhance your adventure. The outdoors are uncertain and ever changing. Conditions and events are not ours to decide. Training for the unexpected can keep us pushing through the drudgery.
Mount Baker Training Plan Goals
- Increase your endurance. This will be done through trail running, step ups and hiking / rucking under load (30-40#).
- Strengthen your ‘Mountain Chassis’ (legs & mid-section). The stronger your mountain chassis the more efficient you’ll move.
- Exercises that strengthen those often neglected stabilizer muscles will be included to help decrease your risk of injury and keep your body balanced.
- Increase your mental fitness specific to the demands of your Baker summit.
Mount Baker Training Plan Description
This is an intense, progressive, 7-week program. The demands are high and a prior fitness base is recommended prior to starting. The time commitment is no joke. Organization is a must for success. Training runs Monday through Saturday. Sunday is a total rest day.
All training sessions are designed to be completed in order. If you have to deviate from the schedule simply keep the order and do not skip around. The volume of training increases as the program progresses. Week 7 is used as a taper week.
We want you confident and situation ready. Our hope is that this program gives you a desire to keep your fitness at a level not far from a level to complete any bid that beckons.
Equipment List
- Bench or box for step ups approximately 17” high
- Backpack or ruck sack loaded with 20-45# for hiking / rucking
- Sandbag 40# women / 60# men – an old army surplus bag filled with mulch or pellets and sealed with zip tie and gorilla tape will do the trick
- 10# Iron Plate for dragging / pushing 15# / 25# plate or bumper for rotational mid section work
- Jump Rope
- Pull Up bar
- Small Resistance Bands
- Optional – Counter for step ups / phone app or GPS watch for trail runs, hiking and rucking
Frequently Asked Questions
Q: What’s the difference between my hike and ruck efforts?
A: Hiking has prescribed vertical feet to complete. Ruck is over your choice of terrain, and should look like a fast walk / light jog.
Q: What do the first and second number represent after an exercise? i.e Sandbag Get Ups – 40#/60#.
A: First number is the load for women, second for men.
Q: There is only prescribed stretching on Wednesday’s. Should I do more?
A: Absolutely. We highly recommend spending at least 15 minutes on mobility work after every Mountain Endurance / Leg Strength session.
Q: Do you have videos / descriptions of the prescribed exercises?
A: Please see the following videos / descriptions of exercises included in the Mount Baker Training Plan.
Mini Leg Blaster
- 10x Air Squats
- 5x Lunge (each leg, 10x alternating)
- 5x Jump Lunge
- 5x Jump Squats
Full Leg Blaster
- 20x Air Squats
- 10x Lunges (each leg, 20x alternating)
- 10x Jump Lunge
- 10x Jump Squats
Mount Baker Training Plan Sessions
Session 1: Mountain Endurance / Chassis Integrity
1) 600x Step Ups with 25# Pack or Vest
2) 10 Minute Grind
– 5m Plate Drag
– 6x Seated Russian Twist 15/25#
– 6x Sandbag Get Ups 40/60#
Session 2: Leg Strength / Mountain Endurance
1) 5:00 Jump Rope
2) 10 Rounds Mini Leg Blaster with 30 Seconds Rest
3) 3.0 Mile Trail Run – Conversational Pace
Session 3: Chassis Integrity / Upper Body
1) 10 Minute Grind
– 5x Shoulder Taps
– 8x EO’s
– 10m Sandbag Carry 40/60#
– 10/10 Seconds Standing Founder
2) 5 Rounds
– 3x/5x Chin Ups
– 3x/5x Pull Ups
– 5x Strict Knees to Chest
– 8x Band Shoulder Dislocates
3) 3 Rounds
– 5m Band Walk
– 3x Shoulder Sweeps
– Camel + Frog Stretch
– Pigeon Stretch
Session 4: Mountain Endurance
1) Ruck 5.0 miles with 35# Pack
Session 5: Leg Strength / Mountain Endurance
1) 10 Rounds Mini Leg Blaster with 30 Seconds Rest
2) Hike 1,000 Vertical Feet with 25# Pack
Session 6: Mountain Endurance
1) 5.0 Mile Trail Run – Conversational Pace
Session 7: Mountain Endurance / Chassis Integrity
1) 800x Step Ups with 25# Pack or Vest
2) 12 Minute Grind
– 5m Plate Drag
– 7x Seated Russian Twist 15/25#
– 7x Sandbag Get Ups 40/60#
Session 8: Leg Strength / Mountain Endurance
1) 6:00 Jump Rope
2) 2 Rounds Full Leg Blaster with 30 Seconds Rest
3) 6 Rounds Mini Leg Blaster with 30 Seconds Rest
4) 3.5 Mile Trail Run – Conversational Pace
Session 9: Chassis Integrity / Upper Body
1) 12 Minute Grind
– 6x Shoulder Taps
– 12x EO’s
– 15m Sandbag Carry 40/60#
– 15/15 Standing Founder
2) 6 Rounds
– 3x/5x Chin Ups
– 3x/5x Pull Ups
– 5x Strict Knees to Chest
– 8x Band Shoulder Dislocates
3) 3 Rounds
– 5m Band Walk
– 3x Shoulder Sweeps
– Camel + Frog
– Pigeon Stretch
Session 10: Mountain Endurance
1) Ruck 6.0 Miles with 35# Pack – Conversational Pace
Session 11: Leg Strength / Mountain Endurance
1) 2 Rounds Full Leg Blaster – 30 Seconds Rest
2) 6 Rounds Mini Leg Blaster – 30 Seconds Rest
3) Hike 1,200 Vertical Feet with 25# Pack
Session 12: Mountain Endurance
1) 6.0 Mile Trail Run – Conversational Pace
Session 13: Mountain Endurance / Chassis Integrity
1) 1,000 Step Ups with 25# Pack or Vest
2) 15 Minute Grind
– 5m/5m Plate Drag and Push
– 8x Seated Russian Twist 15/25#
– 8x Sandbag Get Ups 40/60#
Session 14: Leg Strength / Mountain Endurance
1) 3 Rounds Full Leg Blaster – 30 Seconds Rest
2) 4 Rounds Mini Leg Blaster – 30 Seconds Rest
3) 4.0 Mile Trail Run – Conversational Pace
Session 15: Chassis Integrity / Upper Body
1) 15 Minute Grind
– 7x Shoulder Taps
– 14x EO’s
– 20m Sandbag Carry 40/60#
– 20/20 Second Standing Founder
2) 7 Rounds
– 3x/5x Chin Ups
– 3x/5x Pull Ups
– 5x Strict Knees to Chest
– 8x Band Shoulder Dislocates
3) 3 Rounds
– 10m Band Walk
– 5x Shoulder Sweeps
– Camel + Frog
– Elevated Pigeon Stretch
Session 16: Mountain Endurance
1) Ruck 7.0 Miles with 35# Pack – Conversational Pace
Session 17: Leg Strength / Mountain Endurance
1) 3 Rounds Full Leg Blaster – 30 Seconds Rest
2) 4 Rounds Mini Leg Blaster – 30 Seconds Rest
3) Hike 1,400 Vertical Feet with 35# Pack
Session 18: Mountain Endurance
1) 7.0 Mile Trail Run – Conversational Pace
Session 19: Mountain Endurance / Chassis Integrity
1) 1,200x Step Ups with 25# Pack
2) 17 Minute Grind
– 5m/5m Plate Drag & Push
– 9x Seated Russian Twist 15/25#
– 9x Sandbag Get Ups 40/60#
Session 20: Leg Strength / Mountain Endurance
1) 4 Rounds Full Leg Blaster – 30 Seconds Rest
2) 2 Rounds Mini Leg Blaster – 30 Seconds Rest
3) 4.5 Mile Trail Run – Conversational Pace
Session 21: Chassis Integrity / Upper Body
1) 17 Minute Grind
– 8x Shoulder Taps
– 16x EO’s
– 20m Sandbag Carry 40/60#
– 25/25 Second Standing Founder
2) 8 Rounds
– 3x/5x Chin Up
– 3x/5x Pull Up
– 5x Strict Knees to Chest
– 8x Band Shoulder Dislocates
3) 3 Rounds
– 10m Band Walk
– 5x Shoulder Sweeps
– Camel + Frog
– Elevated Pigeon Stretch
Session 22: Mountain Endurance
1) Ruck 8.0 Miles with 35# Pack – Conversational Pace
Session 23: Leg Strength / Mountain Endurance
1) 4 Rounds Full Leg Blaster – 30 Seconds Rest
2) 2 Rounds Mini Leg Blaster – 30 Seconds Rest
3) Hike 1,600 Vertical Feet with 35# Pack
Session 24: Mountain Endurance
1) 8.0 Mile Trail Run – Conversational Pace
Session 25: Mountain Endurance / Chassis Integrity
1) 1,400x Step Ups with 25# Pack or Vest
2) 20 Minute Grind
– 5m/5m Plate Drag / Push
– 10x Seated Russian Twist 40/60#
– 10x Sandbag Get Ups 40/60#
Session 26: Leg Strength / Chassis Integrity
1) 9:00 Jump Rope
2) Full Leg Blaster – 30 Seconds Rest
3) 5.0 Mile Trail Run – Conversational Pace
Session 27: Chassis Integrity / Upper Body
1) 20 Minute Grind
– 9x Shoulder Taps
– 18x EO’s
– 20m Sandbag Carry 40/60#
– 25/25 Standing Founder
2) 9 Rounds
– 3x/5x Chin Ups
– 3x/5x Pull Ups
– 5x Strict Knees to Chest
– 8x Band Shoulder Dislocates
3) 3 Rounds
– 10m Band Walk
– 5x Shoulder Sweeps
– Camel + Frog Stretch
– Standing Pigeon Stretch
Session 28: Mountain Endurance
1) Ruck 9.0 Miles with 35# Pack – Conversational Pace
Session 29: Leg Strength / Mountain Endurance
1) 5 Rounds Full Leg Blaster – 30 Seconds Rest
2) Hike 1,800 Vertical Feet with 35# Pack
Session 30: Mountain Endurance
1) 9.0 Mile Trail Run – Conversational Pace
Session 31: Mountain Endurance / Chassis Integrity
1) 1,600x Step Ups with 25# Pack or Vest
2) 20 Minute Grind
– 5m/5m Plate Drag & Push
– 10x Seated Russian Twist 15/25#
– 10x Sandbag Get Ups 40/60#
Session 32: Leg Strength / Mountain Endurance
1) 5 Rounds Full Leg Blaster – 30 Seconds Rest
2) 5.5 Mile Trail Run – Conversational Pace
Session 33: Chassis Integrity / Upper Body
1) 20 Minute Grind
– 10x Shoulder Taps
– 20x EO’s
– 20m Sandbag Carry 40/60#
– 25/25 Second Standing Founder
2) 10 Rounds
– 3x/5x Chin Ups
– 3x/5x Pull Ups
– 5x Strict Knees to Chest
– 8x Band Shoulder Dislocates
3) 3 Rounds
– 10m Band Walk
– Elevated Pigeon Stretch
– 5x Shoulder Sweeps
– Camel + Frog Stretch
Session 34: Mountain Endurance
1) Ruck 10.0 Miles with 35# Pack – Conversational Pace
Session 35: Leg Strength / Mountain Endurance
1) 5 Rounds Full Leg Blaster – 30 Seconds Rest
2) 1,800 Vertical Feet Hike with 35# Pack
Session 36: Mountain Endurance
1) 10.0 Mile Trail Run – Conversational Pace
Session 37: Mountain Endurance
1) 600x Step Ups with 25# Pack or Vest
2) 10 Minute Grind
– 5m Plate Drag
– 5x Seated Russian Twist 15/25#
– 5x Sandbag Get Ups 40/60#
Session 38: Mountain Endurance / Upper Body
1) 3.0 Mile Trail Run
2) 5 Rounds
– 3x/5x Chin Up
– 3x/5x Pull Ups
– 5x Strict Knees to Chest
– 8x Band Shoulder Dislocates
Sessions 39-42: Rest
Tonia Boze founded Terrain Gym in 2007 as a strength and conditioning facility to specialize in training athletes specifically for their sport or profession.
Tonia Started working in the fitness industry in 1996. Certifications / Seminars include – Mountain Athlete Coach, Mountain Tactical Institute Advanced Programming, Catalyst Athletics, USA Gymnastics National Congress, Primal Blueprint Nutrition Coach, Precision Nutrition Level 1 Coach, BioForce Conditioning Coach, BioForce HRV, CrossFit Level 1.
Reflections from the Rope Line
Greg Morgan climbed Mt. Baker as a guest with Baker Mountain Guides. He has written a thoughtful account of his experience on his personal blog, and graciously permitted us to share and re-post his words here. To read more of Greg’s writings, please visit his Blog: Midlife Sabbatical
One of my great delights this summer has been a climb of Mount Baker (10,781’) in northwest Washington, a mountain that one guide book describes as “pound for pound, the iciest of the Cascade volcanoes.” My climb was blessed by fabulous companions, expert guides, and perfect weather, and it left me with wonderful memories that will be food for joyful reflection for years to come.
The journey from base camp (around 6,000’) to the summit is really just a long walk, requiring no rock-climbing skills. The catch, of course, is that the route is over snow and ice virtually all the way, in places quite steep, and much of it over the top of an active glacier. The use of an ice ax and crampons (snow spikes attached to one’s boots) are essential, and we were roped together in teams of four for the entire duration (except for on the broad, flat summit). A few interesting reflections rose for me as I climbed and descended this mountain in unison with the three other companions on my rope line.
The chief purpose of the rope line was captured perfectly in the book of Ecclesiastes more than 2000 years ago: “Two are better than one, for their partnership yields this advantage: if one falls, the other can help his companion up again” (Eccl. 4:10). And four are better than two, for if one falls there are three to help. We had all practiced self-arrest techniques the previous day, in which the ice ax is used to stop a slide on steep snow. But one’s confidence is increased immeasurably by knowing that others are there to help break any such fall and help out as needed. It is much easier to attempt new goals that feel risky when one is surrounded by community.
For much of the climb we were “on the long rope,” separated from each other by thirty feet or so (as pictured above). Most of the rope between any two climbers should glide along the surface of the snow in a straight line, with no excess slack. Each climber should be able to move fairly independently, but the rope should become taut immediately in the event anything unexpected happens. This tension is never maintained perfectly, but we were taught the motto “better to be a jerk than a slacker.” The lesson I take from this: when living in a community, maintaining space and boundaries are important, but it’s better to be in a little too frequent contact than to drift apart and lose touch.
During one long, easy part of the descent, I was in the lead position on the second rope. My companion Bruce was in the back position on the first rope, close enough to begin a conversation. We drew closer to each other to be able to speak more easily, but the guide on my rope called out “Greg, maintain the same distance from Bruce as we are keeping between those of us on this rope.” I replied, “Will do, but I am curious as to why.” He replied, “This is an active glacier, and one can never tell for sure when one might be walking on a snow bridge over a crevasse. We never want two people walking over a snow bridge at the same time – it increases the risk of a bridge failing, as well as the consequences.” Clearly, sometimes there are more reasons than we realize for maintaining healthy spacing between us!
Still, there are also times for pulling together more closely, and in climbing this is called “short roping.” In this technique, the climbers have only about eight feet between them, and the goal, in the words of our guide, is to “behave as a single organism.” The rope has little slack, so that any slip can be stopped quickly. We used this technique when climbing “the Roman Wall,” a slope of snow that increases from a 20% grade to 40% in the course of ascending 800 vertical feet. We moved with synchronized steps, each climber utilizing the prints of the person just ahead to ensure good footing. We found a pace that we could all sustain comfortably, and then we ascended steadily—as one organism.
One climbing site opined that the chief advantage of this method is psychological: “Short-roping greatly increases the climbers’ confidence. As a result they are more relaxed and concentrate better on secure footing, thus greatly reducing the probability that they fall.” This accurately described my own experience, especially during the more challenging descent of the Roman Wall, where I was in the lead—the comforting, encouraging chatter from my rope-mates right behind me really settled my nerves and helped me focus on placing my feet and ice ax. The immediate tug of the rope I felt on the one or two occasions where I slipped a bit reminded me of the extra security my companions were providing me and further enabled me to be a better climber. As one living, breathing, communicating, moving organism, we descended safely down the steepest pitches of the wall and back to easier terrain.
Life on the short rope, or any rope—literal or figurative—can only be sustained comfortably for so long. We all instinctively desire independence in our movements and actions, so it felt good to move back to the long rope after completing the steepest part of the descent, and even better to shed the ropes completely once we got off the snow. We also feel best living in a place with sufficient security that such protective measures aren’t generally necessary, so, as always, I began to breathe a little more easily once I returned to the comforts of civilization.
Knowing how many people in the world today live without the basic security I enjoy, I recognize what a luxury it is to be able to undertake such adventures voluntarily. But I am nonetheless grateful for the opportunity this climb provided me to experience living in close community in an entirely different way. And I don’t need to stay tied in to a rope line in order to try to apply these lessons to living in community every day.
The Devil You Know – Green Creek Traverse
My husband is a mountain guide and a business owner, John Minier of Baker Mountain Guides to be exact. He typically works weekends and every hour of every day when he is home. I work a normal 9-5 Monday-Friday job. We rarely have the same days off. So when the opportunity presented itself for both of us to have two consecutive days off in a row, we jumped on it, even though John had just come off a trip that previous night and was exhausted. This is how most stories that don’t have the fairy tale ending start.
The Twin Sisters Range has long held a soft spot in my heart. Close to home, virtually devoid of humans, and largely wild and untamed. For several years now, we have been venturing into this area. This year we wanted to try to complete a traverse of the Green Creek Glacier, linking up multiple peaks along the way. It’s not a hard or long traverse. It can be done in less than two days, presuming you have the right weather.
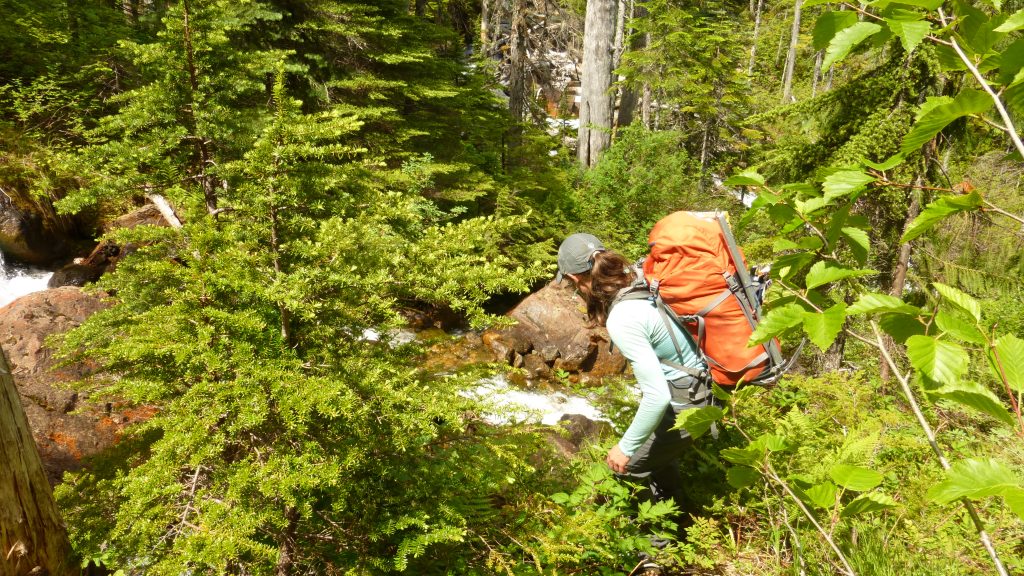
Our favorite way to access the area is via the Elbow Lake Trail from the Middle Fork of the Nooksack. At only 45 minutes from our door, it’s the closest access for these kinds of adventures, plus you get an AWESOME bushwhack through neck deep, unbelievably dense blueberry bushes. As the crow flies the bushwhack is a mile or less, but it sure does feel a lot longer when all you can see is the blueberry branch in front of you, hour after hour. What keeps you going is the occasional view of the valley ahead.
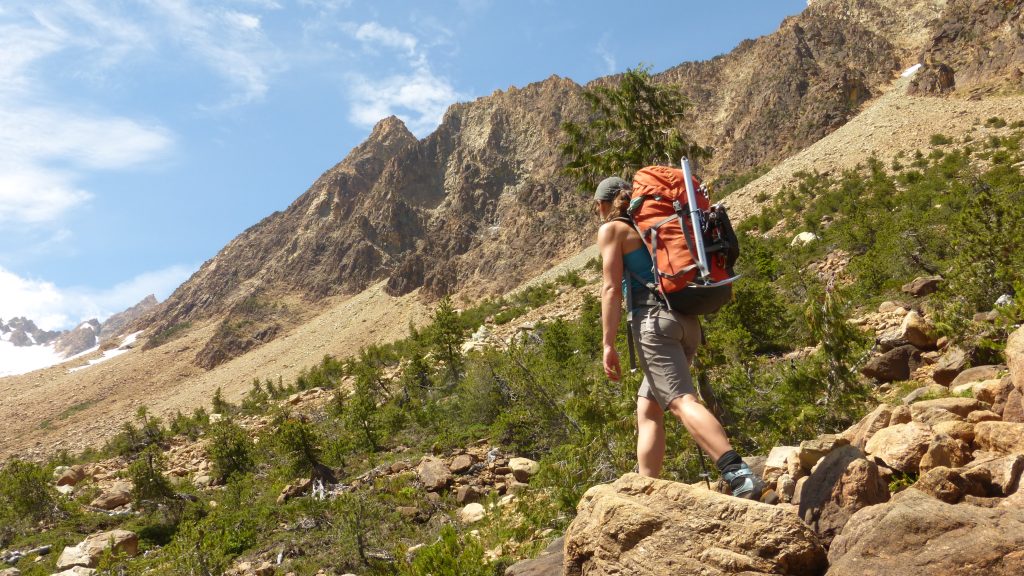
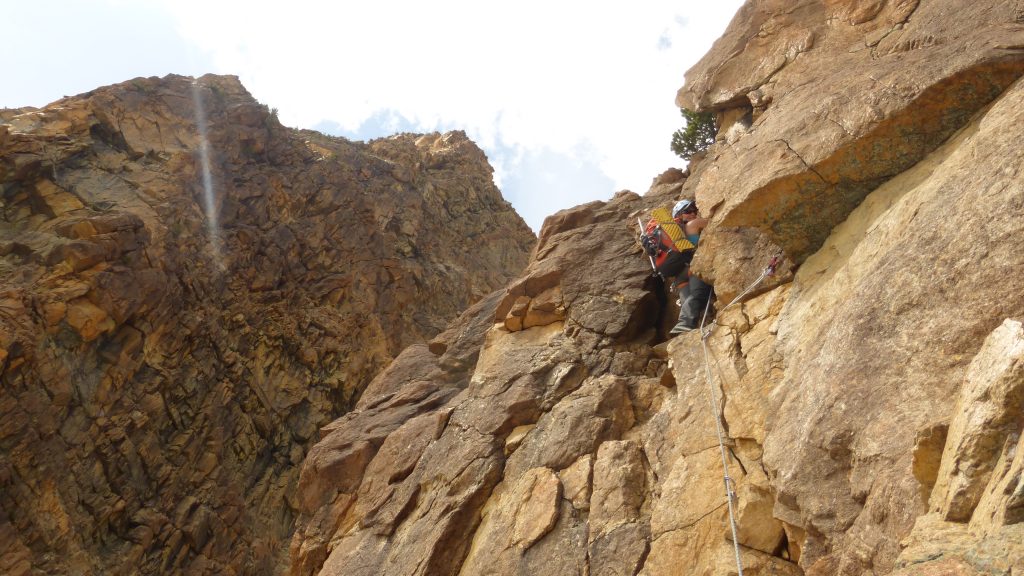
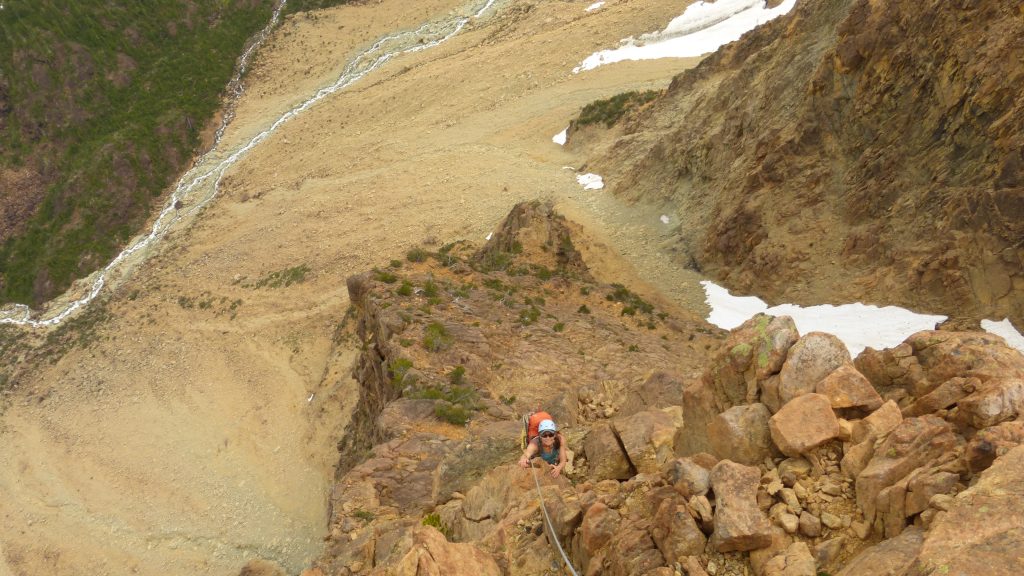
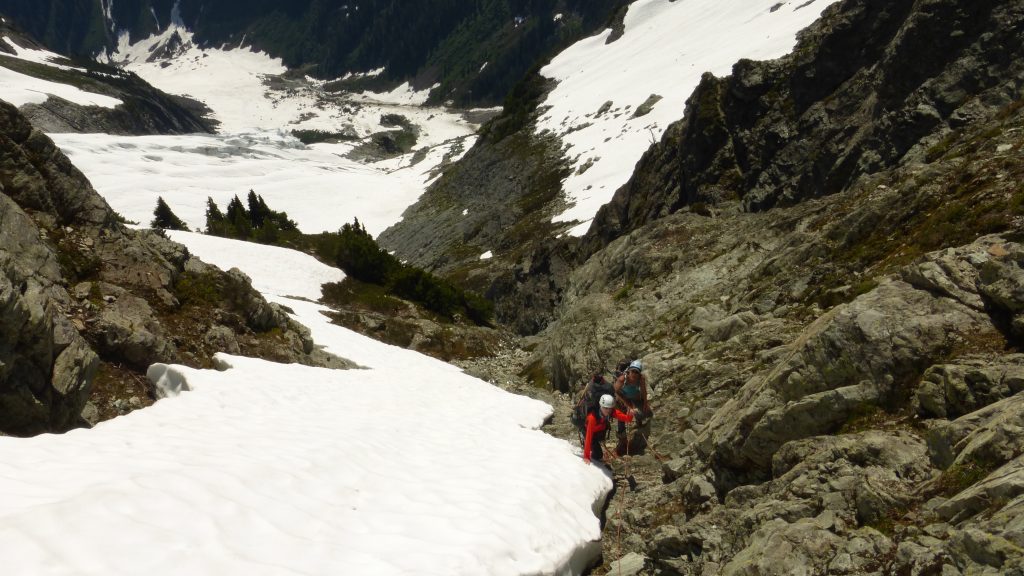
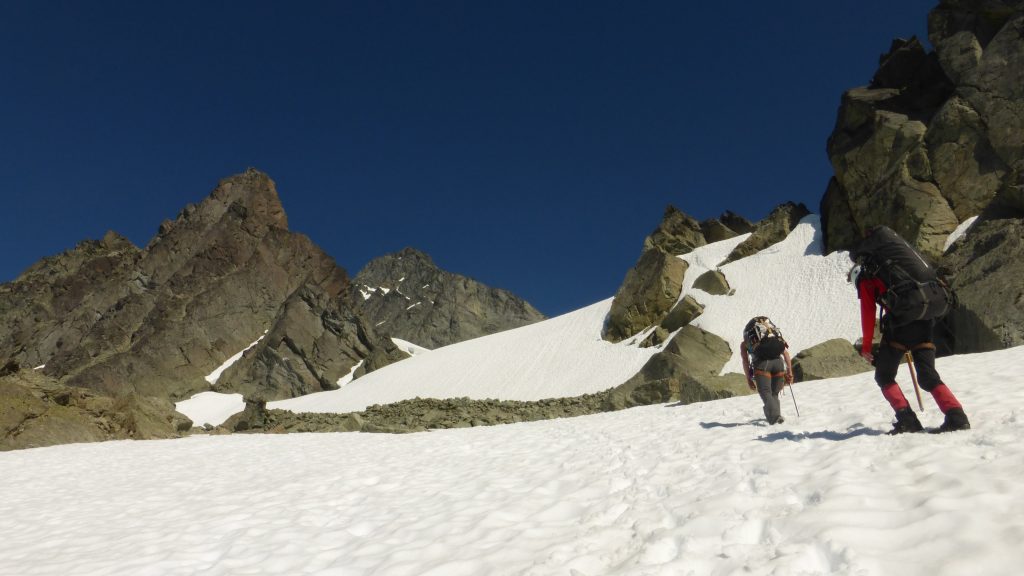
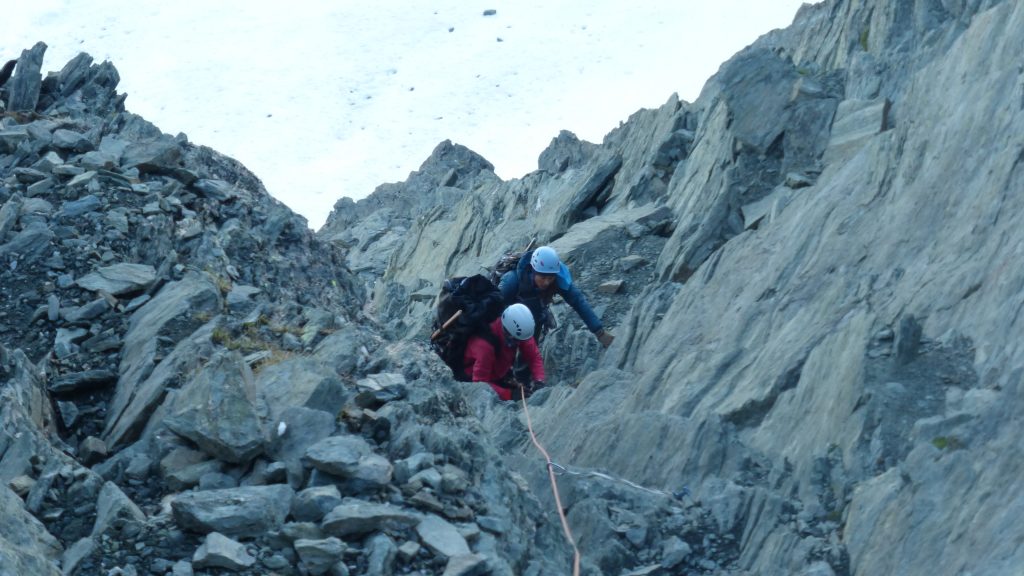
We got a late start, were on the trail around 11am, and at the base of the Green Creek Arête around 130pm. After some excellent scrambling and low 5th class climbing up the Arête, we topped out, pleased to find that the loose talus that dominates the area was still covered in snow. Both John and I were also grateful that some afternoon clouds had moved in and cooled the solar cooker that we were currently walking through. However, the clouds quickly turned into more than just shade. By the time we reached the base of the South Twin it was raining, not hard per se, but constant. We continued up the South Twin Sister in the rain, through some of the most fun scrambling I’ve done in the range yet. We topped out around 630pm, hoping to bivy on the summit. The view to the west was a black wall of water. Thanks NOAA.
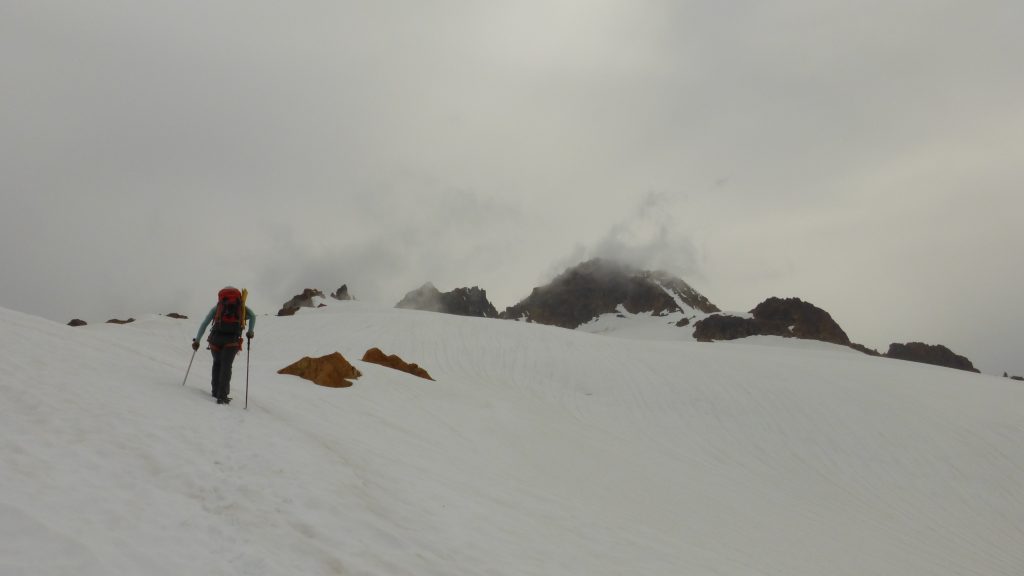
For those of you who live in the Pacific Northwest, this is a more common experience than one would like. NOAA will call for clear sunny skies and what you’ll actually get is rain. That’s all well and good if you have the right gear for it. We however did not. We had planned on going fast and light. We were going to sleep under the stars sans tent or hardshell jackets, and in my case my NeoAir sleeping pad.
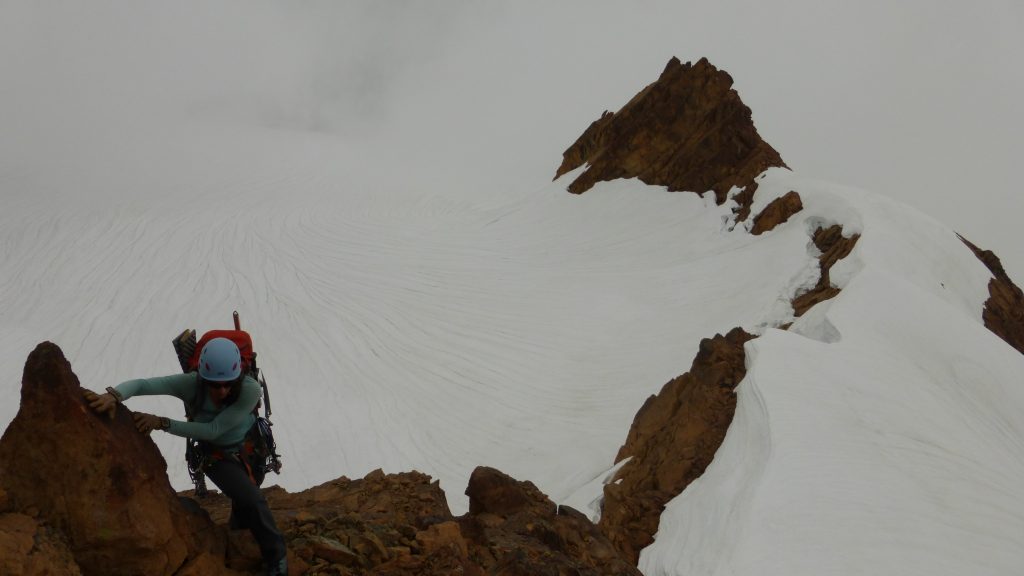
We poked around the summit of the South Twin Sister for a few minutes and pondered just going for it. If we kept moving, we could be over Jaw’s Tooth and Skookum before dark and we could just keep going until the storm (hopefully) passed. As John so keenly stated though, do you take the devil you know or the devil you don’t? The devil we knew involved scrambling back down the South Twin Sister, and rappelling and scrambling down the Green Creek Arête…on wet rock. Then there was the walk down the Field of Dreams – a 1000 vertical foot talus slope sometimes covered in sand and dirt. It’s a total disaster as far as walking is concerned. Many a people have lost some skin here. None of the rocks actually fit together, so pretty much everything you step on moves, no matter what size the rock. I’ve spent a lot of time on the Field of Dreams from my other trips into the range, so I have a sort of kindred relationship with the hellish slope. We chose the devil we knew.
We debated pushing out to the car that night. It was already after 9pm and we still had some awesome bushwhacking to do. Instead, we opted to camp in the basin at what I lovingly call “The Spa.” I’d been there before on a previous altered mission and luckily was able to find it again. It’s this nice camp spot in the bottom of the basin with two springs of fresh running water, and awesome sandy bivy spots amongst huge boulders. One of them was overhanging just enough to protect us from the rain. Unfortunately I had chosen not to bring my NeoAir sleeping pad. John, being the gentleman that he is offered me his. However, being the stubborn woman I am, I declined, purporting that I needed to learn my lesson.
We woke up early (John well rested and me exhausted from a rough night on the dirt) and stopped at the Refugio for a scone and coffee. We were home by 1030am. John and I were both a bit disheartened because the weather that morning was perfect, and we have very much wanted to complete the traverse. Sometimes in those moments when you make the choice to turn around you forget the awesome journey that brought you to where you were. We had perfect weather the entire way in and made it to the top of the South Twin Sister, which neither of us had done before. We had a wonderful night out in one of the most beautiful basins in the area and we made it out safely. We ended up grateful for the experience despite not being able to complete the objective. For us, everything is a work-life balance, and the balance is tricky. The scale seems to tip to the work side more often than not. We ended up with the best of both worlds this weekend. We got home early and were able to spend the evening on the river with our pup Tatlow playing fetch and chasing bunny rabbits!
And besides, if we have completed the entire traverse, what would we do next year?
Baker Mountain Guides Crusher Award
May I present to you the Baker Mountain Guides Crusher Award. We’ve never given one before, and we may never give out another one again. We rarely post about specific clients or trips because each trip is an expression of the hard work and passion of each of our clients. There is so much joy to share from each adventure. However, this past month, we had the pleasure and honor of accompanying Michael Hannan on his successful summits of both Mount Baker via the Coleman-Deming Route and Mount Shuksan via the Fisher Chimneys Route. So he climbed both peaks in a week, no big deal right? Read on. Michael is 70 years old and fit as a fox. He drove up here from Salt Lake City, climbed Mount Baker and Colfax Peak in two-days (which is normally a three day climb), took a day off, and then climbed Mount Shuksan in two days (which we normally like to do in four). And he crushed it. He carried a heavy pack and kept a pace that most thirty-year-olds would be envious of.
It was a truly inspirational experience for me. I found myself repeatedly reminding myself throughout our two days on Shuksan that this guy was 70 years old. Michael will tell you himself, you cannot let age be an excuse. Michael is an avid hiker from the Wasatch Range of Utah and began mountaineering at the age of sixty: yes sixty years old. He has a family and is retired from a career as a pilot.
For those of you who know the Fisher Chimneys route on Mt. Shuksan, it’s a party now – pay later trail. Right from the get go, you descend 800 feet down into the Swift Creek Valley. This is fine on the way in, but it means you must hike up the same 800 feet of vertical at the end or your trip. Our last day was a hot one. As we exited the Fisher Chimneys onto the snow fields at Lake Ann, we all started to cook like turkeys in a rotisserie. Michael however, is a fan of Robert W. Service poetry and kept us sane by reciting “The Ballad of Blasphemous Bill.” It took near 10 minutes for him to recite the entire poem, and I can’t imagine that he missed nary a word. Truly beautiful and amazing. This was immediately followed by snow angels at Lake Ann and glissading down the basin back towards Swift Creek. I remember looking back uphill and seeing this 70-year old man glissading with this huge smile on his face. He was having the time of his life and I felt so grateful to be able to share it with him.
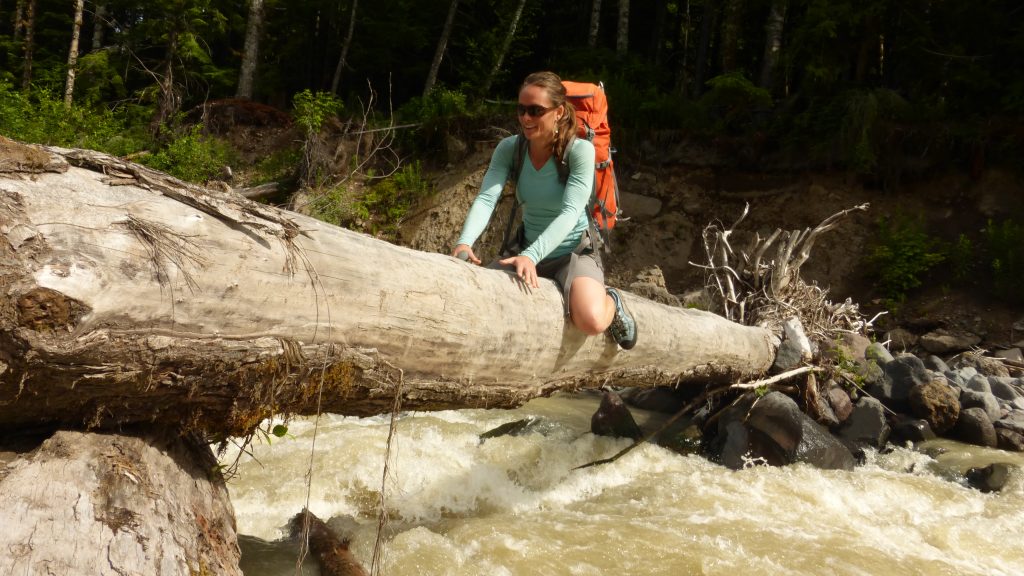
We trudged on, punching through warming snow bridges to our final major crossing of Swift Creek. The whole week prior had been warm and I could hear the creek roaring from a ways away. I knew that is was potentially too high to cross, and that we might have to bushwhack through shallow snowpack back to the head of the valley. Not a fun prospect for the end of your trip. We got to the creek and the normal crossing was, in fact, too high. I looked upstream and found a slightly mellower place to cross, but there were no rocks or logs. We were just going to have to ford the creek. Michael looks back to John and says, “Why not? It’s the only thing we haven’t done so far!”
Michael is probably tired of people commenting on what a crusher he is. No matter. He’s earned this award. He was a joy and an inspiration to spend two days in the mountains with and it’s a trip I will never forget! Thank you, Michael!
Never Miss A Post
Get blog updates sent to your inbox.