Backcountry Skiing Courses
Backcountry Skiing Courses and Ski Mountaineering Courses
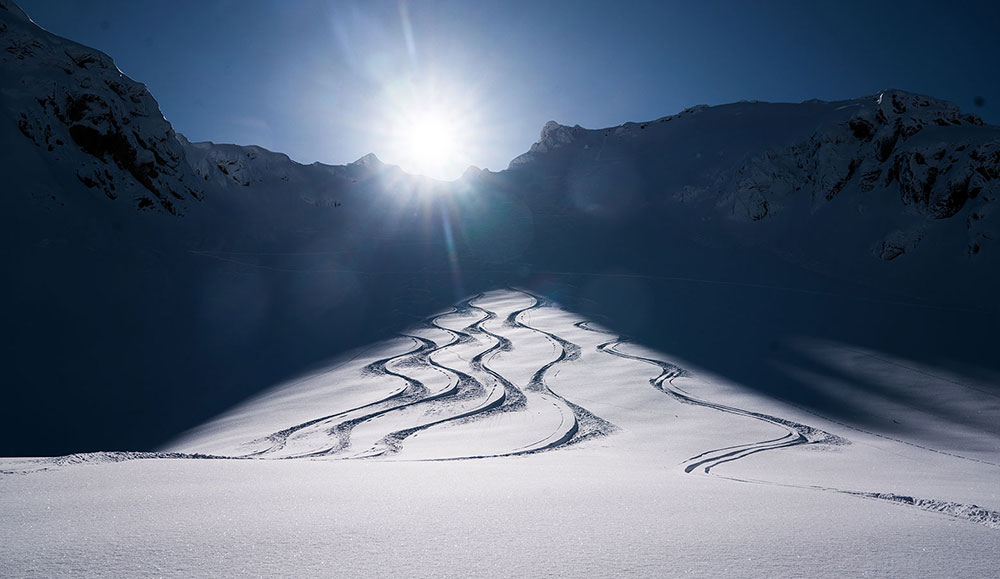
A pair of skis are the ultimate transportation to freedom.
~ Warren Miller
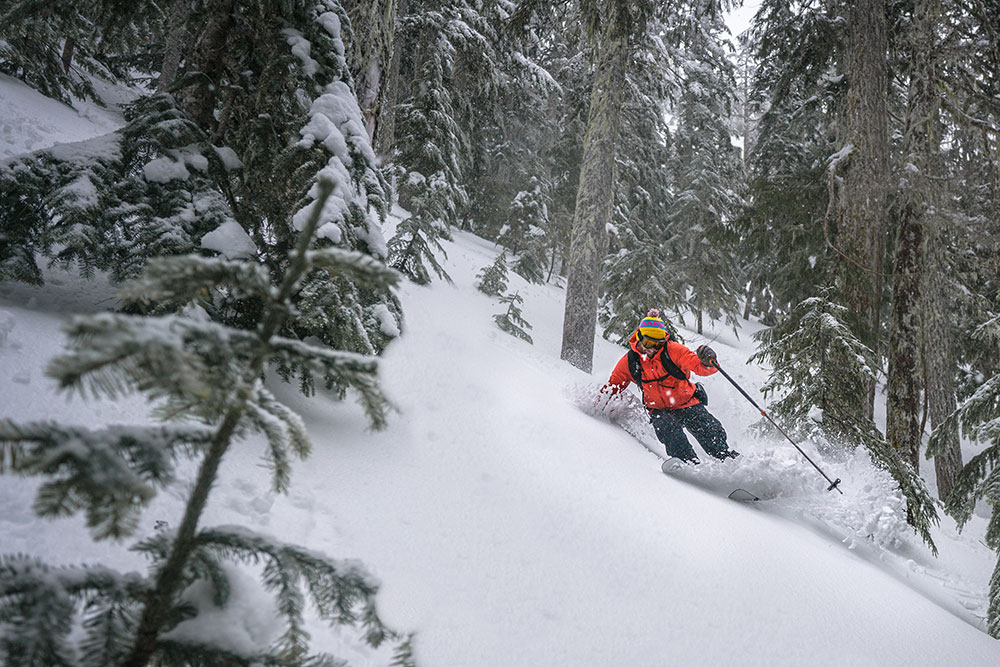
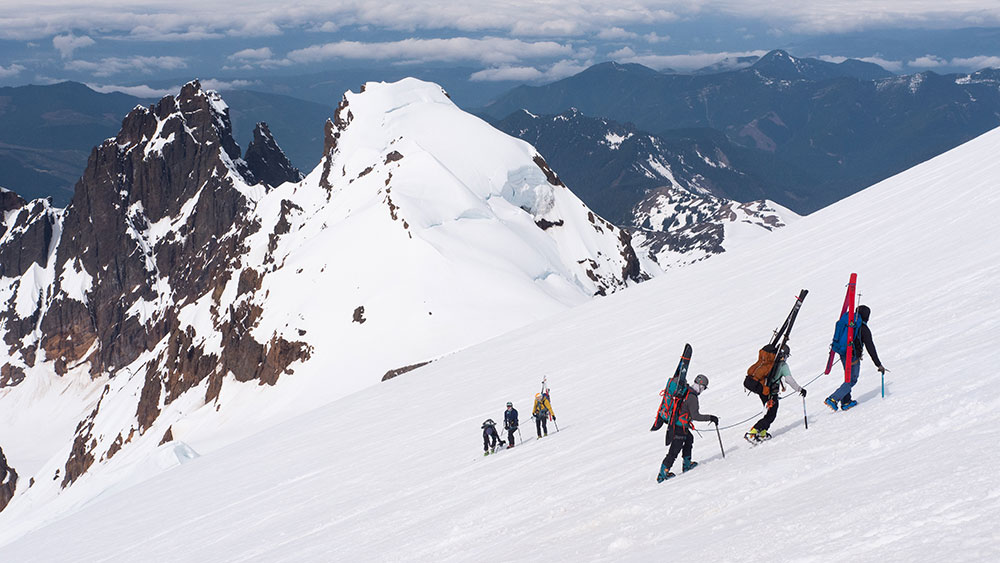
The popularity of backcountry skiing and snowboarding has exploded in recent years. Crowded ski areas and costly passes are pushing people out of bounds. The backcountry provides a sense of adventure and freedom that cannot be achieved by riding a lift. However, backcountry touring involves much more than simply skiing and riding. Avalanche education is a common starting point, but it is not the complete package. We have found that new backcountry skiers and snowboarders often underestimate the challenges of backcountry touring. While most people don’t ultimately kill themselves, they often wind up sweaty, frustrated, and sometimes lost. Suffice it to say that more than one backcountry novice has spent an unplanned night in the mountains.
Which is why we, at Baker Mountain Guides, believe in the value of backcountry skiing and snowboarding education. The purpose of this post is to provide a summary of Baker Mountain Guides backcountry skiing and snowboarding curriculum so that you can make an informed decision regarding your backcountry education. Additionally, we’ll review the venues that we use for different elements of our curriculum, as well as regional weather and snowpack trends.
Backcountry Courses | Backcountry Venues | Weather and SnowpackBACKCOUNTRY COURSES
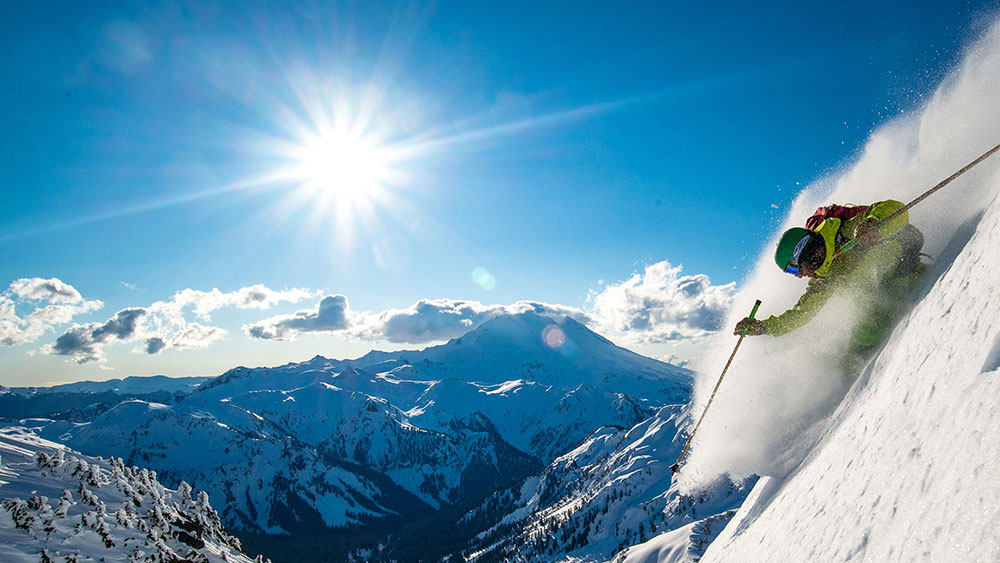
The learning curve is steep and the consequences grave, but fear not, fellow travelers. Our backcountry skiing courses and ski mountaineering courses are specifically designed with the recreational backcountry traveler in mind. No matter your goal, there’s a course for your specific needs. Our well-scaffolded curriculum paired with the rugged beauty and record snowfalls of Mount Baker, the Twin Sisters, and the North Cascades makes for an unforgettable learning experience.
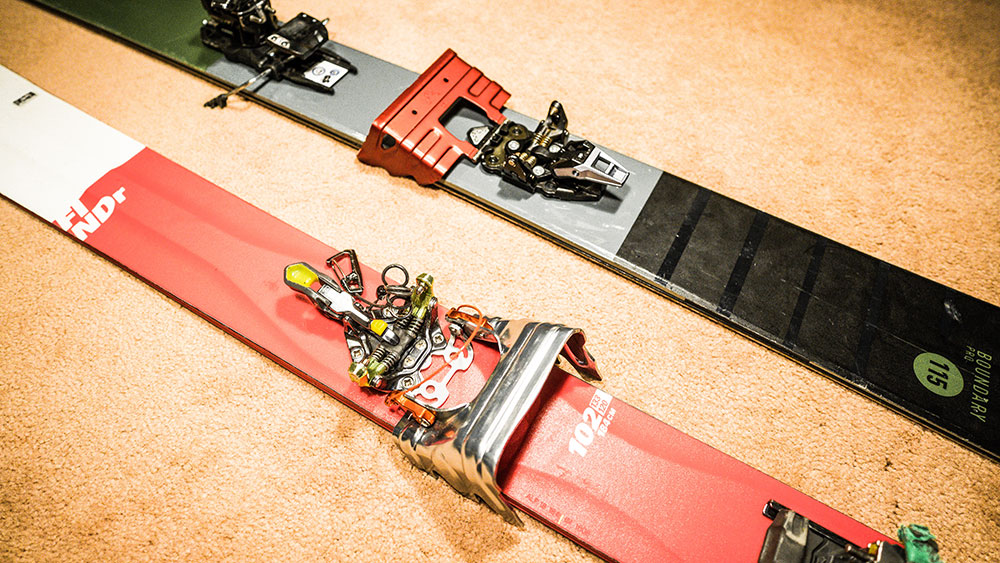
All of our backcountry skiing courses and ski mountaineering courses are broken up into either Tech Courses or Pro Courses. Tech Courses are designed to provide specific technical knowledge in a short course format. Pro Courses, on the other hand, are for recreational backcountry skiers and snowboarders wanting to tour at the same level as ski and avalanche professionals. Pro Courses offer the chance for student-led objectives and mentorship while tech courses are led by instructors who demonstrate skills and allow time for practice. Below are our five available backcountry skiing courses and ski mountaineering courses.
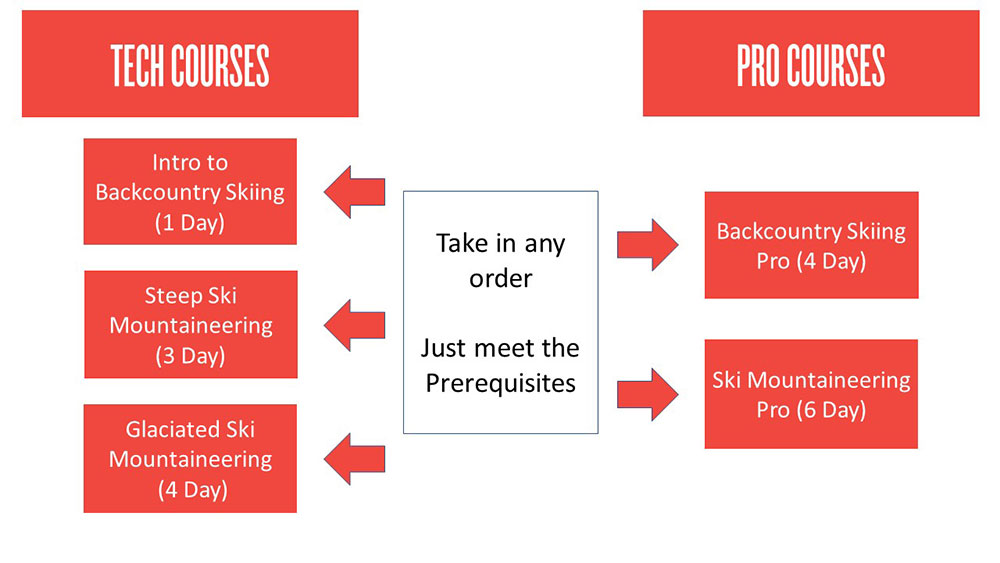
TECH COURSES
Baker Mountain Guides backcountry tech courses are designed for those seeking a concise and affordable approach to learning technical backcountry skiing and riding skills. From introductory skinning techniques to rappelling into couloirs, our tech series has you covered.
Our three Tech Courses are: Intro to Backcountry Skiing Course | Steep Ski Mountaineering Course | Glaciated Ski Mountaineering Course
INTRO TO BACKCOUNTRY SKIING COURSE
Required Skiing & Riding Ability: Intermediate
Duration: 1 Day
Cost: $200
Baker Mountain Guides Intro to Backcountry Skiing Course is designed for competent skiers and snowboarders wanting a crash course in backcountry travel. The backcountry is NOT an ideal place to learn how to ski or ride, so we require that participants have intermediate to advanced downhill sliding abilities. As ski guides, we understand that the goal of backcountry touring is to ski and ride great terrain in great snow, so we have built the Intro to Backcountry Skiing Course around making turns. Instructors will assist students in the use of any new equipment, introduce common travel and efficiency techniques, and provide a running dialog of their decision-making process. Avalanche awareness and rescue will be sprinkled throughout the curriculum.
Back to Tech Courses | Back to Top
STEEP SKI MOUNTAINEERING COURSE
Required Skiing & Riding Ability: Advanced
Duration: 3 Days
Cost: $700
Baker Mountain Guides Steep Ski Mountaineering Course seeks to equip experienced backcountry skiers and snowboarders with high-angle ropework skills that can be employed to minimize the likelihood of falling when accessing steep terrain. Students will learn techniques such as ski lowers, ski rappels, and belayed skiing and riding. Although the Steep Ski Mountaineering Course includes steep skiing and riding objectives, the curriculum does not cover decision making in avalanche terrain. If you are wanting to develop your skills as a leader in steep, backcountry terrain, check out our Ski Mountaineering Pro Course
.Back to Tech Courses | Back to Top
GLACIATED SKI MOUNTAINEERING COURSE
Required Skiing & Riding Ability: Advanced
Duration: 4 Days
Cost: $1000
Skiing and riding glaciated terrain presents objective hazards in the form of crevasses. To mitigate crevasse hazard you must 1) know how to not fall in a crevasse and 2) know how to get yourself out if you do. Baker Mountain Guides Glaciated Ski Mountaineering Course is designed to equip students with both skill sets. Additionally, skiers and snowboarders utilize the rope differently than climbers and the curriculum is customized to address these differences. The course concludes with a ski descent of Mount Baker proper.
Back to Tech Courses | Back to Top
PRO COURSES
Pro Courses are designed for recreational skiers and snowboarders wanting to develop their leadership skills and operate at a professional level. The only certifying body in the United States for professional Mountain Guides is the American Mountain Guides Association (AMGA). If you’re looking to become a ski guide, our courses can definitely help you gain the knowledge to get better at your craft, but you won’t come away with a certification. If certification is not your goal, just the professional level of knowledge, our courses offer a similar curriculum as these industry professional-level courses but tailored specifically to you, the recreationist.
Advanced skiing and riding ability, as well as AIARE Level 1 avalanche training, are pre-requisites for our two Pro Courses:
Backcountry Skiing Pro Course | Ski Mountaineering Pro Course
BACKCOUNTRY SKIING PRO COURSE
Pre-requisites:
- Advanced skiing or riding ability
- AIARE Level 1 Avalanche Course
Duration: 4 Days
Cost: $800
If you’re just getting into backcountry skiing, the common progression is: take a level-one avalanche course and then you’re set loose to gain experience and “figure it out” while hopefully not dying in the process. To fill this void, we developed the Backcountry Skiing Pro Course. The idea behind the Backcountry Skiing Pro Course is to teach strong skiers and snowboarders how ski guides successfully plan and execute backcountry tours in unfamiliar terrain. Students learn how to research terrain options as well as weather, snowpack, and avalanche conditions so that they can perform professional-level hazard assessment. The field curriculum focuses on strategies for maximizing efficiency and margins of safety so that you can go big AND go home at the end of the day.
Back to Pro Courses | Back to Top
SKI MOUNTAINEERING PRO COURSE
Pre-requisites:
- Advanced skiing or riding ability
- AIARE Level 1 Avalanche Course
- Backcountry touring and avalanche hazard assessment experience
Duration: 6 Days
Cost: $1500
Ski mountaineering essentially requires cross-disciplinary proficiency in backcountry touring and technical climbing. Many people are strong and experienced backcountry skiers and snowboarders, and many people are strong and experienced climbers, but few people are both. Baker Mountain Guides Ski Mountaineering Pro Course is designed for experienced backcountry skiers and snowboarders who want to ski off of summits. The curriculum focuses almost entirely on ropework and movement skills for traveling through technical terrain, be it steep or glaciated. Winter camping techniques are covered as well since many ski mountaineering objectives require multiple days.
The Ski Mountaineering Pro Course challenges students to research terrain and conditions, evaluate hazards, and make decisions regarding what to ski/ride and why. Instructors provide mentorship throughout the process, with the goal of developing our students into both leaders and peers.
Back to Pro Courses | Back to Top
BACKCOUNTRY VENUES
Baker Mountain Guides backcountry ski courses and ski mountaineering courses are built around a number of exceptional venues that provide a diversity of terrain options. In fact, we’re confident that we offer the absolute best terrain for learning how to backcountry ski and snowboard. Nowhere else in the county will you find better access to traditional backcountry touring, steep ski mountaineering, and heavily glaciated, big mountains. Anything that you could possibly do on a pair of skis or snowboard, you can do with Baker Mountain Guides.
Mount Baker Backcountry | Twin Sisters Backcountry | Mount Baker Proper | Snowmobile Access
MOUNT BAKER BACKCOUNTY
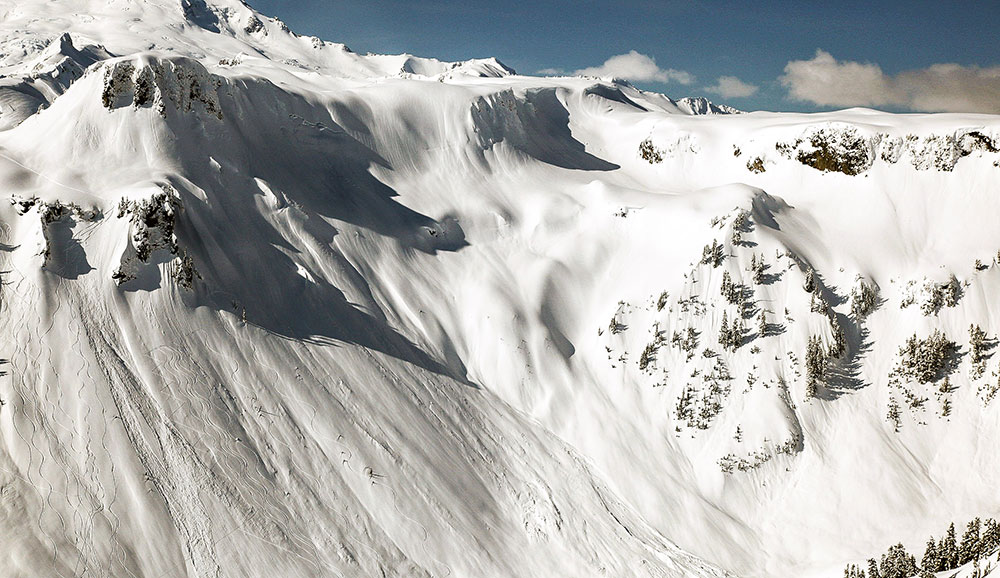
Drive time from Bellingham: 80 minutes one-way
Elevation: 4200 ft. – 6000 ft.
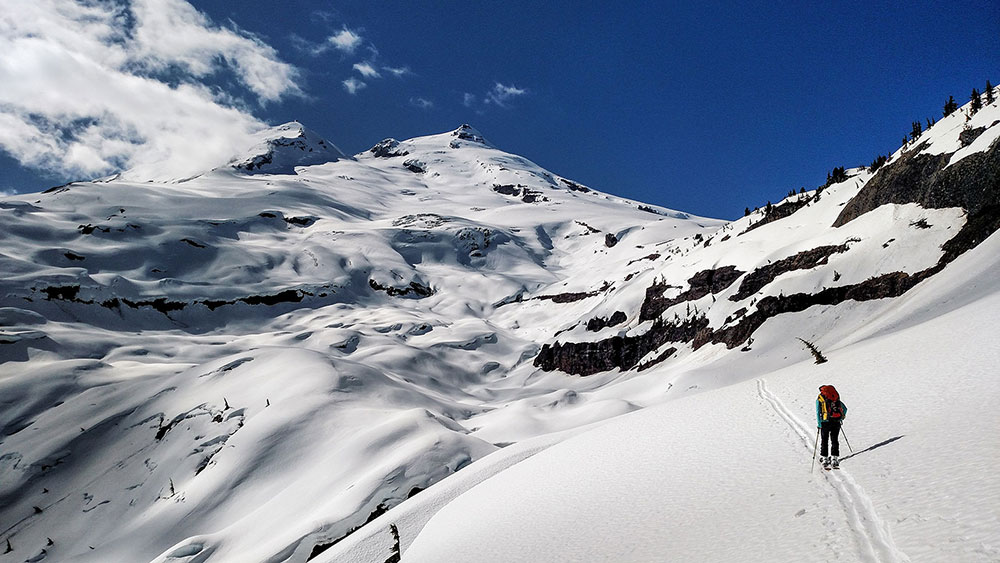
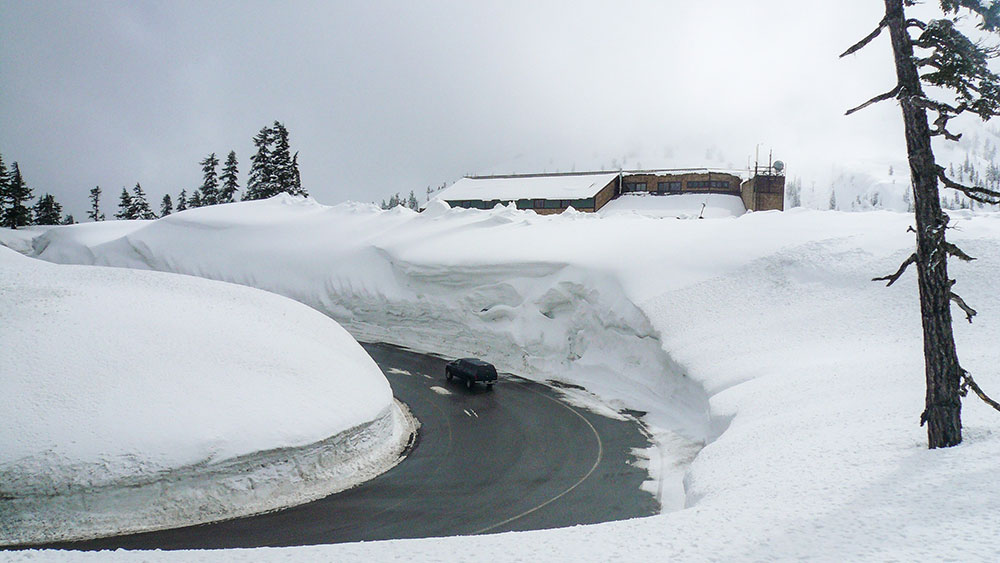
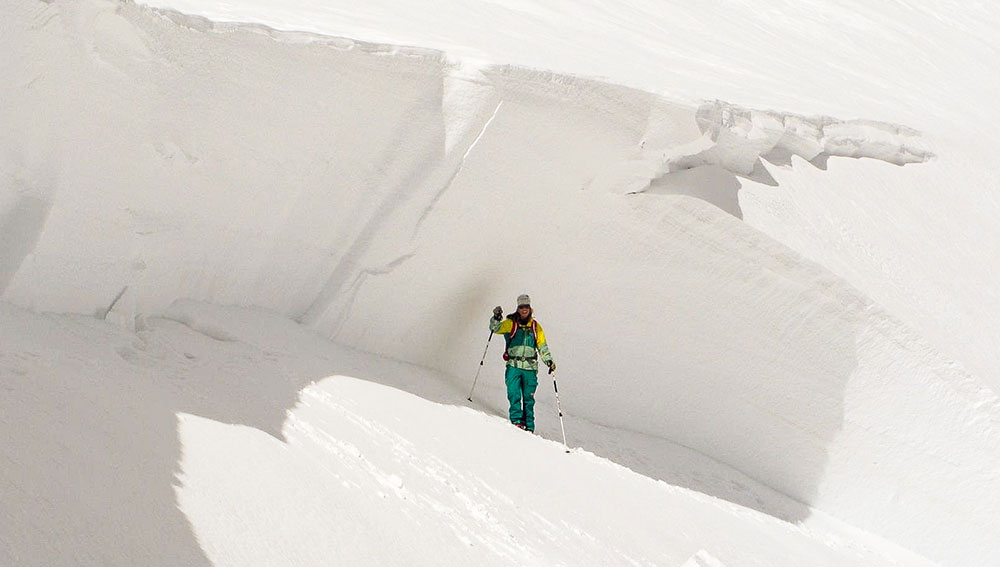
The Mount Baker Backcountry ◙ refers to terrain adjacent to the Mt. Baker Ski Area. The two main zones are the Shuksan Arm and Bagley Basin. The Shuksan Arm is accessed through the ski area via Chair 8 and does not require touring equipment. Consequently, it’s heavily used by ski area patrons. However, the backcountry in Bagley Basin can be easily accessed from the car and does not require a lift ticket. Bagley Basin and the extended backcountry offer phenomenal, non-glaciated backcountry terrain for intermediate to advanced skiers and snowboarders. The terrain is mostly near and above treeline and characterized by many smaller mountains with complex valley systems in between. Last but not least, the Mount Baker Backcountry holds the world snowfall record of 95 feet during the 1998-1999 season.
Baker Mountain Guides utilizes the Mount Baker Backcountry on all of our backcountry ski courses and ski mountaineering courses. The Mount Baker Backcountry is a great training ground for foundational skills in backcountry touring and technical ropework. And, of course, the skiing and riding are pretty good too.
TWIN SISTERS BACKCOUNTRY
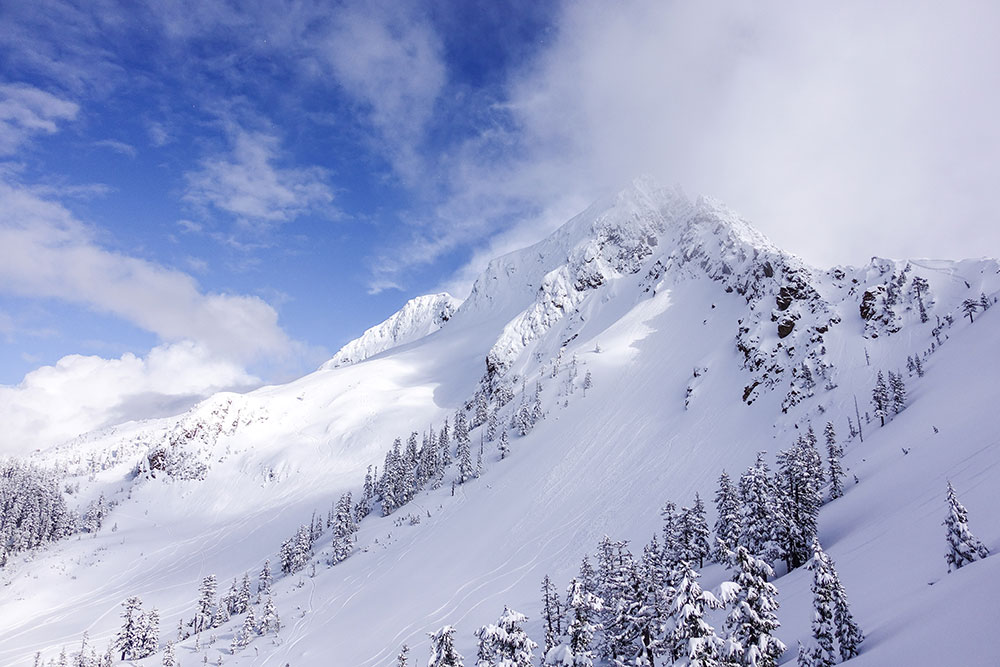
Drive time from Bellingham: 50 minutes one-way
Elevation: 4100 ft. – 6800 ft.
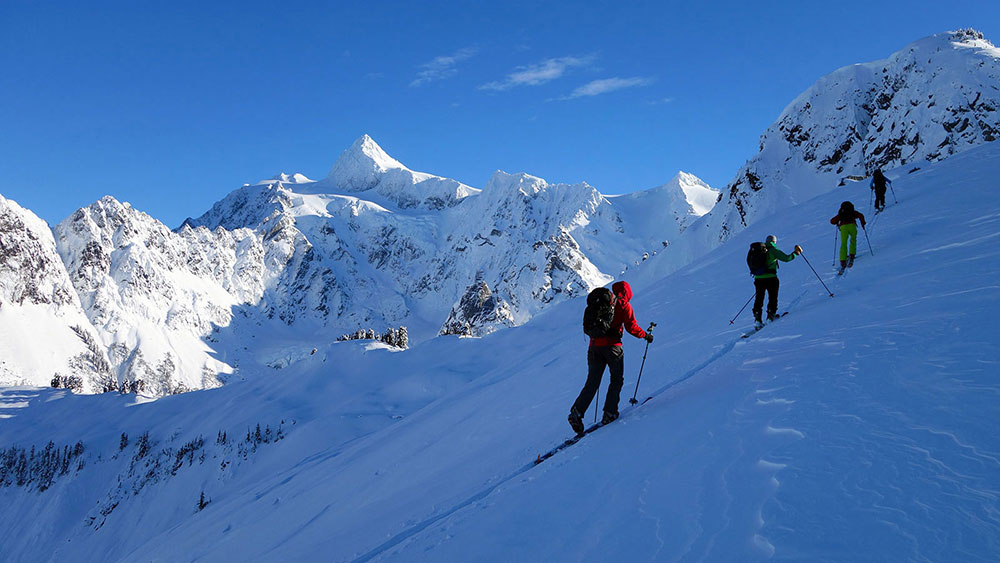
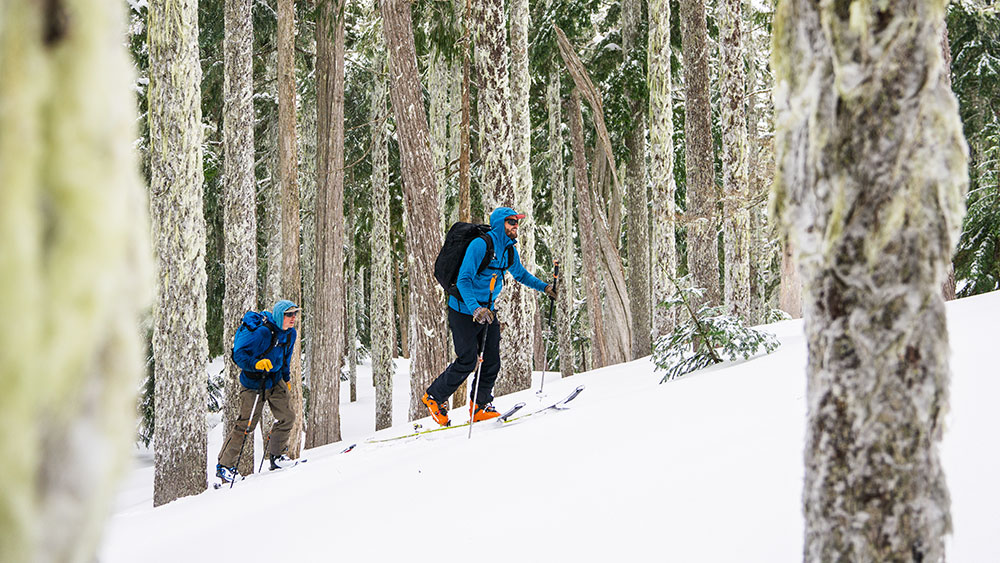
The Twin Sisters Range ◙ is a subrange of the Cascades, located between Mount Baker proper and the Pacific Ocean. The terrain is mostly non-glaciated and is characterized by craggy peaks, couloirs, alpine faces, bowls, and glades. We like to think of the Twin Sisters as being like a miniature Grand Tetons. Objectives include excellent ski mountaineering on clear days and tree skiing on storm days. Access to the Twin Sisters is via privately owned and gated timber roads. Baker Mountain Guides agreement with the timber company grants us commercial access as well as the ability to operate snowmobiles on the roads.
Baker Mountain Guides uses the Twin Sisters for ski mountaineering curriculum on our Steep Ski Mountaineering Course as well as our Ski Mountaineering Pro Course. The Twin Sisters allow for easy access to steep terrain that is excellent for the instruction of technical ropework skills as well as steep skiing and riding movement techniques.
MOUNT BAKER PROPER
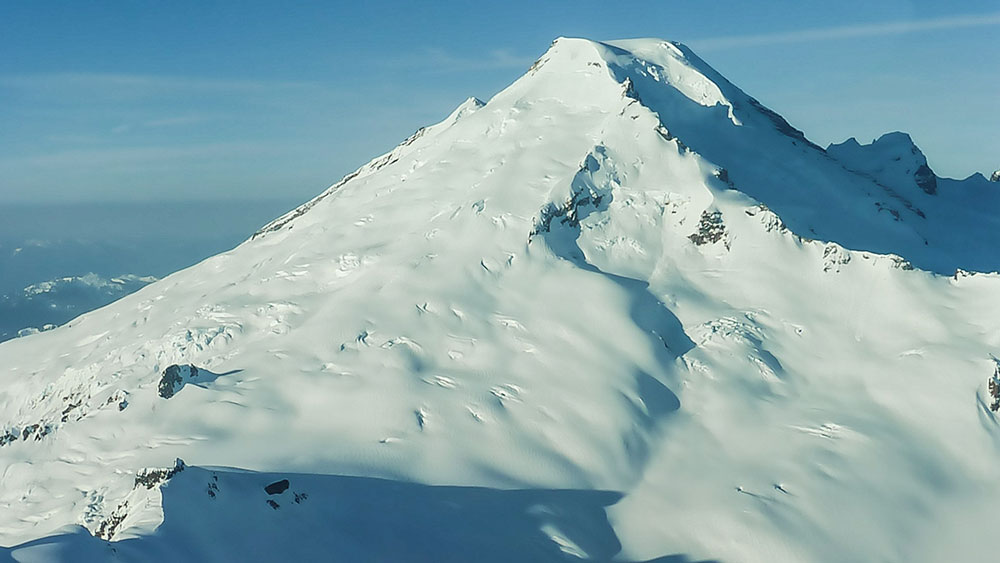
Drive time from Bellingham: 60 minutes one-way
Elevation: 3,600 ft. – 10781 ft.
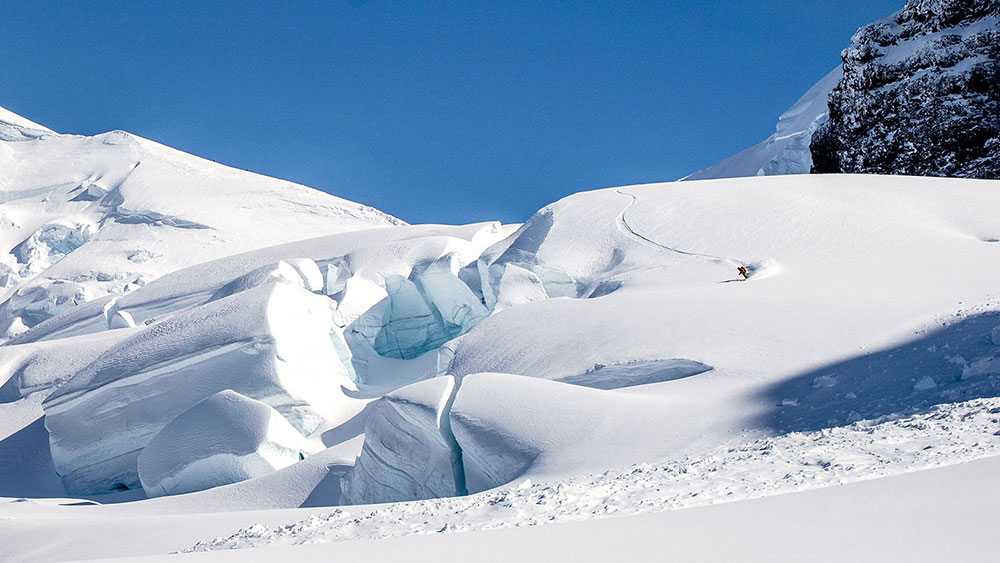
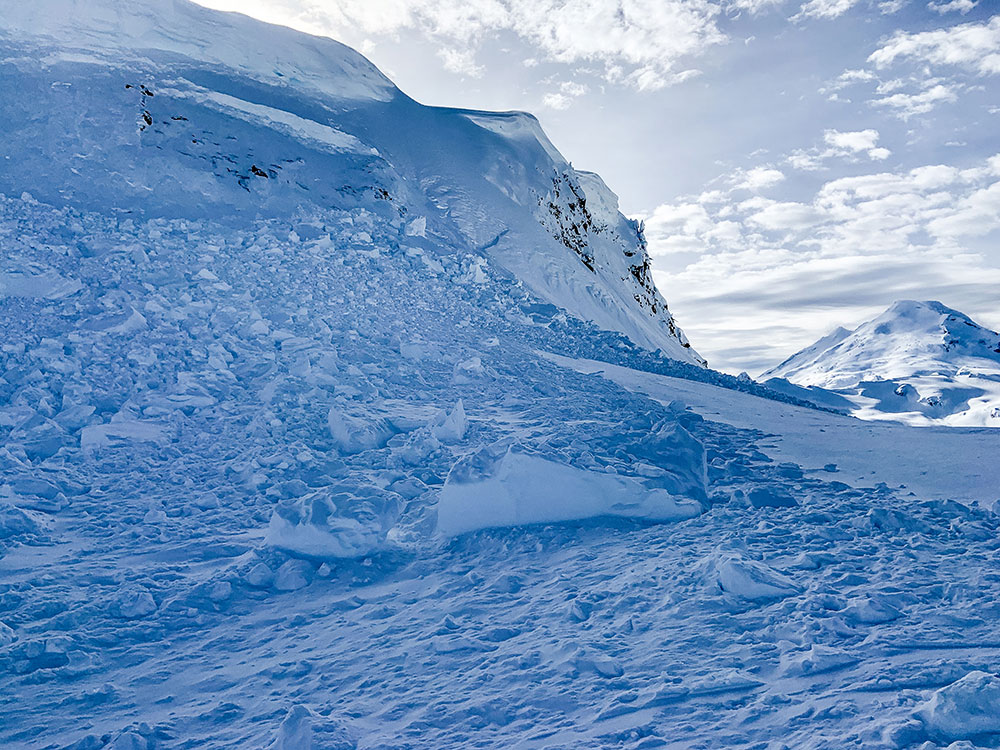
Mount Baker ◙ is one of the most heavily glaciated mountains in the contiguous US, second only to Mount Rainier. Unlike Mount Rainier, public land management allows for guided ski and snowboard descents from the summit, which makes Mount Baker the best glaciated backcountry skiing and snowboarding classroom in the country. Mount Baker’s topography allows for ski and snowboard descents of all aspects. The upper mountain is characterized by 30° – 50° headwalls that are generally crevasse free. Mid-mountain terrain offers moderate glacial runouts through and around icefalls and crevasse fields. Forest Service roads are not maintained during the winter, so access requires the use of snowmobiles.
Baker Mountain Guides uses Mount Baker proper for ski mountaineering curriculum on our Glaciated Ski Mountaineering Course as well as our Ski Mountaineering Pro Course. Glaciated terrain allows for crevasse rescue instruction, the application of glaciated route-finding skills, and the reward of skiing and riding a big mountain.
Snowmobile Access
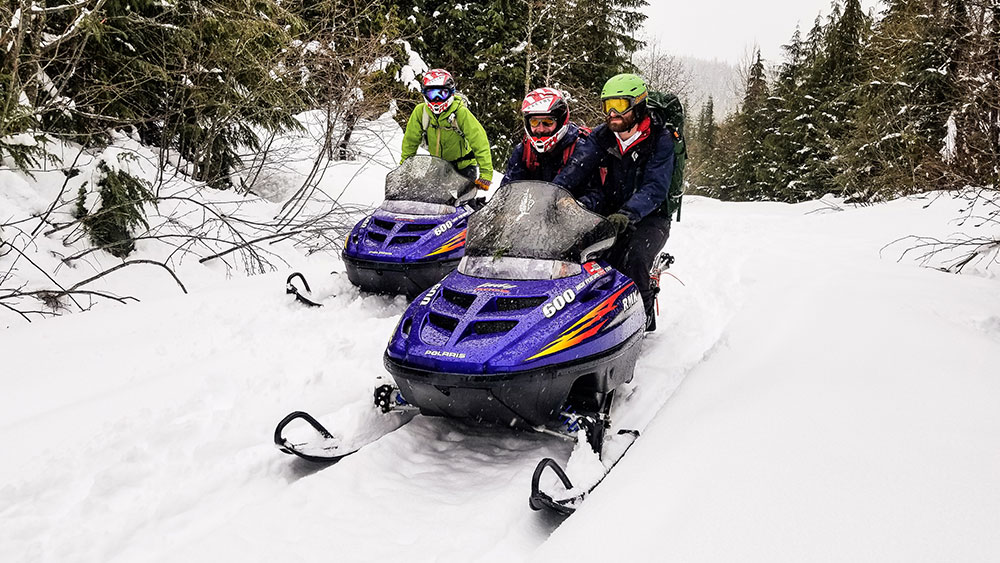
At Baker Mountain Guides, we’re all about earning our turns. We believe that terrain worth skiing or riding should be terrain climbed. That being said, snowmobiles come in pretty handy for getting into venues that would otherwise be inaccessible. The Mount Baker Backcountry is accessed via WA State Highway 542, which is maintained all winter long by WashDOT. However, the Twin Sister and Mount Baker proper are accessed via unmaintained timber roads, which require a snowmobile shuttle.
Snowmobiles provide Baker Mountain Guides with a competitive advantage by dramatically decreasing the amount of time and effort required to get into terrain. Consequently, we can deliver ski mountaineering curriculum in fewer days than our competition. This saves you money on instructional fees and miles on your legs. And you get to ride on a snowmobile. How great is that?
WEATHER AND SNOWPACK
Mount Baker and the surrounding region receive an immense amount of snow. During the winter of 1998-1999, the snow telemetry station located near the Mt. Baker Ski Area recorded world-record-setting snowfall of 1140 inches (95 feet). Snowfall in the Cascades is primarily driven by mountain orographics. Mount Baker proper is located at the head of the Straight of Juan de Fuca ◙ and is the closest Cascadian volcano to tidewater. The Pacific Ocean provides endless amounts of moisture, which is forced up and over the Cascades by the winter jet stream. As the warm air rises, it cools, moisture condenses, and snow falls over the mountains. Additionally, the topography of the Mount Baker region forces incoming storms to converge upon themselves. Blizzards literally crash into each other over the Mount Baker Backcountry.
Warm air can hold more moisture, and in general, Mount Baker has a warm temperature regime. Most of our snow falls between 28° and 32° F. Temperatures in the single digits and teens are considered to be exceptionally cold. Rain can occur at any point during the winter, but the Mount Baker Backcountry also receives plenty of low-density snow at temperatures in the mid to low 20’s.
Consequently, Mount Baker has what is known as a “Maritime Snow Climate.” Heavy snowfall, a warm temperature regime, and a deep snowpack facilitate rounding processes. Rounding creates small snow grains that pack together tightly and bond well to each other, which forms a relatively stable snowpack. With a stable, mid-winter snowpack, we are often able to ski and ride more aggressive terrain than would be possible in other parts of the country. If this is the first time that you have seen the terms “Orographics,” “Maritime Snowpack,” “Temperature Regime,” and “Rounding” then we would encourage you to consider adding avalanche training to your backcountry skiing and snowboarding education.
Feel free to reach out to us if you’re interested in these courses and find out why we’re so excited about them. Shred safe our friends.
Want to learn more about backcountry skiing or riding? Check out our Ultimate Guide to Backcountry Skiing.
Whiteout
Navigation
Whiteout Navigation
Whether you are a backcountry skier or mountain climber, learning the basics of whiteout navigation is essential for off-trail travel in the mountains. This post presents tools, strategies, and techniques to keep in your quiver for those low visibility days.
This post has two main sections:
1. Where to Move (Tools for knowing where to go in a whiteout)
Whiteout Navigation Plan | Navigation Tools
2. How to Move (Strategies and techniques for how to travel and stay on course)
Handrails | Bearing Off | Travel Techniques
Where to Move
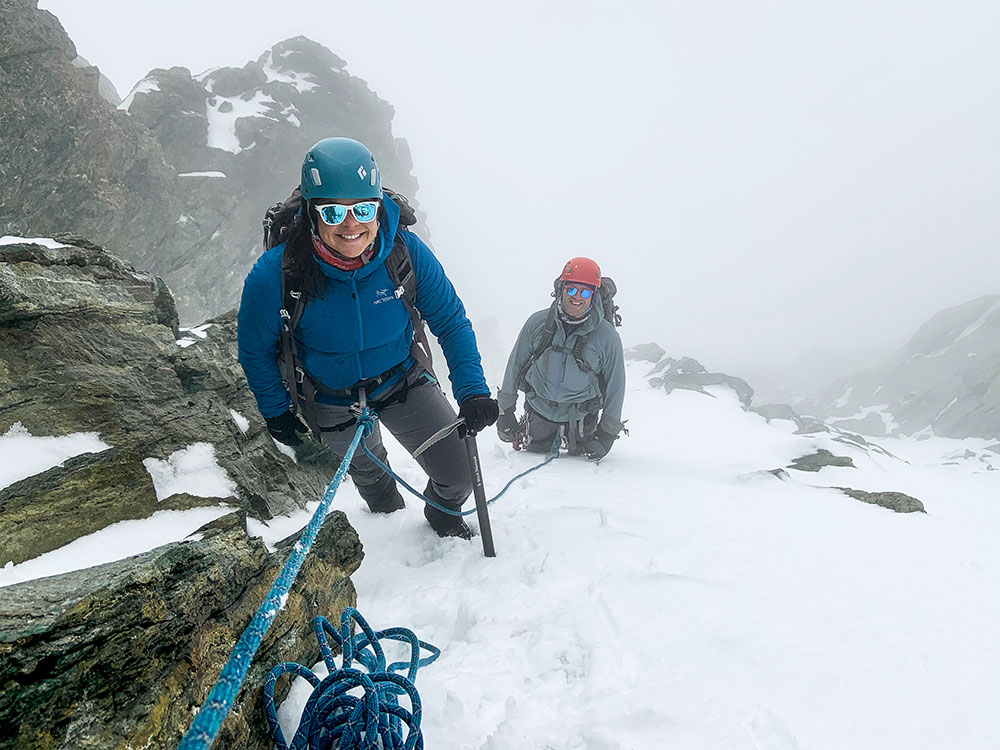
If you get caught out in a whiteout, especially in glaciated or snowy terrain with no distinguishable terrain characteristics, it’s easy to become disoriented. Heard the phrase “inside the ping-pong ball?” Below are the things you need to know to make the best decision on where to navigate.
Whiteout Navigation Plan
The easiest way to know where to navigate in a white-out is to be proactive and have a whiteout navigation plan. These plans can be as complex and detailed as you’d like but need at the core three main details: Waypoints, Bearings, and Back Bearings. Below is an example of a complex whiteout navigation plan that also includes UTMs, distance, elevation, and munter rates. Curious how to make complex tour plans? Check out our Backcountry Skiing Pro Course for backcountry skiers and riders.

Waypoints
Waypoints are points placed along your route at regular intervals that are used for navigation. Think of them like a trail of bread crumbs you can use to navigate through terrain and then also get back home. Ideally, waypoints are placed at the start and end objective of your route, and anywhere a change in direction is required.
They also work best at obvious terrain features that you can’t miss. Those could be an individual tree or large boulder on a ridge, or a lake, cliff face, drainage, highway, or larger scale feature. Your goal is to go then from waypoint to waypoint to get to your objective and then reverse the waypoints to get back home.
Bearings
Where waypoints are the bread crumbs, bearings are how you navigate to the next bread crumb without getting lost. By recording the compass bearing in your plan to the next waypoint, you can be sure that you’re headed in the right direction (remember to adjust for declination). Don’t know how to take a bearing or what declination is? Check out our Backcountry Navigation 101 blog.
Back Bearings
Just as important as knowing your bearing to the next waypoint is the bearing back to the previous one. Back bearings get you home. Calculating the 180 degree opposite of your bearing to a waypoint gives you the back bearing. In the navigation plan above, you can see on line one that the bearing from the car to the first waypoint is 198 degrees. Therefore, 198-180 = 18 degrees for the back bearing.
Navigation Tools
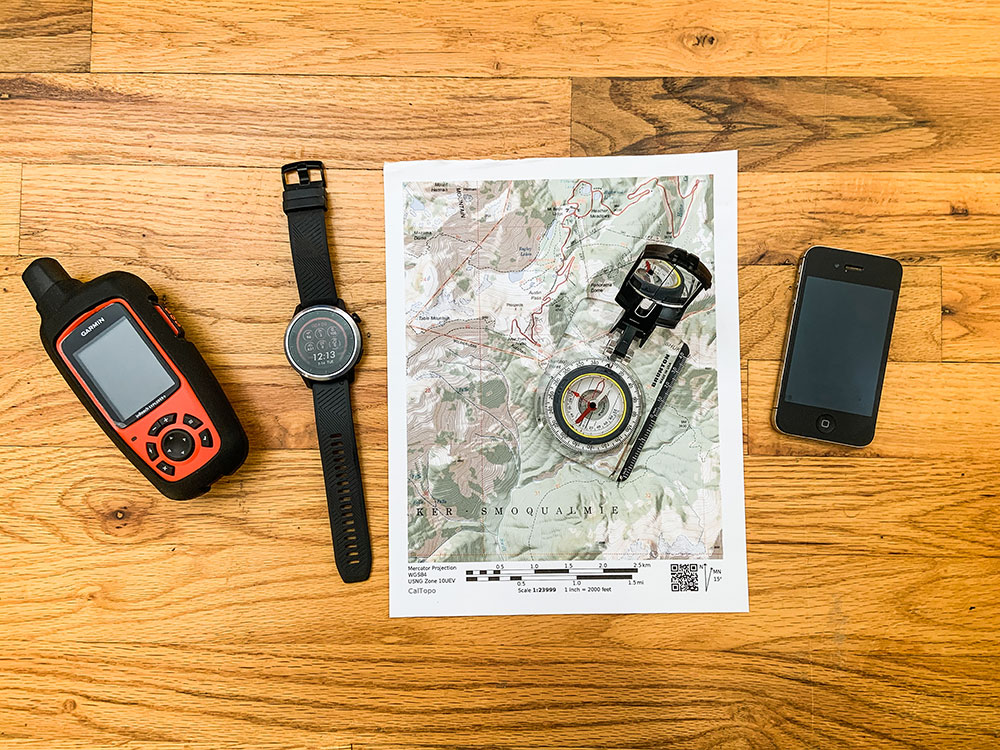
GPS
There are cell phone applications now like CalTopo and Gaia that turn your cell phone into a GPS even in airplane mode. This can be a more affordable option than to drop hundreds of dollars on a stand-alone GPS unit. Drawbacks to using your cell phone as a GPS unit is battery life, cell phones die quicker, and usability in wet conditions (like a whiteout). Touch screens don’t really work well when wet.
Altimeter
There are quite affordable altimeter watches now that (if calibrated regularly) are quite accurate. Knowing your elevation is essential when navigating in a whiteout. A GPS will provide your elevation, but it’s nice to have a back up in case your phone or GPS unit runs out of battery.
Map
Have an analog backup to the technology. If you actually want to be able to use it in a whiteout, laminate the map or at least put it in a zip lock bag to waterproof it.
Compass
The ultimate navigation tool. Much easier than trying to pull out your cell phone or a GPS in a storm. If you did your homework and have a good whiteout navigation plan, then you just need to follow your compass bearing.
How to Move
Once you decide on where to go, here are some strategies and techniques to help keep the squad together and to where you need to go.
Handrails
These are obvious physical terrain features that you can use as a “handrail” to ensure that you don’t get off route. A creek or river, ridgelines, valley bottoms, couloirs, and roads are all obvious terrain features that you’ll recognize when you hit them, even in a whiteout. Below is an example of a ridgeline handrail (the railroad grade on the Easton Glacier route up Mount Baker). Even in a whiteout, as long as you don’t stray from the ridge, you’ll make it where you want to go.

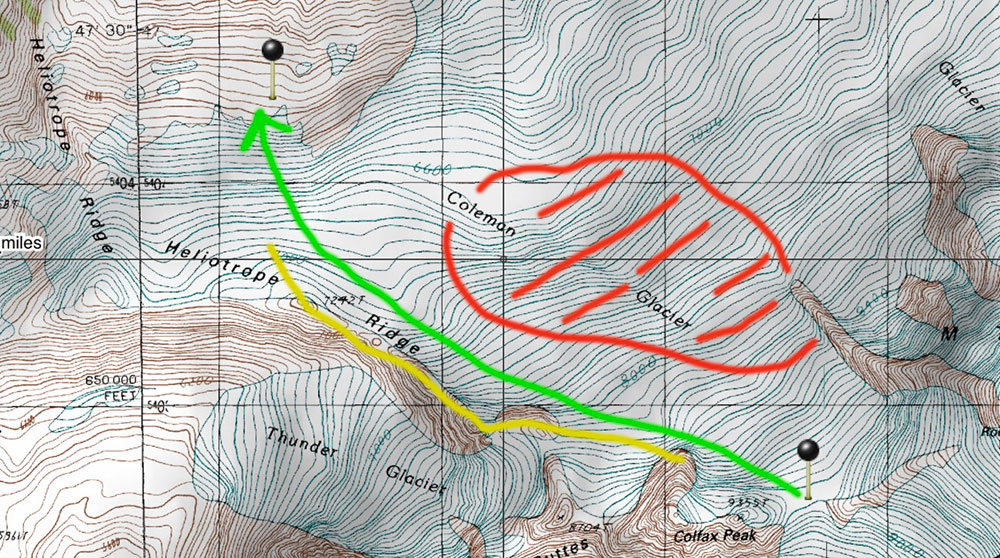
In the picture below, if trying to get from the saddle on the Coleman-Deming Route of Mount Baker (Waypoint in lower right) back to camp (Waypoint in upper left), it is important to avoid the center of the Coleman Glacier (Red) where it is heavily crevassed. By using the Heliotrope Ridge (Yellow) as a “handrail”, you can make sure that you’re headed in the right direction by keeping the ridge in sight on the left as you travel downhill (Green).
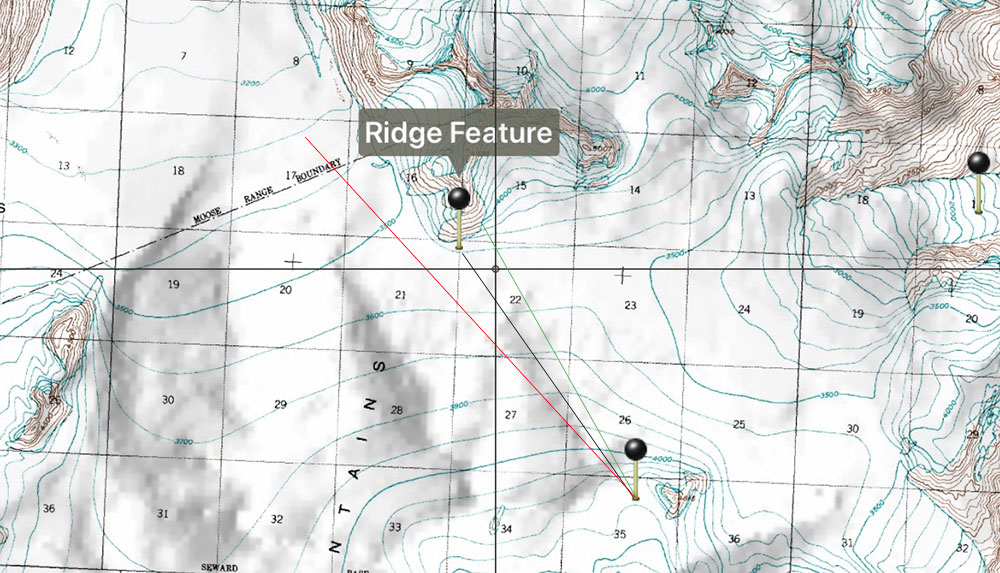
Bearing Off
This is a technique where you intentionally take a bearing that is a few degrees off of your true desired destination in order to hit an obvious handrail feature that ensures you won’t miss your destination. In the example below, in glaciated terrain, we took a bearing that was intentionally off (green) in order to hit the ridge feature where we needed to change direction. If we missed the ridge feature (red), we’d end up out in the middle of the ice field with no physical handrails to know where we were.
Travel Techniques
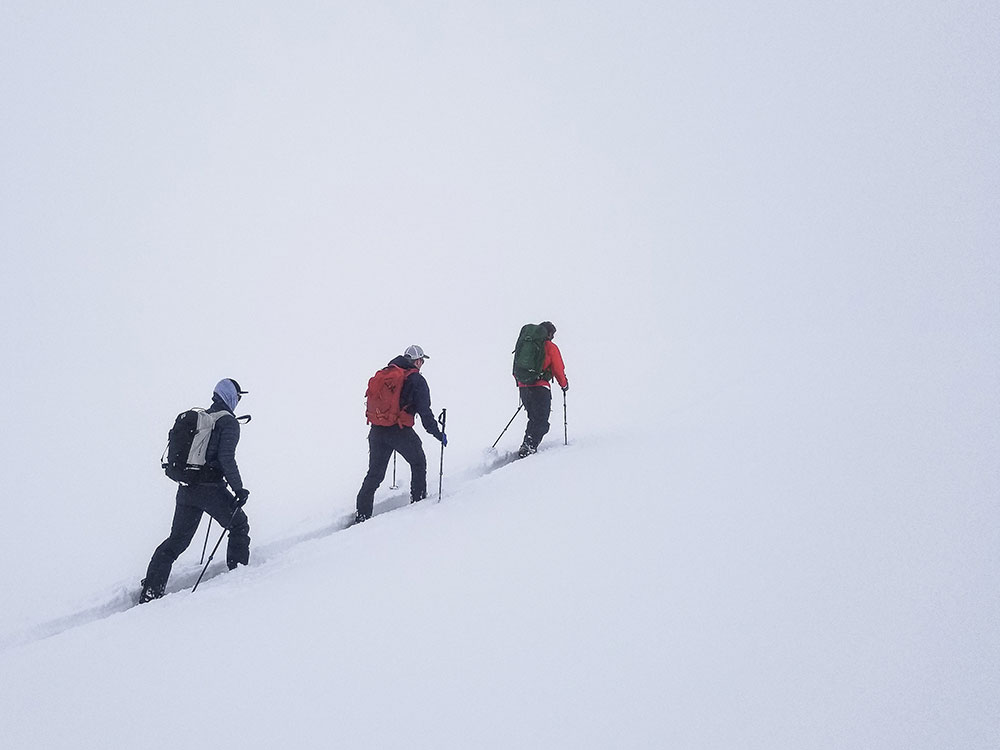
Iron Caterpillar
Make this your default uphill technique for ensuring the squad stays together in whiteout conditions. It’s pretty self-explanatory: Stay just behind the person in front of you (tip to tail if you’re on skis), and, like Ludacris says: “When I move you move”. Just like that.
Check the Leader
On flat terrain, most folks travel in circles thinking they are walking in a straight line. To combat this, travel in your iron caterpillar and have the last person carrying a compass and the first person acting as a reference point. Regularly check the compass bearing against the leading person and adjust their direction left or right as required.
Only two of you? Have the leader walk while the rear person stands still and holds the bearing. Instruct the leader where to go to be in line with the bearing and have them stop when they’re almost out of sight. Then Catch up to them, reacquire the bearing, and repeat.
Physical Markers
A common backcountry skiing and riding trick to be able to ride in whiteouts is to place some sort of physical thing on the slope in order to provide some contrast. Examples of this include large washers with flagging tape around them tossed at various intervals downslope, a ski pole tossed a little further ahead, or cordalette tied to a pole that you swish downhill in front of you. If you create a skin track or boot track on the way up, this could also count as a physical marker that could potentially be followed on the way back. Commonly in big glaciated terrain, folks use wands placed at regular intervals to navigate. If you go this route, make sure you pick up your wands on the way back unless you need to leave them for other parties so they don’t just become trash on the glacier.
Want to learn more? Check out our Ultimate Guide to Backcountry Skiing.
Travel Techniques for
Backcountry Skiers
Travel Techniques for Backcountry Skiers and Riders
In the backcountry, as a skier or rider, it is of utmost importance that you manage your group through terrain appropriately. Below are some common travel techniques on the uphill and downhill to help you keep your squad skiing/riding together for a lifetime. And we at Baker Mountain Guides want that to be a long lifetime.
Uphill Techniques
When traveling in the backcountry, it’s the golden rule to stay together unless you have a very good reason to do otherwise. This is much more easily accomplished on the uphill when you are traveling slower but can become a problem if there are folks of different fitness/ability levels. Below are some common uphill specific techniques to keep the squad together and communicating.
Iron Caterpillar
Make this your default uphill technique for ensuring the squad stays together — especially in white-out conditions where someone could easily become disoriented if separated from the group by even ten feet. It’s pretty self-explanatory: Stay tip to tail with the person in front of you, and, like Ludacris says: “When I move you move”. Just like that. Among the many benefits of this technique include: You won’t lose your friends, improves communication, you break at the same time, everyone is present to be involved in decision making.
Space Out
Sometimes the iron caterpillar is not the best option. For example: traveling on glaciated terrain where you want to make sure only one person is on a snow bridge at a time or crossing a known avalanche path you think is safe, but space out to expose only one person at a time.
No FU Breaks
The ol’ FU Break is all too common. Let’s say your squad of four is out for a tour but person “A” is a bit slower on the uphill. Consequently, they fall behind consistently. The rest of the team is moving easily through the terrain but decides to stop every now and again to let person “A” catch up. This break may last 5 or so minutes where the other three members get to enjoy some water and snack while person “A” struggles huffing and puffing to catch up. Once Person “A” finally arrives, the rest of the squad is rested, but getting cold and antsy to continue, so they start moving again. The FU Break in action. Person “A” doesn’t ever get a break to get water and refuel so they will just get slower and slower, and angrier and angrier and angrier.
To avoid this event, utilize the Iron caterpillar technique or at least put the slower person up near the front as you travel. They likely will say: “I don’t want to go up front because I’ll hold you back,” but this is nonsense. In order to travel as a group, you can only go as fast as your slowest member. There will always be a slowest member. Putting that person near the front isn’t a slight on them as a human being — even the fittest humans out there have their off days. Embrace reality rather than play pretend.
Downhill Techniques
Once you transition to downhill in the backcountry, things can go wrong in a hurry. Though there are many incidents where travelers are caught in avalanches on the up-track, the majority of accidents happen on the downhill. Where you’ve hopefully been traveling pretty close together and utilizing the uphill travel techniques above, it’s much easier to spread out and lose each other once gravity is on your side.
Skiing or riding downhill is really fun… so the human factor also begins to creep into our decision making. As always, the most important way to stay safe is to choose appropriate terrain for the conditions and your squad. Below are some common travel strategies to help manage folks through terrain once you make the choice to go.
Eyes On
This is one of the techniques you should always seek to do. Keeping folks in visual contact not only allows you to know where to start a search if a rider is caught in a slide, but also aides in mitigating non-avalanche hazards like tree wells, deep snow immersion, or just getting lost.
Ease into the Slope
Rather than the first person hucking their meat off of the cornice in order to center punch the line, the first person on the slope should ease in. You should feel confident that the slope is safe in order to decide to ride it, but people often make the wrong decision. What’s wrong with being just a little more conservative when your life is on the line?
One At A Time
Only one person on the slope at a time hopefully means only one person is exposed to danger at a time. This only holds true, of course, if those not riding are actually stopped in safe zones.
Safe Zones
Safe zones are areas in terrain where you are protected from hazard. The top of a slope or ridgeline away from cornices where nothing can fall on you or break under you for instance. As much as possible, try to travel from safe zone to safe zone in terrain.
Fencing
Fencing is the technique of utilizing physical features on slopes (rocks, trees, and other terrain features) to create boundaries/constraints for riders. If you’re blessed with a blank canvas of untouched pow to ride, you can also use your own tracks for fencing (i.e “stay rider’s left of my track to avoid…” the cliff, crevasse, or other hazards).
Stacking Tracks
By stacking tracks, or spooning, you ensure that folks ride where they are supposed to. This reduces the chances of folks getting separated and lost or getting sucked towards a hazardous terrain feature that should be avoided. As an added bonus, you conserve more of the slope for your second lap or for the other humans that want to enjoy the pow. Sharing is caring.
Buddy System
This is great for when you aren’t concerned about avalanche hazard and are most concerned with getting separated (i.e. tight trees and whiteout conditions). By pairing up, you’ll at least be with one other human if you get separated from the group.
The “Yell-a-pillar”
Similar to the reasoning of the buddy system and the iron caterpillar. The “Yell-a-pillar” is where you try to ride closely together using your voices to make hoots and hollers so you know where folks are. For this technique, it’s great to stop often to ensure you haven’t lost anyone. Also, keep the person behind you in sight!
Short Pitches
In order to keep eyes on and the group together in challenging or complex terrain, it may be necessary to ride in short pitches rather than skiing something from top to bottom. Instead, ski from safe zone to safe zone.
Long Pitches
Sometimes you need to ski something in one long pitch because there’s no safe place to stop in the run. Think couloir or big alpine face. No matter how much your quads burns, keep skiing or riding!
Leap-frogging
This strategy is one you can use in place of short pitches to keep visual contact with your squad in rolly/benchy terrain. Rather than the entire squad stopping at the first convex roller where you would lose sight of them, only the first person stops. Then the next rider can ski a longer pitch as they continue past the first person to the next roller. This helps keep things flowing and allows the squad to ski longer pitches. This only works, of course, if there are clear stopping places and safe zones that folks know to regroup at.
Want to learn more? Check out our Ultimate Guide to Backcountry Skiing.
Backcountry Skiing
Skinning Techniques
Backcountry Skiing Skinning Techniques
Backcountry skiing is much more enjoyable once you understand how the equipment works and the skinning techniques that maximize your gear’s potential. This post walks you through some general skinning techniques, uphill techniques, and transitions.
General Techniques
Baby Steps
Unless you’re traveling on relatively flat terrain where you can get good glide, taking small steps will be much more efficient and easier on your body. Melanie Bernier explains in the video below.
Stand up Straight
As much as possible, try to stand up straight as you skin — especially on the uphill. If your weight gets too far forward, you’re more likely to slide out and fall backwards.
Risers
When to use risers is a hot topic. In general, risers have pros and cons that should at least be understood so you can hopefully use them when appropriate. IFMGA Mountain Guide Margaret Wheeler explains in the video below.
Uphill Techniques
Rounded and AVA Turns
As much as possible, try to use rounded and AVA turns while skinning rather than kick turns. If done correctly, they shouldn’t take much effort and allow you to keep your cadence going without having to break stride. In the video below, IFMGA Mountain Guides Jeff Ward and Margaret Wheeler explain both turns.
Kick Turns
Probably one of the most dreaded turns for folks just starting out is the kick turn. These are turns on slopes too steep to use the rounded or AVA turns. There are three types of commonly used kick turns: Tail Jab Kick Turn, Pole Basket Grab, and Windshield Wiper. By mastering the kick turn, you’ll avoid the all too common “V of Doom” and “Tip Dive.” In the video below, Margaret Wheeler demonstrates all three types of kick turns and offers some guidance for how to avoid the “V of Doom” and “Tip Dive.”
Firm Conditions and Improving the Skin Track
In firm conditions, it’s important to engage as much of the skins as possible. Folks have a tendency to lean into the slope when side-hilling. This puts you on your edges and makes it much more likely that you slide out. Instead, roll your ankles downhill to engage more of the skin. Though counter-intuitive, it works like a charm. If you’re in really firm conditions and this technique isn’t working, consider ski crampons.
Ski Crampons
When conditions are so firm that no amount of good skinning technique can get you purchase, ski crampons can be applied to give you that purchase.
Transitions
Up to Down
Keep Heat In
Though you may be warm, now that you’ve stopped, zip up coats and put on another layer to keep that warmth in.
Lock Down Your Boots
Tighten things up for the downhill. Remember to go out of walk mode if you have AT boots.
Rip Skins
As a skier, learn to remove your skins without having to get out of your skis. This is much more efficient time-wise and also negates the need to worry about some of the troubleshooting and considerations below that occur when you remove your skis. Fold skins glue-to-glue and put them in your bag or, if temps are cold and you’re worried about the glue freezing, put them in your jacket.
Down to Up
Remove Layers
Now that you’re going back up, prepare to get hot again. Take your helmet off and skin in a hat. Put on sunglasses rather than goggles to keep them from fogging up. Also, before totally stripping down, make sure you grab a bite to eat and drink!
Loosen Boots
Loosen your straps for uphill and remember to go back into walk mode.
Re-apply Skins
Make sure there is no snow or ice on the skins before you put them back on. If there is snow/ice, run the glue side along the edge of the ski to scrape it off.
Troubleshooting and Considerations
Snow/Ice in Tech Boots
If you step out of your skis to transition, you may get snow/ice built up in the holes where your pins go on the toe of your boots. By stepping back into the binding and moving your foot up and down a few times, the snow should clear.
Snow/Ice in Binding
It’s common for snow to build up underneath the springs on your binding toe pieces, make sure to clear this out by clicking the toe piece up and down multiple times or until clear. If you don’t, you might pre-release from the ski.
Below is a fantastic video by Jeff Ward that summarizes transitions well.
Next Steps
Getting good at these skills takes time, so go out and practice! If you want more hands on mentorship, our one day Intro to Backcountry Skiing Course is a great way to get affiliated with your gear and get feedback on your technique. You can also learn more online. Check out our Ultimate Guide to Backcountry Skiing for all things backcountry skiing and more content like this.
Backcountry Skiing First Aid Kits
Backcountry Skiing First Aid Kits
Do you have the necessary tools to respond to an emergency in the backcountry? Do you have the medical training? Avalanche Rescue training? The more training I get and the more I know, the bigger my pack gets. Below is what I carry in my backcountry skiing first aid kit. Some items are essential items you should always carry in your kit, while others are situational, but always worth consideration. I’ve also included some items that are more rescue oriented than purely first aid.

Blister/Burn Care
The most common injuries while touring in my experience? Blisters and sunburns. The key to treating these injuries is prevention. I carry:
– Moleskin
– Athletic Tape and PT Tape
– Tincture of benzoin (makes things sticky so they’ll stay)
– 2nd Skin
– Sun Screen (Ginger Strength or 30 SPF+)
Fractures and Dislocations
Skiing and riding allows you to get going pretty fast on the downhill. Broken bones (wrists and legs most commonly) and dislocations (shoulders and fingers) can be quite painful and scary if severe enough. I carry:
– Pain Relief (Acetaminophen and Ibuprofen taken together are just as effective as presecription pain killers and safer to take in most cases. 1000mg acetapminophen + 800mg IBU every 8 Hrs.
– Triangular bandage
– SAM Splint (Situational, I usually have other things like climbing skins and poles with me that can be used as a splint)
– Stuff to stop bleeding in case of an open fracture (see below)
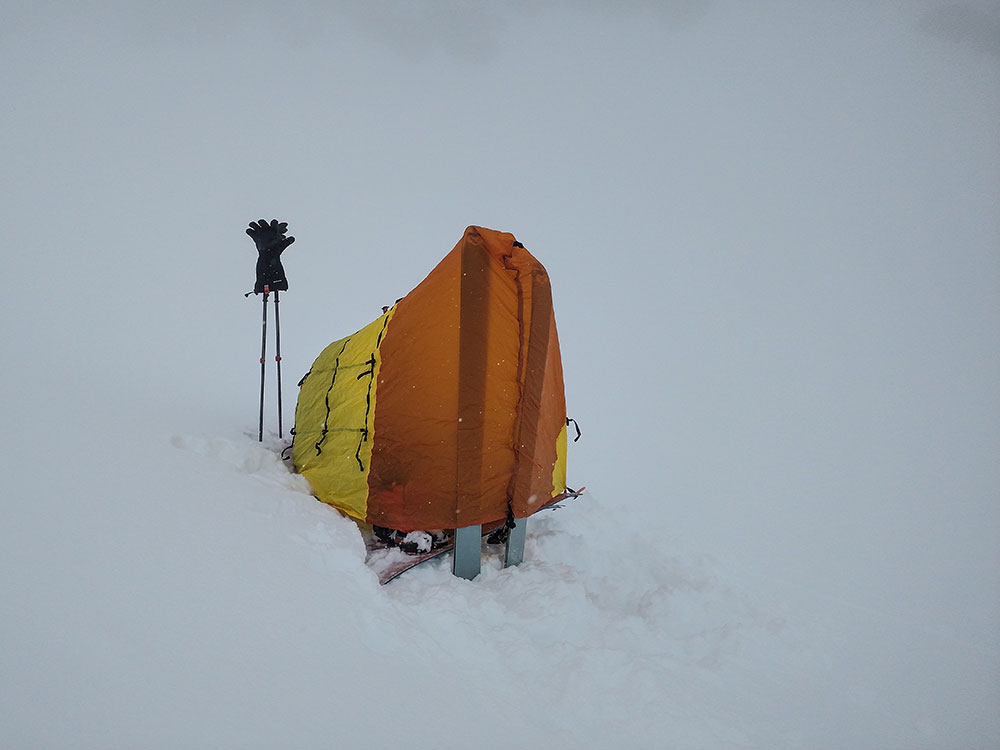
– Rescue shelter/bivy/sled and inflatable pad(in case we need to wait for rescue or move to a safer location)
Cardiovascular
Whether you just take a fall, smack a tree or rock, or are caught in an avalanche, you’ll likely have some sort of trauma leading to bleeding. To plug those holes in the human container I carry:
– PPE – Gloves and Mask (Non-latex gloves)
– Tournaquet (For severe bleeds)
– Blood clot powder and gauze (For severe bleeds)
– ABD Pads and standard gauze pads
– Wound Closure Strips (For deep wounds requiring stitches)
– Trauma Shears or Knife (for exposing areas under clothing unable to be removed)
– Irrigation Syringe (for cleaning of wounds)
– Various sizes of band aids for the widdle boo boos
Hypothermia
Just being out in a winter environment warrants carrying equipment to keep warm, but, worst-case scenario, someone is caught in a large avalanche and buried in snow for a while or falls through a snow bridge into a crevasse. Once they get out, they’ll be cold if not hypothermic. I carry:
– Extra layers – Large gloves and puffy coat
– Rescue shelter/bivy and inflatable pad (Get someone off the snow and out of the elements)
– Stove and sleeping bag (For overnight expeditions I’ll have these items and have them in the squad as rescue gear)
Drugs
As my father always says… “find your drug and find your dose.” Here are the essential drugs I’ve found helpful:
– Tylenol and Acetaminophen (Pain Relief)
– Aspirin (Pain/Swelling)
– Benedryl/Antihistamines (Allergic Reactions and Anaphylaxis)
– Diamox (For expeditions at high altitudes)
– Anti diarrheals (When you don’t want to poop anymore)
Building Your Backcountry Skiing First Aid Kit
Luckily for you, there are already a lot of great kits out there to choose from that are a lot more affordable than trying to entirely put together your own kit. Instead, I recommend getting a kit like those sold by Adventure Medical Kits that are ultra-light and waterproof and then supplement as needed.
Lastly, it’s important to remember that a first aid kit is only one part of your emergency gear/rescue kit. You should be well acquainted with Avalanche Rescue as well as how to administer first aid as a first responder to an incident. Get the gear, get the training, and then stay current on best practices. You’ll hopefully never need to use your knowledge or rescue kit, but, if 2020 is any indication… prepare for the worst. Shred safe friends.
Want to learn more? Check out our Ultimate Guide to Backcountry Skiing.
Back to TopRepair Kits for Backcountry Skiing
Repair Kits for Backcountry Skiing and Riding
Let’s layout a little scenario. You’re out for a long day tour in perfect pow conditions. To get away from the crowds, you push out pretty far into terrain and drop into a different drainage than the car is parked. On your run down, you take a tumble and rip out your toe piece.
Without a repair kit, what are your options? How long will it take you to crawl out? Is that even possible? People have died this way. The way to avoid (at the least) a very frustrating and slow evacuation out of the field is to invest in a quality repair kit that can fix most problems. If you put together your own kit, you’ll be surprised how modest a financial investment it is. There are some quality repair kits pre-built out there now by Traverse Equipment for $90 if you want to go that route.
Below is a breakdown of the everyday essentials you should always have, other items to consider bringing and multi-day specific items.
The Everyday Essentials
Depending on how long of a backcountry tour you plan to go on, your repair kit should adapt accordingly. Are you going out overnight or for multiple nights? Your kit will be much more inclusive than for just a short day tour near a ski area. No matter how long your tour, here are some essential items to always have with you.
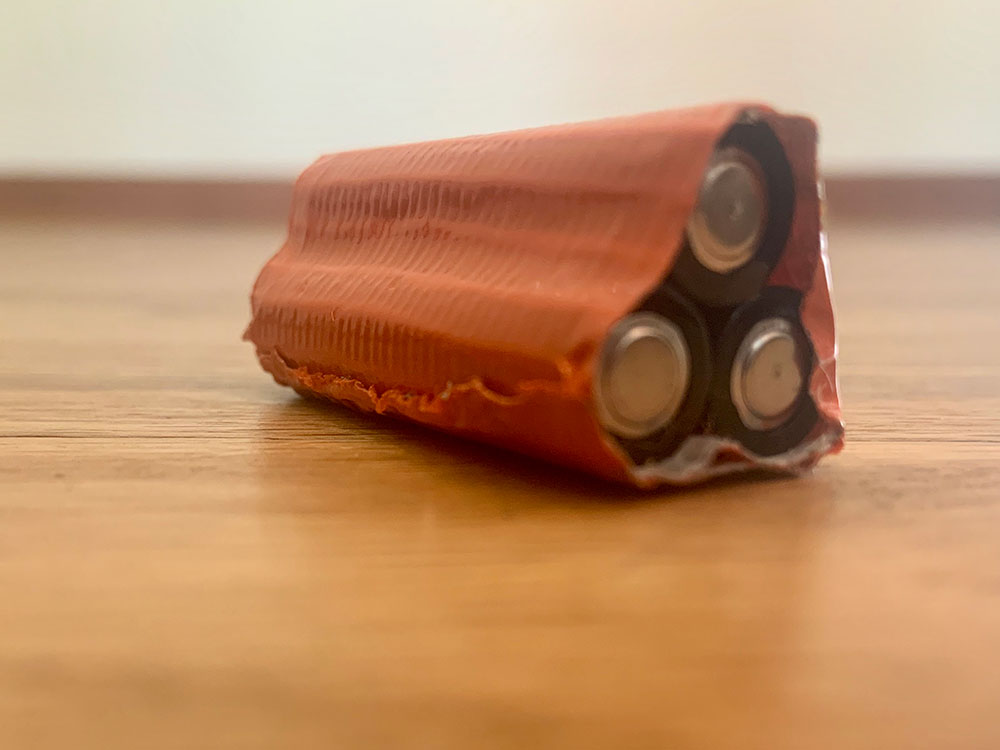
Spare Batteries
Most avalanche beacons and headlamps take triple A. Bring three of them.
Pro Tip: Wrap a piece of tape around the three batteries to keep them together so you’re not fishing around for three individual batteries.
Knife
Sometimes you’ll just need to cut something. Worst case is an emergency where someone has major trauma and you need to expose something buried beneath a lot of different layers. You might need to cut some clothing off. More likely, you’ll need the knife for cutting that spare p-cord to the appropriate length or your block of cheese. Regardless, carry one.
Multi-Tool With Pliers
This multi-tool could also be your knife as long as it’s actually a good one. Pliers are great for grabbing metal parts, which will be quite cold out there in the snow. It should also have some different bits (Phillips and straight at a minimum) so you can tighten loose screws on boots or bindings. Bonus is wire cutting capabilities.
Pro Tip: Keep this in an accessible pocket rather than in your repair kit. You don’t always have to have all items of your repair kit inside the same bag.
Ski Straps
So many applications. I carry three at all times. Break a buckle or tensioning strap on your boot? Ski Strap. Skins falling off your skis or lose a tail clip? Ski Strap.
Pro Tip: Store two rolled up in your repair kit and keep one accessible either rolled on your ski pole or in a pocket that is easily accessible.
Spare Screws
These should be specific to your boots or bindings. If the screw that holds your walk-ride lock falls out, have fun riding downhill in a sloppy boot.
Pro Tip: If you are a splitboarder, make sure the screws on your binding are tight before each run. Most splitboard bindings have a lot of moving parts, which leads to screws and straps loosening throughout the day. Avoid having to use your spare screws by tightening them proactively!
Extra Powder Basket
Poles are useless in snow without powder baskets. Just carry a spare in case you lose one.
Extra Climbing Skin Tail Clip
You can use a ski strap to keep a climbing skin on a board, but these tend to get scraped off as you walk and can be annoying since they affect glide. It’s way better to just have a spare clip.
Scraper
Snow adhering to your climbing skins? Scrape it off. Snow or ice building up on the bottoms or tops of your boards? Scraper. Can’t get your binding to lock in the right place because there’s too much snow? Scrape it!
Other Items to Consider
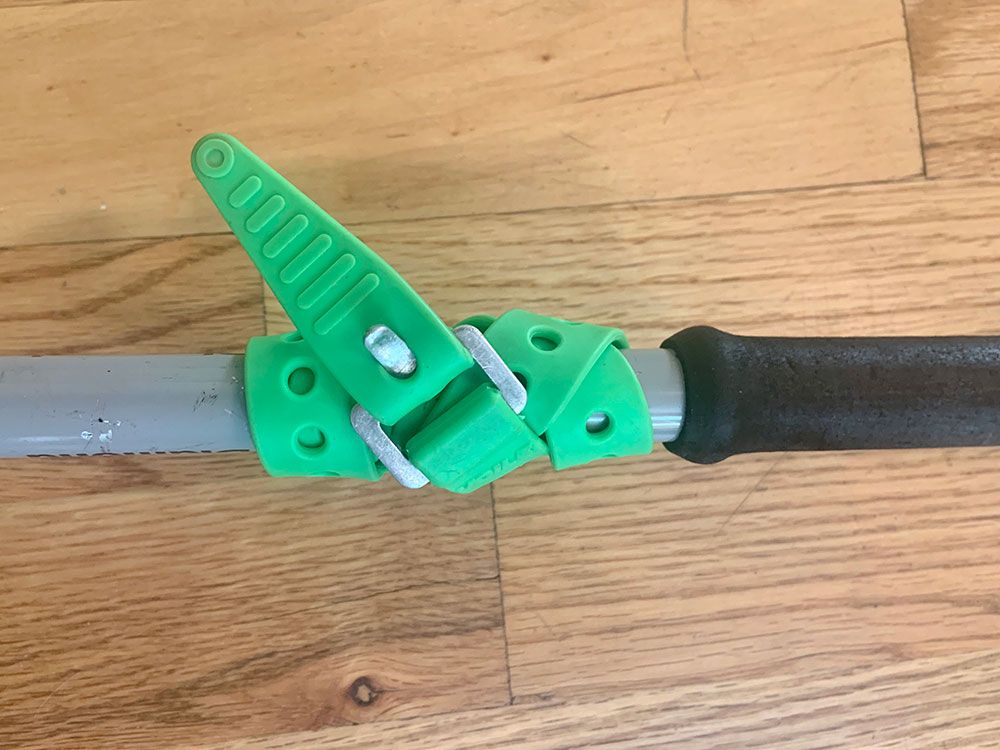
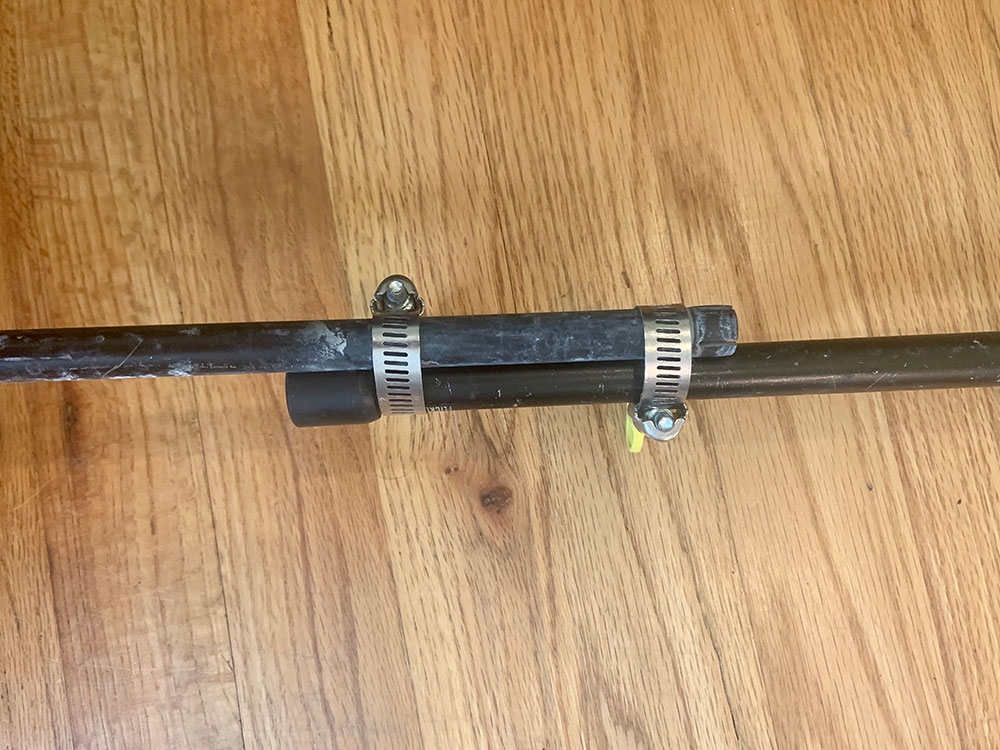
Pole Repair
If you take a tumble and snap a ski pole, it’s nice to be able to repair the pole to at least make it usable to get out. With two small hose clamps you can simply clamp the broken pieces together with a little overlap.
Tape
Duct Tape is classic, but leaves behind a nasty residue once removed and doesn’t adhere to all fabric types. I recommend Tenacious Tape from Gear Aid. I’ve had clothing patches survive multiple years going through the wash. Strong stuff from an awesome local company.
Paracord
Multi-Use similar to ski-straps, but smaller, lighter, and can be cut to any length.
Pro Tip: cauterize the cut end with a lighter to keep it from unraveling!
Lighter
For cauterizing that paracord you just cut, lighting your stove, or creating that fire in a survival scenario.
Binding Buddy
Lots of manufacturers sell cheap but effective multi-tools that get most jobs done if you’re not wanting to drop for a nicer multi-tool just yet.
Glop Stopper Wax
Definitely a nice item to carry in the springtime anywhere, but year-round if you ride in a warmer/wetter climate like the Pacific Northwest. Glop Stopper Wax keeps snow from adhering to the bottoms of your climbing skins. If you’ve ever been out after a fresh dump of snow and then had that snow become sticky risers under your feet, you know the humongous pain that is. It can immobilize you.
Pro Tip: apply it before you actually need it. Once your skins get wet and already have snow sticking to them, it’s tough to retroactively put on the wax. Pay attention to changing conditions and apply glop stopper proactively.
Large Hose Clamp
If you rip out a toe piece on a binding, a large enough hose clamp can fit over the ski and boot to clamp the boot to the ski like a big, dumb snowshoe. This only works, however, if the ski boot has a buckle near the toe to keep the clamp from sliding off the boot as you walk.
Baling Wire
Lightweight multi-use material just like paracord except you don’t need a lighter. You do, however, need wire cutters in your multi-tool if you’re going to bring it.
Storage Bag for Kit
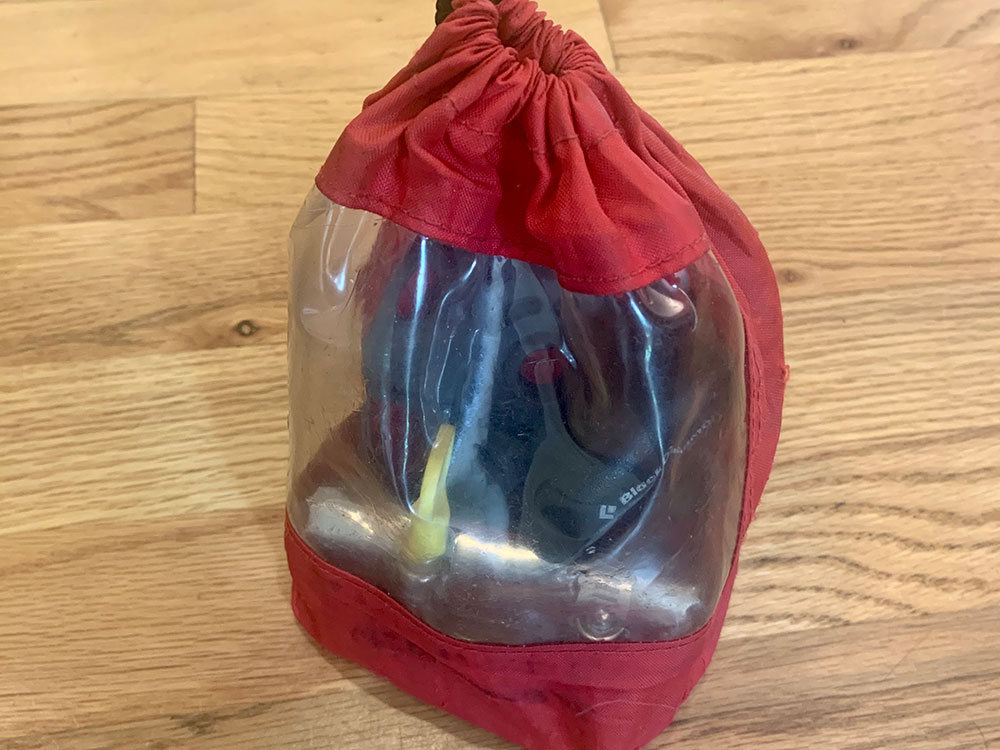
Have a nice compact bag that’s just large enough to accommodate your repair kit items. Preferably this bag is waterproof to keep your metal bits from rusting. Ensuring that you pull out and dry out any items that get wet will protect from rust as well.
Pro Tip: Use a Dynafit Ski Crampon Bag for your repair kit. The clear plastic side is great for visually spotting where the item you need resides. Plus, it’s durable.
Multi-Day Specific
Spare Headlamp
Having a headlamp die can shut down your aspirations for that awesome line you hiked so far into the backcountry to ride. It’s also one of those emergency items that you should always have on you in case your day is way longer than you expected.
Stove Parts
If you’re going out for a multi-day trip, you’ll likely have a stove. Don’t forget to carry spare “o” rings and other items that are stove specific so you can repair whatever issue your stove has in the field. Often melting snow is how you’ll get water in the winter and not having a working stove can be a big safety concern.
Sewing Kit
For three day+ trips (like a traverse) consider bringing a sewing kit to be able to more permanently repair gear rather than the slap and play of tape.
Zipper Repair Kit
Blowing a zipper on a key piece of clothing or, if you’re using a tent, your shelter door is a huge bummer. Rather than poking holes in your items with safety pins to keep them shut, consider bringing a zipper repair kit to fix the issue.
Ripped Toe Piece Repair
On longer multi-day trips a long way from home, it’s nice to know that you can secure back on your toe piece if it completely rips out. Ski straps, baling wire, paracord, and your big hose clamps will do in the short term but require constant management and adjustment. This is a way to reattach your toe piece permanently in order to get out of the field. Take Note: This will destroy your ski, but it’s probably destroyed anyway.
You’ll need:
Socket wrench with Phillips bit and 1/8″ drill bit.
3-4 bolts 1/4″ or smaller that fit through the screw attachment points on your binding toe piece.
3-4 lock nuts and washers that match the size of your bolts.
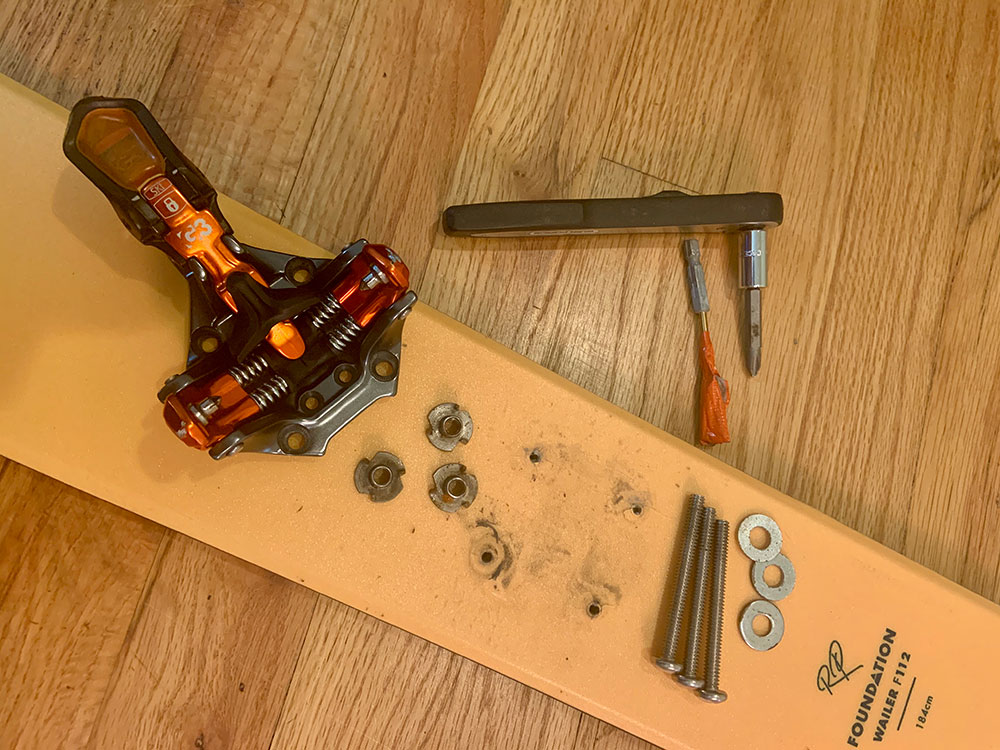
Using the socket wrench and drill bit, drill completely through the ski using the holes where your binding toe piece ripped out. Widen the holes if necessary in order to accommodate your bolts.
Pound the lock nuts into the bottom of your ski.
With a washer on the bolts, screw them through the toe piece and into the lock nuts on the other side of the ski. You’ll likely only need three bolts even if you have four screws in your binding. They won’t be coming out.
Cut off or repeatedly bend the excess bolts with pliers in order to break them off flush with the bottom of your ski. You’re back in business.
Final Thoughts
What you carry in your repair kit should be specific for you and your squad, but should contain at the very least the essentials above. Remember that not everyone in your team needs a full repair kit if you coordinate well, but make it a part of the group gear you always bring.
Like what you learned here? Check out our Ultimate Guide to Backcountry Skiing to get more quality educational content.
Avalanche Problems
The Nine Avalanche Problems Explained
Not all avalanches are the same. This post teaches you about the nine different Avalanche Problems you could encounter any given day while out in the backcountry. To get the most out of this post, you should first have a basic understanding of the North American Avalanche Danger Scale.
Avalanche Problems are defined by four major elements, the Avalanche Character, Location the avalanche can be found in terrain, the Likelihood of triggering, and the Size (how big it will be).
Avalanche Character
In order to communicate the distinct personalities of avalanches, experts identified nine distinct problem types:
Loose Dry | Loose Wet | Wind Slab | Storm Slab | Persistent Slab | Deep Persistent Slab | Wet Slab | Glide | Cornice Fall
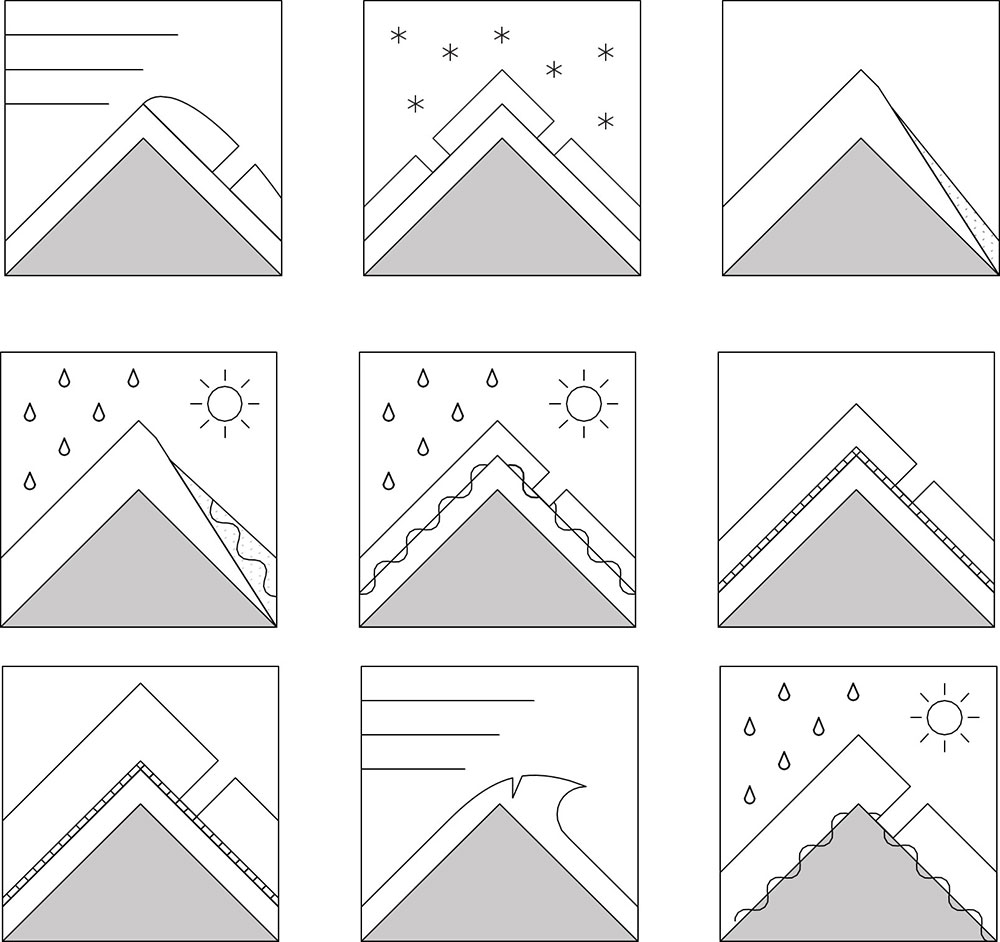
Dry Loose Avalanches
Dry Loose avalanches are the release of dry unconsolidated snow and typically occur within layers of soft snow near the surface of the snowpack. These avalanches start at a point and entrain snow as they move downhill, forming a fan-shaped avalanche. Other names for loose dry avalanches include point-release avalanches or sluffs.
Back to TopWet Loose Avalanches
Wet Loose avalanches are the release of wet unconsolidated snow or slush. These avalanches typically occur within layers of wet snow near the surface of the snowpack, but they may gouge into lower snowpack layers. Like Loose Dry Avalanches, they start at a point and entrain snow as they move downhill, forming a fan-shaped avalanche. Other names for loose-wet avalanches include point-release avalanches or sluffs. Loose Wet avalanches can trigger slab avalanches that break into deeper snow layers.
Wind Slab Avalanche
Wind Slab avalanches are the release of a cohesive layer of snow (a slab) formed by the wind. The wind typically transports snow from the upwind sides of terrain features and deposits snow on the downwind side. Often, wind slabs are smooth and rounded and sometimes sound hollow. They can range from soft to hard. Wind slabs that form over a persistent weak layer (surface hoar, depth hoar, or near-surface facets) may be termed Persistent Slabs or may develop into Persistent Slabs.
Back to TopStorm Slab Avalanche
Storm Slab avalanches are the release of a cohesive slab of new snow that breaks within new snow or on the old snow surface. They typically last between a few hours and a few days (following snowfall). Storm-slabs that form over a persistent weak layer (surface hoar, depth hoar, or near-surface facets) may be termed Persistent Slabs or may develop into Persistent Slabs.
Back to TopPersistent Slab Avalanche
Persistent Slab avalanches are the release of a slab in the middle to upper snowpack when the bond to an underlying persistent weak layer breaks. Common persistent layers include surface hoar, depth hoar, near-surface facets, or faceted snow. These layers can continue to produce avalanches for days, weeks or even months, making them especially dangerous and tricky. As additional snow and wind events build a thicker slab on top of the persistent weak layer, this avalanche problem may develop into a Deep Persistent Slab.
Back to TopDeep Persistent Slab Avalanche
Deep Persistent Slab avalanches are the release of a thick hard slab when the bond breaks between the slab and an underlying persistent weak layer deep in the snowpack. The most common persistent weak layers involved in deep, persistent slabs are depth hoar or facets surrounding a deeply buried crust. Deep Persistent Slabs are typically hard to trigger and are very destructive due to the large mass of snow involved. They can persist for months once developed and are often triggered from areas where the snow is shallow and weak. Deep Persistent Slabs are particularly difficult to forecast for and manage.
Take Note: The main difference between a persistent slab and deep persistent slab is depth. Deep Slabs break on a layer over a meter down in the snowpack. Because of the difficulty in triggering and larger consequence of a deep slab, they are broken out as separate problems.
Back to TopWet Slab Avalanche
Wet Slab avalanches are the release of a slab that is generally moist or wet. They occur when the flow of liquid water weakens the bond between the slab and the surface below. They often occur during prolonged warming events and/or rain-on-snow events. Wet Slabs can be very unpredictable and destructive.
Back to TopGlide Avalanche
Glide Avalanches are the release of the entire snow cover as a result of gliding over the ground. They can be composed of wet, moist, or almost entirely dry snow. Typically, they occur in very specific paths, where the slope is steep enough and the ground surface is relatively smooth. They are often preceded by glide cracks (“the brown frown”). The time between the appearance of a glide crack and an avalanche can vary between seconds and months. Glide avalanches are unlikely to be triggered by a person, so they are nearly impossible to forecast. Consequently, they pose a hazard that is extremely difficult to manage.
Back to TopCornice Fall Avalanche
Cornice Fall is the release of an overhanging mass of snow. Cornices form as the wind moves snow over a sharp terrain feature (like a ridge) and deposits snow on the downwind (leeward) side. They range in size from small wind drifts of soft snow to large overhangs of hard snow that are 30 feet (10 meters) or taller, and can break off the terrain suddenly. Often, they pull back onto the ridge top and catch people by surprise even on the flat ground above the slope. Even small cornices can have enough mass to be destructive and deadly. Cornice Fall can entrain loose surface snow or trigger slab avalanches.
 Back to Top
Location
Where avalanches can be found is broken out into three elevation bands: Below Tree Line, Near Treeline, or Above Treeline. From there, it can get more specific as Aspects (N-S-E-W) can also be conveyed.
Below Treeline (BTL) is the elevation band of a mountain or range that is covered by forest. From its upper to lower limits, it often covers the greatest area and the greatest variation in snowpack conditions of any elevation band. These areas usually see less sun, wind, cold, and precipitation than higher elevation bands.
Near Treeline (NTL) elevation is characterized by sparse forest cover and is the transition between uniform forest cover below it and the alpine above it. These areas are distinct for sharing features of both alpine and below treeline elevations. Exposure to sun, wind, cold, and precipitation is generally less here than in the alpine but greater than below treeline.
Above Treeline (ATL) consists of wide expanses of open, exposed terrain with few or no trees. Where it exists, it is the highest elevation band of a mountain or range. Not all mountains have above treeline terrain, but it may be the dominant terrain in other mountains or ranges. This elevation is usually the most exposed to sun, wind, cold, and precipitation.
The lower extent of the alpine elevation band is highly variable. It transitions to the NTL elevation band where vegetation, especially trees, overcomes the more open and rocky terrain of the alpine.
Back to TopLikelihood
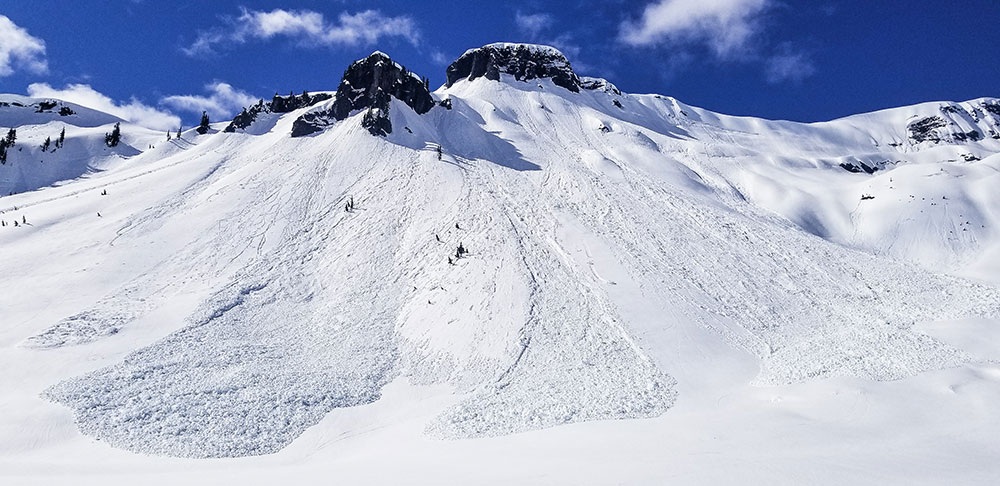
Likelihood is a description of the chance of encountering a particular Avalanche Problem. It combines the spatial distribution of the Problem and the sensitivity or ease of triggering an avalanche. The spatial distribution indicates how likely you are to encounter the Problem in the highlighted avalanche terrain. The sensitivity indicates how easy it is to trigger avalanches including both natural and human triggered avalanches.
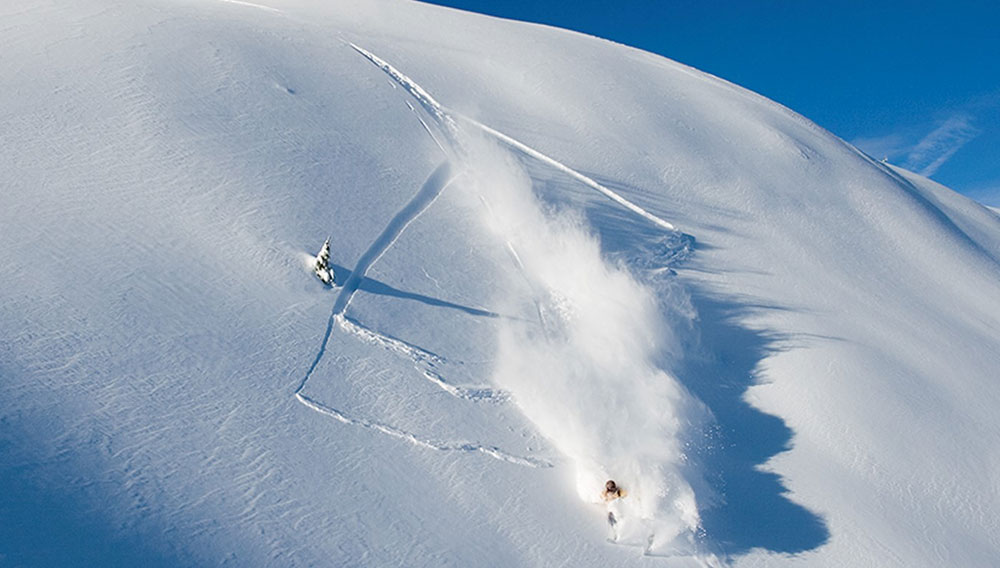
Likelihood is broken down into five categories with Unlikely at the bottom and Almost Certain at the top. In between is Possible, Likely, and Very Likely. Photo below by Grant Gunderson.
 Back to Top
Size
Size is based on the destructive potential of avalanches.
SMALL avalanches are relatively harmless to people unless they push you into a terrain trap.
LARGE avalanches could bury, injure or kill a person.
VERY LARGE avalanches could bury cars, destroy a house, or break trees.
HISTORIC avalanches are even more destructive, and nearing the maximum size the slope could produce.
Back to TopTo Summarize…
The video below does a good job of putting everything together into the bigger picture. Understanding the nuance of where these different avalanche problems live in terrain on any given day takes lots of practice. Take an Avalanche Course to learn more about avalanches and how to avoid them.
Want to learn more? Check out our Ultimate Guide to Backcountry Skiing.
Back to TopAvalanche Beacon
Function Check
How To Do An Avalanche Beacon Function Check
When going out backcountry skiing or riding, one should always do an avalanche beacon function check to ensure everyone is searchable and able to search. Below is a great video created by three IFMGA Guides on how to do a simple and concise avalanche beacon function check.
3 Part Check
1. Battery and Display
Margaret has Mark and Jeff turn on their avalanche beacons, check their displays for any cracks or malfunctions, and then verbally read out their battery percentage.
2. Search Function
Margaret has Mark and Jeff switch their beacons to Search mode (while she stays in Send) and take a step or two back. Then she has them read out their numbers on the digital display to ensure that their numbers go down as she moves her beacon closer.
3. Send Function (Transmit)
Jeff and Mark switch back to Send and stow their beacons appropriately (in the provided harness and below a layer or in a pocket) and at least 30cm (1 foot) away from any other electronic devices like a cell phone. Then she switches to Search and confirms that she can get their individual signals. Margaret then goes back to Send mode and stows her beacon appropriately. “End in Send.”
DBEST Function Check
If you’re an acronym person you can use DBEST in order to remember all the parts of a beacon function check.
Display – is not cracked and working appropriately.
Battery – is at least over 50% or per manufacturers recommendation.
Electronics – are at least 30cm away in Send mode and 50cm away in Search
Search – Everyone is able to find a signal transmitting at the international standard of 457kHz.
Transmit – Everyone is producing a signal at 457kHz.
Do It Every Time
There you have it. Just make sure you do this before you leave the parking lot or TH so you can troubleshoot any issues before you’re in the backcountry. Curious about how to actually use your beacon to perform an avalanche rescue? Check out our blog on Single Burial Avalanche Rescue. Taking an Avalanche Rescue or AIARE Level 1 Course are great ways to get hands-on knowledge and mentorship from professionals.
Want to learn more online? Check out our Ultimate Guide to Backcountry Skiing.
Single Burial Avalanche Rescue
Single Burial Avalanche Rescue
Obviously, the best way to avoid a rescue is to avoid the avalanche all together. Take an Avalanche Course to be proactive and learn how to avoid avalanches. That said, even the most trained professionals can still make mistakes, so everyone traveling in the backcountry should understand how to execute a rescue. At the least, you could help save someone else’s life. Below are the steps to follow if ever you need to perform an avalanche rescue of a single victim.
Avalanche Rescue Checklist
Step 1. (You’re number one). STOP! ASSESS SAFETY! ENSURE NO FURTHER HAZARD
-Risk of second avalanche?
-Hangfire?
-Move to defined safe location
Step 2. CHOOSE A LEADER
-Delegate Tasks
Step 3. HEAD COUNT
-How many missing?
Step 4. CALL FOR HELP
-Others nearby who can help?
-(911) Location, nature of emergency, name, # in group, # missing
Step 5. SWITCH ALL TRANCEIVERS TO SEARCH MODE
-Check that no tranceivers are transmitting
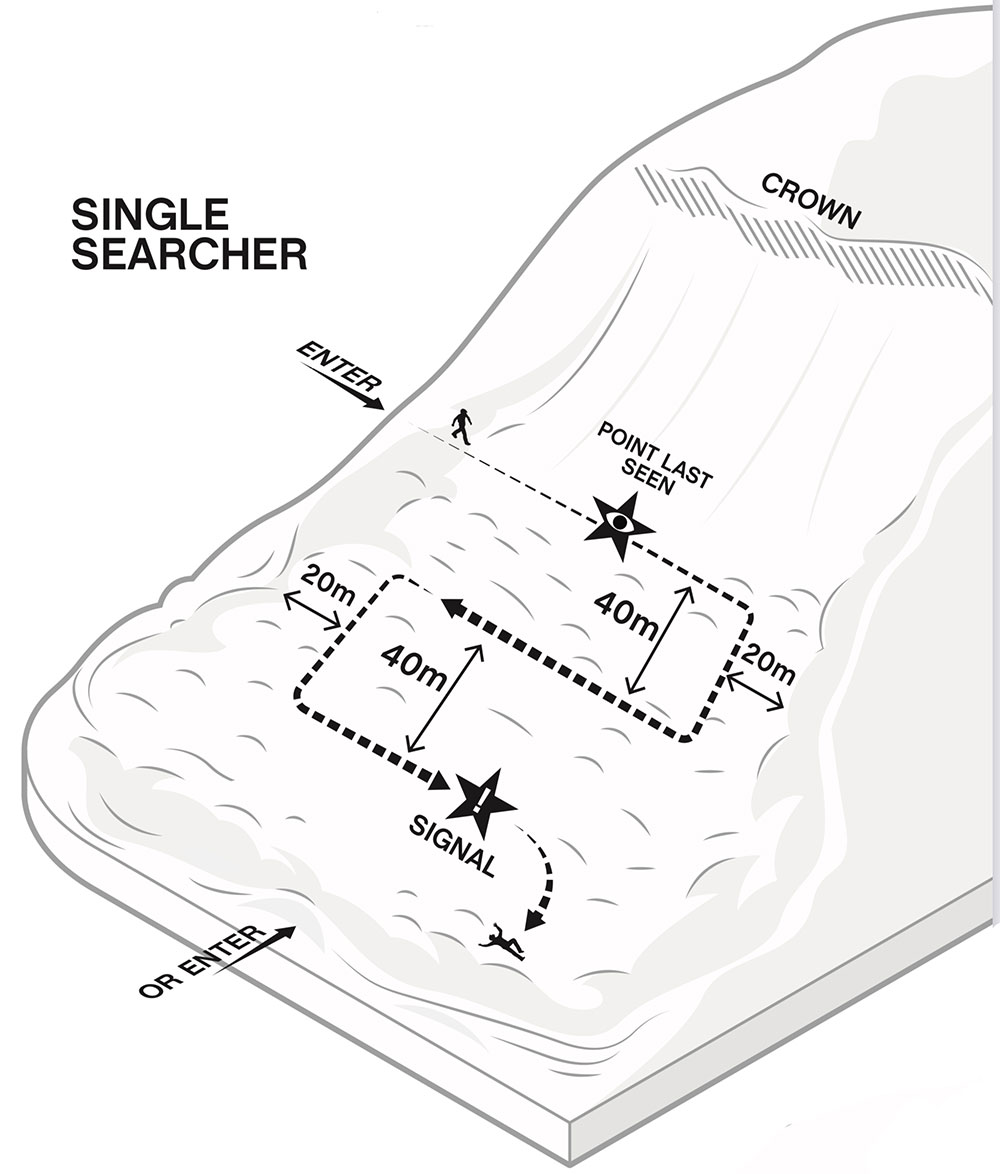
Step 6. DETERMINE WHERE TO SEARCH
-Below point last seen
-In line with visual clues
-Areas of debris, especially terrain traps
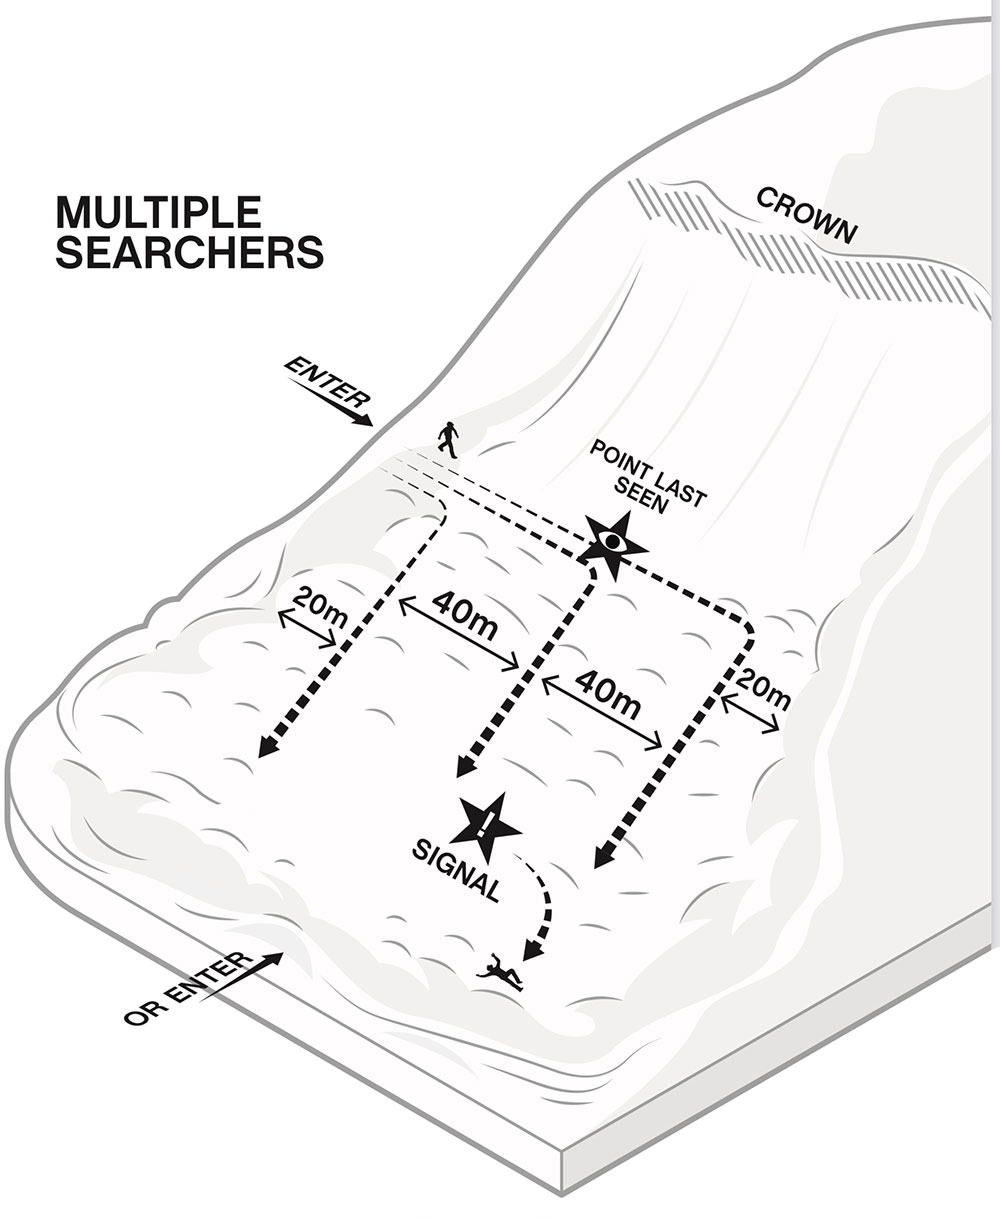
Step 7. SEARCH FOR VISUAL CLUES
-Enter debris from side or toe of path
-Search strips 40m apart (About 40 strides)
Step 8. YELL TO OTHERS WHEN YOU FIND A CLUE OR RECEIVE A SIGNAL
-Pull clue out of snow and lwave on snow surface
-Put marker in the snow where you begin to follow signal
-Call to other searchers not following signal to assemble probe and shovel
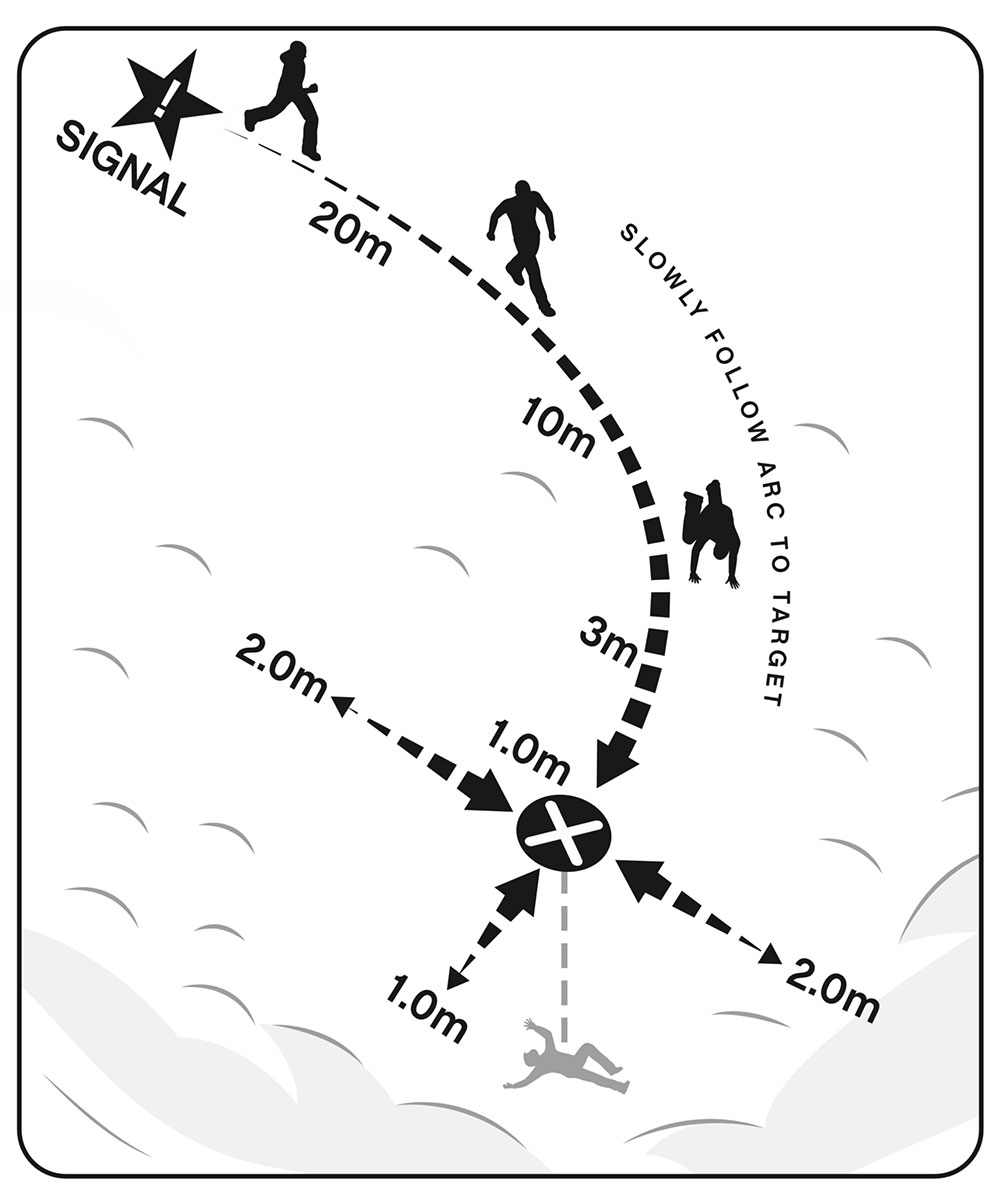
Step 9. FOLLOW SIGNAL TO BURIAL AREA
-Slow and precise as you approach 10m
-Keep tranceivers near the snow surface during final approach (Crawling at 3m)
-Around 5m, place a marker on the snow that points along the approach trajectory
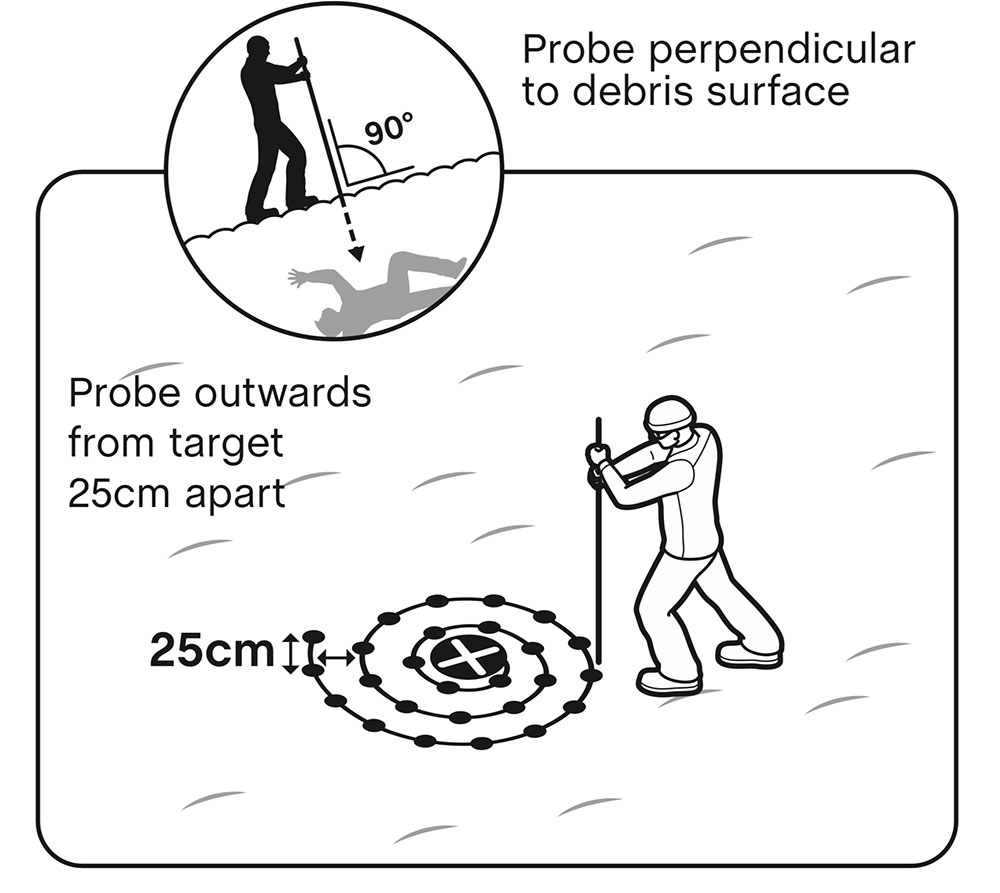
Step 10. LOCATE BURIAL WITH TRANCEIVER AND PROBE
-If possible, 2nd searcher PROBES LIKELY BURIAL AREA in front of tranciever searcher’s trajectory until closest signal located
-Locate the closest transceiver signal by bracketing ahead/behind and to the sides, maintaining consistent transceiver orientation
-Pinpoint using the probe, from the center of the closest signal outwards in a circular pattern
-Probe strike = victim location. LEAVE PROBE IN PLACE!
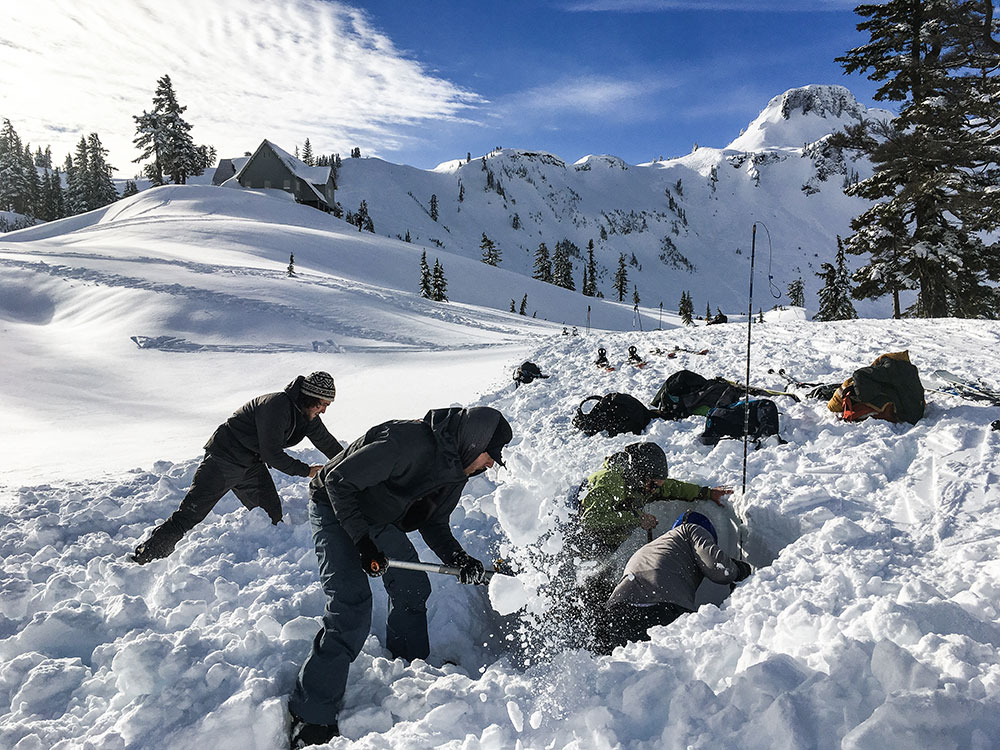
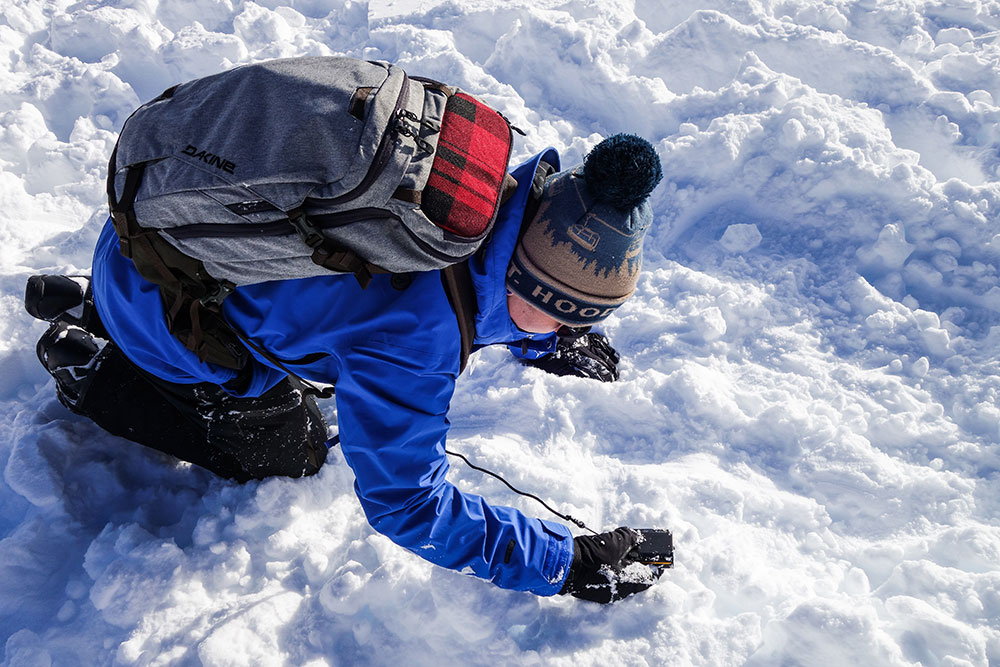
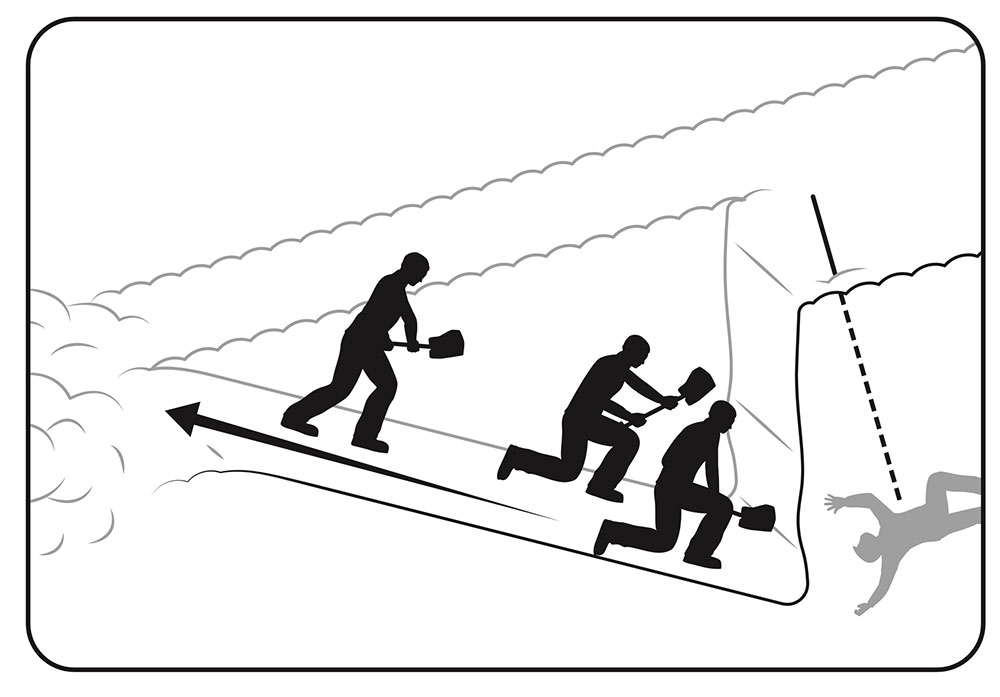
Step 11. SHOVEL FAST AND EFFECTIVELY
-Start with a large step downhill and away from the probe, 2 or more steps if deep burial
-Dig towards the probe; throw snow far away
-CHANGE SHOVELERS OFTEN (if other available)
-Careful shoveling as you reach your buried companion
-Expose face immediately in order to get airway
Learn more about Strategic Shoveling Techniques.
Step 12. PATIENT CARE
-Clear airway
-Provide First Aid or CPR as required
-Move to safe terrain
-Plan evacuation and follow up on call for help
Consider taking a Wilderness First Aid or Wilderness First Responder Course.
IF HELICOPTER COMES TO YOUR AID
-Secure loose items so they do not blow away
-When heli lands, wait for rescuer to come to you
Summary
It takes a lot of practice to get good at rescue and, even once mastered, is a perishable skill. Stay fresh on the most up to date practices and advances in the industry by taking an Avalanche Rescue Course at least every other year. Below is a great video put out by BCA that summarizes beacon searching well. Skip to 2:34 to get the most useful info.
Want to learn more? Check out our Ultimate Guide to Backcountry Skiing.
Ski Crampons for
Backcountry Skiing
Ski Crampons for Backcountry Skiing and Riding
With warm temps and long days becoming status quo in the North Cascades, I’m transitioning my ski kit over to spring mode. Once the melt freeze cycle takes hold, one thing I’ve always got on me is a set of ski crampons for backcountry skiing or riding.
These nifty, little tools can transform an icy skin track or frozen slope from a slippery nightmare into a pleasant stroll. Ski crampons add security to your skis or splitboard while skinning by penetrating the top few centimeters of the snow under the toe of your boot to help prevent slipping backwards or having your edges skate out while side hilling. Here are 5 tips for getting the most out of your ski crampons:
1. Get The Right Pair
Ski crampons are specific in type to your binding, and in size to your ski or board. First, check with your binding manufacturer about what crampons to get. Many companies have their own system for their bindings. Size wise, they should be the smallest size possible while still being bigger than your ski waist. They usually are sold in 10mm increments, so, for example, if your skis are 96mm underfoot you should get a pair of 100mm crampons.
For splitboarders, Spark R&D and Karakoram make splitboard specific crampons. These work the same as ski specific crampons, but are wider to accommodate board width/asymmetry.
2. Have Them Handy
If I think that I might use my crampons, I keep them somewhere I can reach without taking off my pack. I recommend either clipped to a carabiner on your waist belt or clipped to your pack in a reachable spot. Then, if you need to put them on somewhere awkward, you don’t have to worry about your pack sliding away on the icy snow surface. Putting these bad boys on usually takes two hands, unless you have G3’s bindings and Ion Ski Crampons… then you don’t even need to take off your skis.
3. Put Them On (Right) Before You Need Them
Anytime I’m skinning on ice snow I put on my crampons before the slope gets steep. This prevents having to take my skis off anywhere exposed. That said, don’t have them on all the time because they inhibit your ability to glide on lower angle terrain.
4. Leash Your Skis
There are many reasons to put leashes on your skis in the spring. Ski brakes don’t do so well on icy snow, many lightweight ski mountaineering bindings don’t even have brakes, and losing a ski is a bummer at best and could be dangerous for yourself or others below. Since you need to take your skis off to put most crampons on, leash ‘em up!
5. Get The Best Grip
There are two important tricks to get the most purchase out of your ski crampons. The first is to not use any heel risers. This allows your boot to push the crampons as far into the snow surface as possible. It also encourages taking an efficient low angle route. The second trick is to try to keep your skis flat on the snow surface, with your downhill edges dropped toward the snow. This allows both sides of the crampons to dig in, not just the uphill points. This may feel awkward at first but you’ll get used to the motions and will love the added security.
Spring is a great time to do big days and cover some serious ground on firm morning snow on your way to harvest sweet corn. Ski crampons will add efficiency to your ascent and help you save all possible energy for ripping back down to the car. Practice putting them on at home first so your system is dialed before you get out, and enjoy the satisfying crunch of your ski crampons punching through the snow on the way to the top!
Want to learn more? Check out our Ultimate Guide to Backcountry Skiing.
Never Miss A Post
Get blog updates sent to your inbox.